How To Harden Your Docker Containers
Properly securing your containers can be time consuming. This technical walkthrough will guide you through the steps involved in hardening your containers.


Properly securing your Docker containers can be a cumbersome and time consuming task. The goal of this technical walkthrough is to comfortably guide you through the steps involved in hardening your docker containers and securing your containerized infrastructure.
Let's start with the basics, a checklist and common sense best practices, we can then move on to the key point of sandboxing a container: drop capabilities and create ad hoc security profiles. A good example of this is my own project which I have made available in my Github repository, check it out for a much deeper technical insight.
Preliminary steps
1) Update Docker: Clearly this is the first thing to do, even more so when a clever container escape has been recently disclosed (CVE-2019-5736).
2) Deploy Only Trusted Docker Images: enable the Content Trust feature for guarantee the authencity and integrity of the pulled images from Docker Hub. You can also arrange an offline registry available in your environment by setting up Notary.
3) Start With A Clean OS build : A clean OS image from a trusted source is a great starting point. Consider also removing unnecessary services and validating the hardening status with scripts or/and requiring an actual penetration test.
4) Scan The Image For Known Vulnerabilities: There are are number of vulnerability scanners for Docker containers, a few of them are still open source and others are hosted on cloud platforms, available with a subscription plan. Just be aware that the CVE list output from tool to tool may vary due to different analysis capability or CVE definitions available in the database.
5) Other Common Sense Tips: Do not hardcode secrets in the Dockerfile, images or environment variables, use a read-only container (if possible) and store containers in a separate partition.
Hopefully you now have a safe image ready to push on into production. But wait!
The best bit is only just about to start!

Journey into sandboxing
We are now going through these steps in order to achieve 'a good hardening'.
1) Standard security and compliance checklist matters
2) Downgrade to non privileged user
3) Mitigate Denial of Service by limiting resource usage
4) All hail user namespaces
5) Ad hoc Seccomp profile generation
6) Ad hoc Apparmor Profile generation
Security standard and compliance checklist matters
We have updated docker, we have a clean image to use as blueprint for our containers but we still need to verify that the host environment and docker daemon configurations are at their best, that the image adheres to a set of best practices and that ad hoc security options have been applied during the launch of the container.
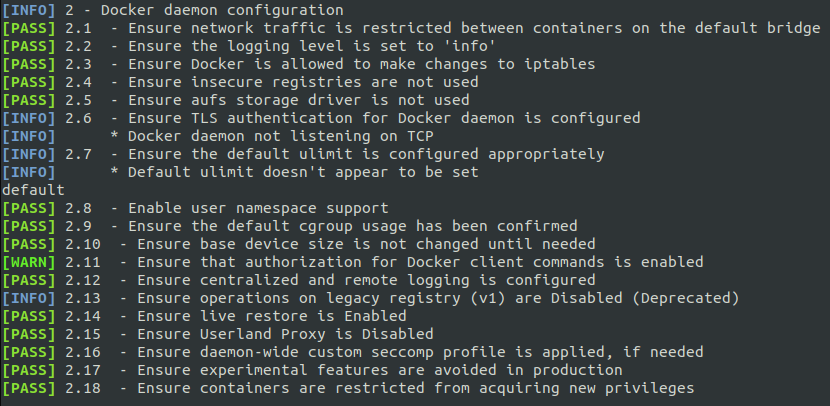
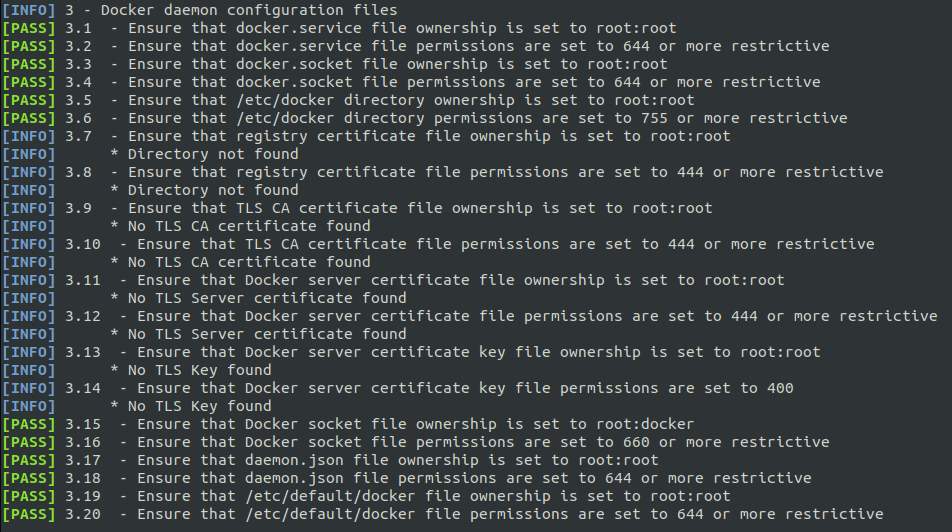
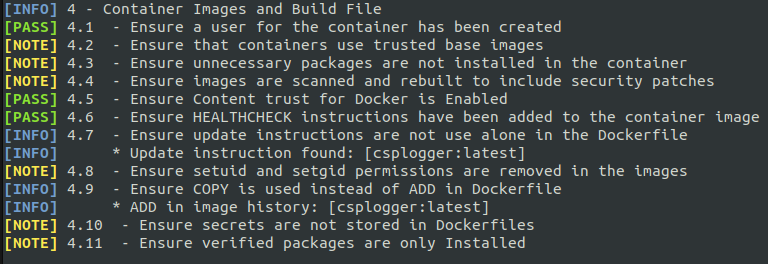
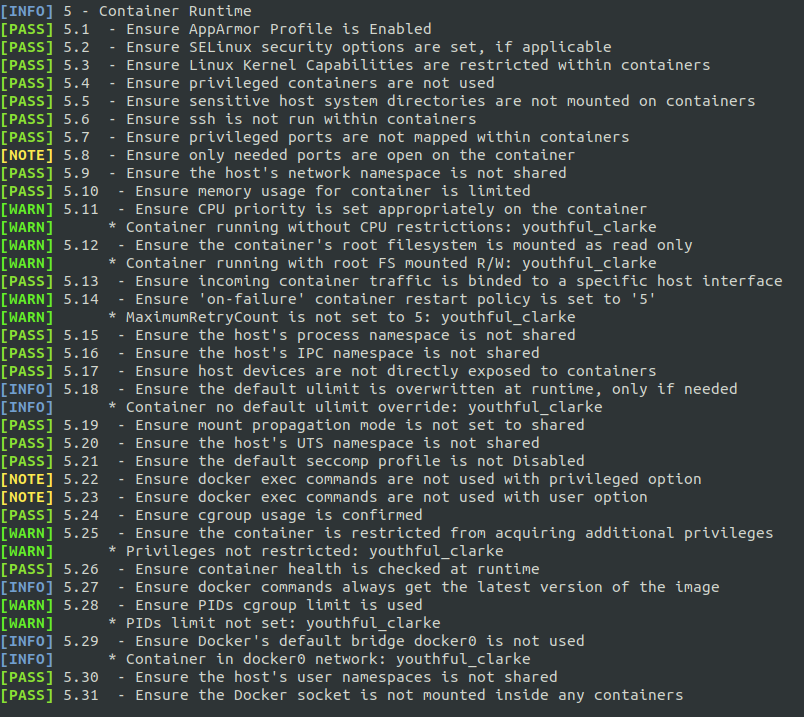
Fortunately, the Center for Internet Security comes to the rescue with this open project. The following images are just taken from the intuitive output for the 5 different section tested by the script.

Downgrade To Non Privileged User
We can get rid of root privileges in containers in the Dockerfile just like this:
RUN adduser -D limited_user
USER limited_user
or providing the following option at runtime:
docker run -u limited_user ubuntu
This way we have added an additional layer of security, requiring a potential attacker to perform a privilege escalation (on a clean install, fully patched and properly hardened, right?).
All Hail User Namespaces
By default a root user inside a container has also the privileges of root outside.
To verify this in the following screenshot we expose the /etc/ directory of the host to the container and see that the root inside the container can effectively read the file /etc/shadow of the host.
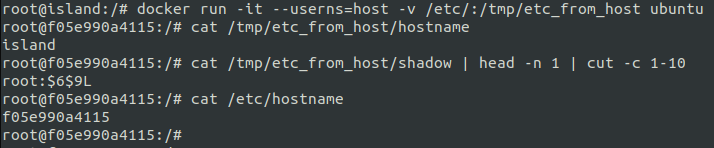
Fortunately, indeed the root user of a container is isolated by default with the use of kernel namespaces but this isolation (pitifully) does not apply for the user namespace.

After adding the user namespace isolation, we can verify that the root inside the container has been confined.

Mitigate Denial of Service By Limiting Resource Usage
With cgroups we can easily limit the system resources (CPU, RAM, storage) available for a specific container.
Example:
docker run -it --cpus 1 --memory 512Mb ubuntu
Seccomp & Apparmor - The Runtime Guardians
While the above steps applies to most of the containers and situations, the generation of a Seccomp and Apparmor profiles are very dependent on the specific container. Enforcing these kernel features for a target container is based on trial & error, mixed with multiple time consuming attempts.
It was disappointing to realize the lack of a decent documentation on how to easily configure both profiles for Docker containers, but as usual, open source projects are out there, waiting for help out.
Seccomp Profile Generation
Similar to the principle of least privilege, we can restrict the system calls that are available in the container. Whilst the default seccomp profile already prevent the use of 50 syscalls out of more than 300 existing, with a carefully generated and tested custom profile we can surely minimize the attack surface.
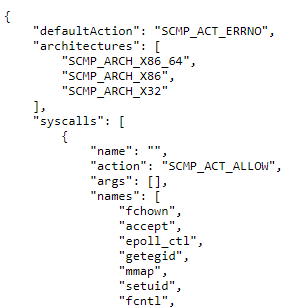
To generate a seccomp profile the general advice is to use strace to keep track of the system calls executed runtime by the container. However, strace happens to 'miss' some syscalls and thus requiring a lot of troubleshooting. The easiest solution I have found is to use the tool available at https://github.com/antitree/syscall2seccomp and follow the "Example with Sysdig" steps. Let your container run and try to cover the flows (in my case it was easy since the CSPlogger does very few things). Stop it, let the tool generate the seccomp profile and finally run your container with the option:
--security-option seccomp="your_profile"
In the seccomp profile created for CSPlogger, I managed to whitelist only 80/300 system calls without impacting the capability of the application shipped within the container.
Please note the risk that if an unexpected system call is executed in the container, the whole container will be immediately terminated.
Apparmor Profile Generation
An even more better hardening is achieved by enforcing a good Apparmor profile. You can use Apparmor (a Mandatory Access Control feature) to further limit the attack surface by whitelisting only the commands strictly necessary and disabling writing and reading to directory not normally use by the applications deployed in the container.
To ease the process of generating the profile, a good start point is the sample profile available here https://github.com/genuinetools/bane and to use the tool bane to convert from that .toml format to the more obscure one used in Apparmor:
~/go/bin/bane [file].toml
The test profile I have generated is located at https://github.com/giuliocomi/csplogger/blob/master/docker-csplogger-apparmor.
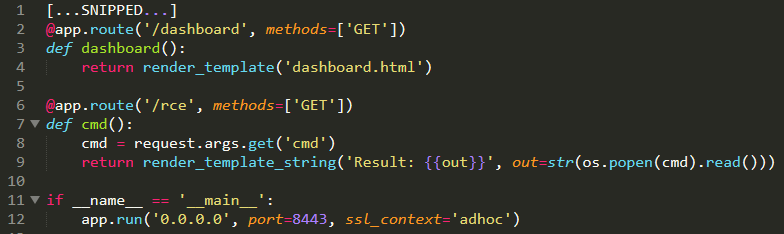
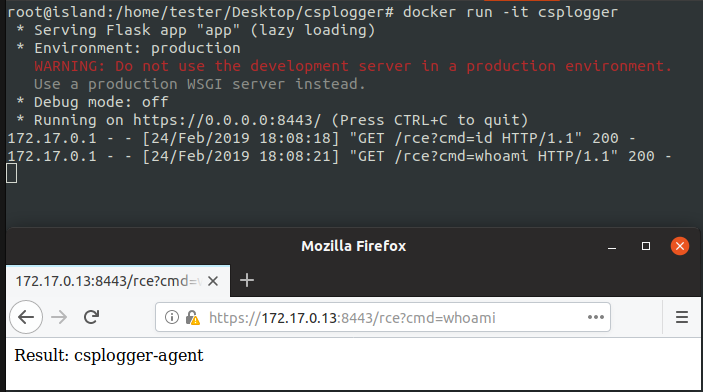
And now let's do a quick test introducing a remote code execution in the CSPlogger app and trying to execute commands in the container:

What's Next?
If you deploy your container within a orchestration platform there are additional steps like verifying the security compliance of the platform itself, create ad hoc network security policies and deploying a centralized log management system.
That's a whole world of new security challenges to face.

References
https://blog.dragonsector.pl/2019/02/cve-2019-5736-escape-from-docker-and.html
https://github.com/giuliocomi/csplogger
https://docs.docker.com/engine/security/non-events/
https://github.com/genuinetools/bane
https://github.com/antitree/syscall2seccomp
