HackTheBox "Find the Secret Flag" Reversing Challenge
Welcome to my technical write up of the new HackTheBox reversing tutorial 'Fund The Secret Flag'.

Welcome a technical writeup of a new reversing tutorial, one of the most challenging ones, on the HackTheBox portal.
This time we have to "Find the Secret Flag", before you go to start remember to add privileges to execution to the bin file:
chmod +x secret_flag.bin
First of all, launch your IDA disassembler and open the bin file. You should start to see the disassembled code.

On the bottom of the first block of code the call to the main function of the program is visible. Following it you should arrive at the real main block that will be our starting point.
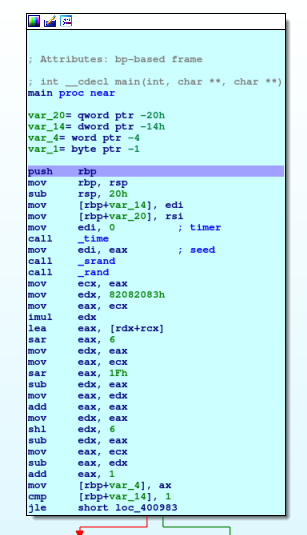
Put a break on the beginning of the method (point the cursor on the instruction and press F2) and start the debugger (you can do that using the relative voice on the "Debug" menù or pressing F9 key). Execute until you find the first ramification.
In this first block are managed the arguments passed to the executable; I only understood the flow of the program with a deeper analysis after I found the flag. I can use also this parameter to find the final flag, but with some complex steps that in this tutorial I prefer to avoid. The first blocks on the left in the next image, check the value passed, but the code after is patched to not use it. Anyway, go ahead.
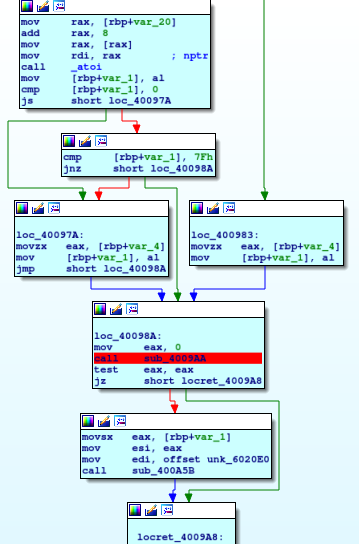
The block immediatly after (which one with the break inside), is our first stumbling block, run until that point and enter with F7 key (execute each instruction with F8 key or right-click with the mouse button and select "run to cursor", the code will be executed and stopped automatically when on the instruction you chose). Give a look at the code.
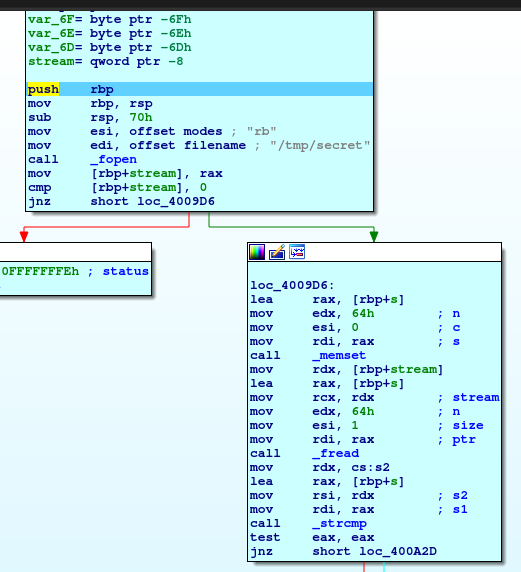
Immediatly we can see that there's an _fopen function (file open, probably is a c++ executable) that open a the file "/tmp/secret" in read and binary mode; but we haven't and the process exit. Well, I think you already know what you have to do, create a file on the temp directory named "secret", come back on the debugger and start again, following again the same steps you did before.
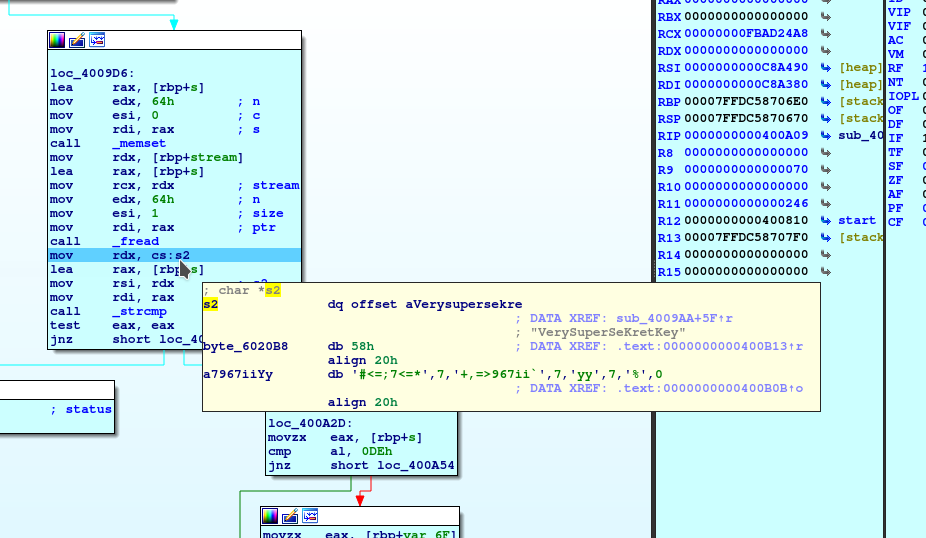
This time the flow move on the other branch. It seems to initialize variable, read from file and compare some string (first reference to a string that we meet).
I would like to give you homework, just to make confident with the IDA disassembler and debugger. Try to write something on the file you create on the tmp folder, then execute the code and break on the _fread instruction. You could see that the value on the EAX register is valued; this is the number of bytes read from the file. Try to write different string inside and verify that the number in the EAX identify the number of character you write inside the file.
After reading the bytes inside the file, continue checking the code.
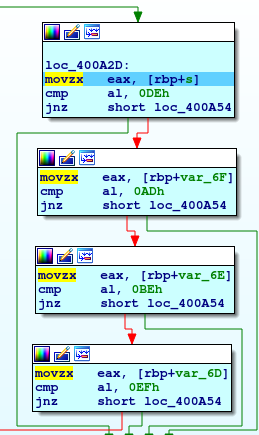
These are four blocks, that execute similar code and is quite simple to understand that takes a byte and compare with four different values. If you execute the code step by step, checking how to change the registry and identifying the values that are involved in this comparisons, you'll understand that the bytes are referring to the string you insert in the "secret" file. It's clear enough, then, that the file has to contains four chars and that chars have to be valued as in the following: 0DEh, 0ADh, oBEh and 0EFh.
To insert hex data in the file, I suggest to put some random char into and edit with hexeditor command from linux.

Come back again on the debugger, start a new session, follow the previous steps and finally you bypass the first check on the secret file. When return you should start on the main procedure.
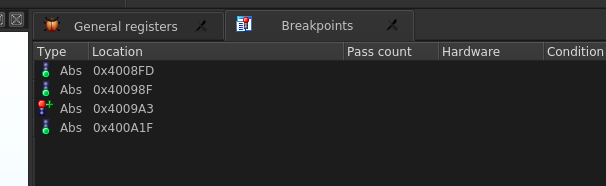
A small suggestion, if you don't want stop on the break you have just bypass, don't delete your breakpoints, let they available for every eventuality; you can disable it on the breakpoints panel where you can consult the complete list. And stay care, red it means the code "break", green the code "pass".
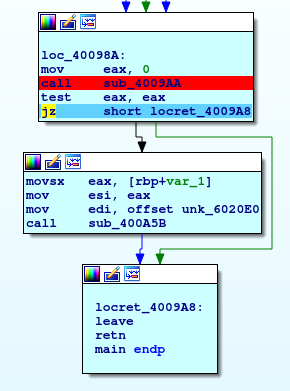
Well, there's another call before the main function ended, so try to reach that point and "step into" with the debugger. What appears is a cycle that inspects a string and checks for a char by code 71h for 11h times. The stranger thing is that in the string, the value 71h is not present.
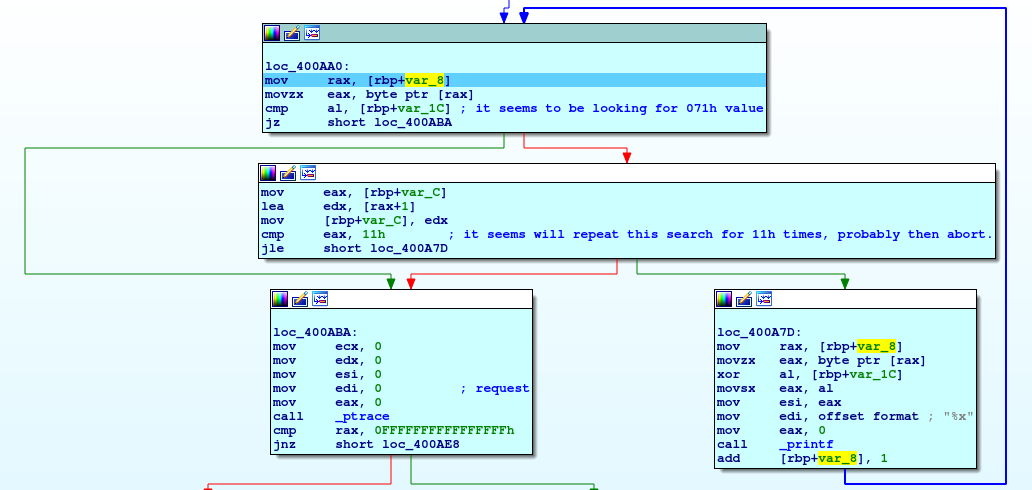
After some turn, I understand that is writing something on the screen, so I stop my debug and launch the program to see the output.
in7rud3r@kali:~/Desktop/challenge$ ./secret_flag.bin
7c4f5853795f5a4f58794f61584f5e614f53
Are you sure it's the right one? ..
in7rud3r@kali:~/Desktop/challenge$
Beautiful, but that message doesn't convince me. Anyway, I understand that the string is printed in hexadecimal format (the printf with the format "%x" is clear, if you want an output in string you have to print the character formatting it with the string "%c"). So I try to convert it to a string manually, but I'm almost sure it won't help much. The result string is: |OXSy_ZOXyOaXO^aOS

Really strange, I try to provide this as the solution on the HTB portal, but, as I supposed, does,t work. So, I try to launch again and the trap is highlighted, the flag change each time:
in7rud3r@kali:~/Desktop/challenge$ ./secret_flag.bin
7c4f5853795f5a4f58794f61584f5e614f53
Are you sure it's the right one? ..
in7rud3r@kali:~/Desktop/challenge$ ./secret_flag.bin
794a5d567c5a5f4a5d7c4a645d4a5b644a56
Are you sure it's the right one? ..
in7rud3r@kali:~/Desktop/challenge$ ./secret_flag.bin
1625323913353025321325b322534b2539
Are you sure it's the right one? ..
Well, it seems that there's nothing else, but, is not possible, so, I pass to the text view and start to search and with surprise, I found something interesting.
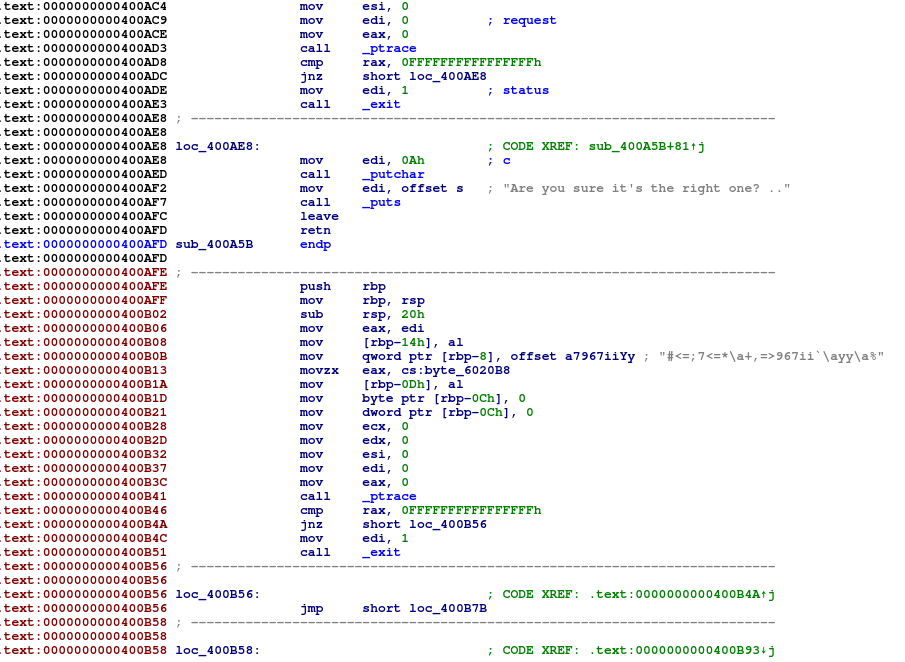
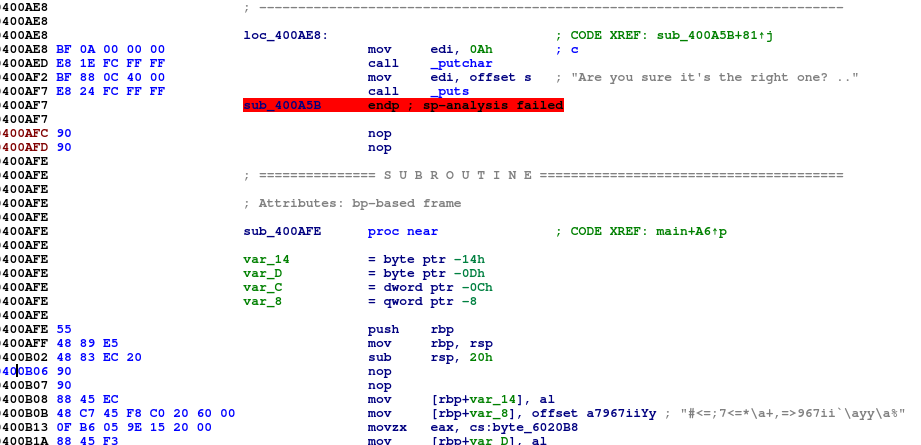
After the end of the procedure with the cycle, seems to be another piece of code, that couldn't reach by any section of the code. It seems to be a "hidden procedure" and I can see a strange string inside it on the beginning. Ok, we have to reach this block of code during debugging session.
We have different ways to achieve this task; we can reach the end of the previous function and before to return we can set the IP of the process on the beginning of the hidden procedure, good, but let me say, that probably you will execute this block of code many times to understand how it works so, I think is the right moment to understand how to patch an executable. To do that, and to avoid possible errors, activate the opcodes visualization on the disassembled view.
Open the options panel and write the number of bytes that you want to show for the opcodes column (usually eight is enough).
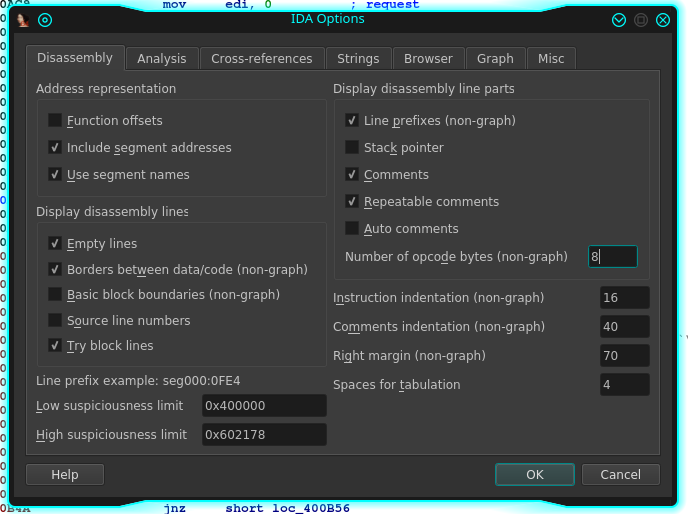
Your disassembled view should be similar to this now:
You are seeing the equivalent instruction in hexadecimal format.
Considering that the number of bytes to write an instruction, change based on the type of the instruction (and if it is a 16 or 32-bit operand size), an important rule that you have to follow when you change instructions on code is to maintain the same sizing of the instruction if possible, you can fill the additional bytes with the 90h operand (nop instruction, we'll see in the tutorial) if your new code is less than the original, but in the opposite case, you have to consider to sacrifice additional bytes from the instructions near the changed one (if possible).
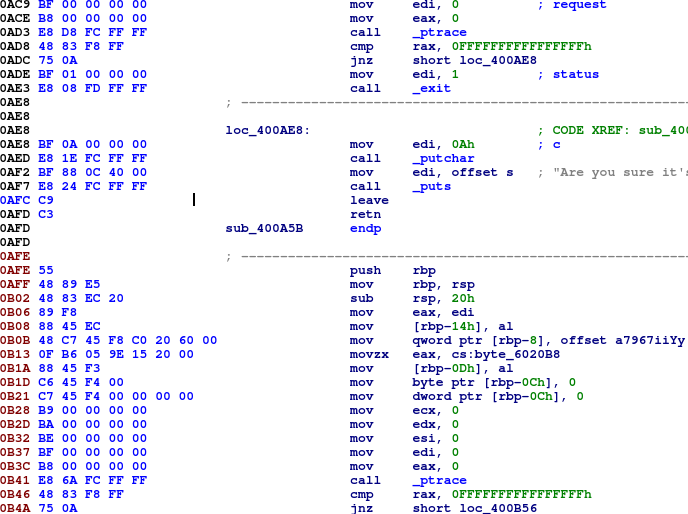
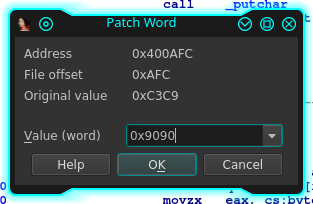
The fix that we will go to apply change on the instruction at the address 400AFC (sorry, screenshot cut the address columns), replacing it exactly with two nop operation, so, when the code executes that piece of code, don't return and go on with the execution of the hidden procedure. We could change or delete only the return instruction (change less is better), anyway should not be a problem to do that. To modify the instruction move on the address you want to change and from the "Edit" menù chose "Patch program", you should have different possibilities, let me explain all:
- Change byte: you'll be able to change a custom number of bytes.
- Change word: you'll be able to change two bytes only, it is useful most of the time, considering that most instructions take a word.
- Assemble: This is a really cool feature, it allows you to write the equivalent command without using the hexadecimal format, we'll use further on.
- Patched bytes: Show the list of the applied patches on the executables and give to you the possibility to revert the fix.
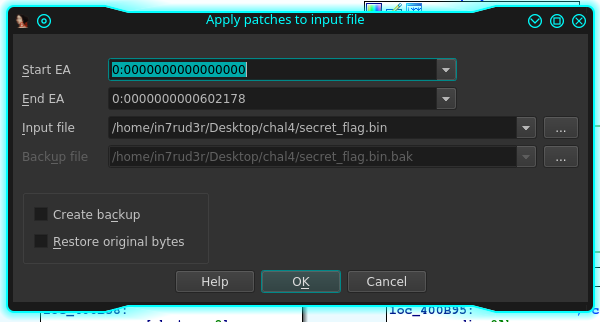
- Apply patch to input file: Allow you to patch the original file, in order to apply the same changes done in memory to the original executables and launch it with the new behaviour.
Well, in this specific case we will use the "Change word" feature, we have exactly two bytes to change, so, I think it should be the right one.
After the patch, here how to appear your new code (and we have a nice surprise):
It seems that the debugger has recognized the new procedure (you can see also the four parameters of the method), so it has created a label to refer it in the code. Well, my original idea to execute and continue, is changed now, why don't change the call to the previous procedure to that new one? so proceed, locate the code on the right address and this time we have to patch in assemble.
As yet done before, after locating the instruction to change, click on it and this time, chose "Patch program" -> "Assemble". The previous form appears, but this time it provides you with the instruction "call sub_400A5B". Change it with the new label, your new code will be "call sub_400AFE", the form will be presented to you another time, but, close the window and go ahead.
Ok, activate again another session of debugging and repeat all the steps that permit you to arrive at the new function call. Well, this time, pressing F7, we will in the hidden procedure, start immediately to try to understand it. At once, we find a debugger trap, a _ptrace call, used usually to identify if the current process is controlled by another process.
.text:0000000000400B37                           mov     edi, 0 ; request
.text:0000000000400B3C                           mov     eax, 0
.text:0000000000400B41                           call    _ptrace
.text:0000000000400B46                           cmp     rax, 0FFFFFFFFFFFFFFFFh
.text:0000000000400B4A                           jnz     short loc_400B56
Well, anyway is really simple to bypass, after comparison change the "zero flag" and the code will jump on the right branch. Now, a fast look at the following code.
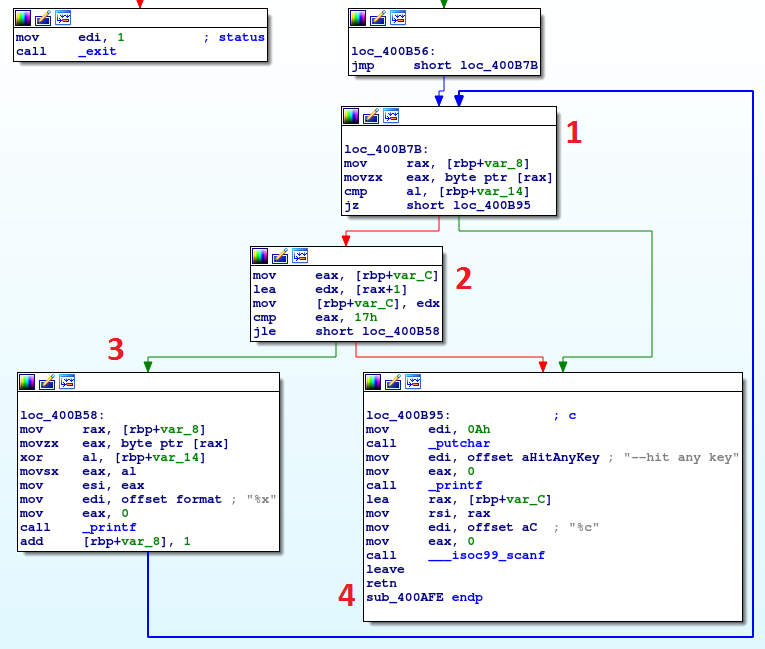
Another interesting cycle. Also in this case, the cycle iterate on a string. Let me explain the four principal blocks. The first block check for a specific char inside the string, I don't know exactly the origin of this char, but the char doesn't stop the execution (in this case). The second block check how much char are worked and the entire cycle ends after 17h chars. The third block works on the specific char in the string (the important instruction is the xor operation) changing it with another value, the new char is printed on the screen and the cycle continue.
The final block, the fourth, is executed at the end of the cycle, it prints the message "--hit any key" and wait to read a char (the scanf instruction). So, the entire cycle, work a string, changing and visualizing the result on the screen. Well, good, let's patch the original file and launch it to see the output. As described before, you can use the "Patch program" menù to apply all the change you have done in memory to the original file.
Well, when I launch my patched program the output is this:
ffffffe3fffffffcfffffffdfffffffbfffffff7fffffffcfffffffdffffffeaffffffc7ffffffebffffffecfffffffdfffffffefffffff9fffffff6fffffff7ffffffa9ffffffa9ffffffa0ffffffc7ffffffb9ffffffb9ffffffc7ffffffe5It seems to be the result of a "two's complement" operation, to give the negative form of a number (in this case in the hexadecimal form). Well, this can be converted in two different way, considering the only byte on the left or applying the "two's complement" operation again and identifying the original value (that you simply can do with a hexadecimal calculator and writing the last byte applying the minus sign to it), anyway, in both the cases we have a char.
Well, let me avoid to you this operation, I try but the flag is not comprehensible and anyway, the HTB portal don't accept it. To simplify a little our job we can print immediately the string from the executables, as I said, the simple thing to do is to replace the "%x" formatting string (that print a hexadecimal value), with "%c", that it print a char. So, try to do that, look the code below:
movzx eax, byte ptr [rax]
xor al, [rbp+var_14]
movsx eax, al
mov esi, eax
mov edi, offset format ; "%x"
mov eax, 0
call _printf
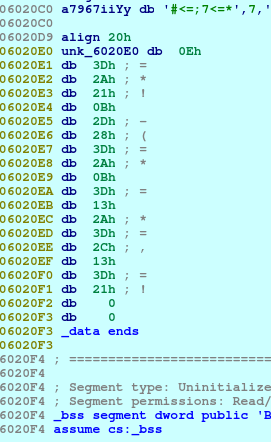
add [rbp+var_8], 1The string for formatting is on the offset "format", double click on it, you will move on the code where is saved the string data. The "x" char is 78h, to replace with a "c" you have to replace the 78h with 63h. So copy the address you are on, move on the "Hex View" panel and "jump to address" (specify the copied address).
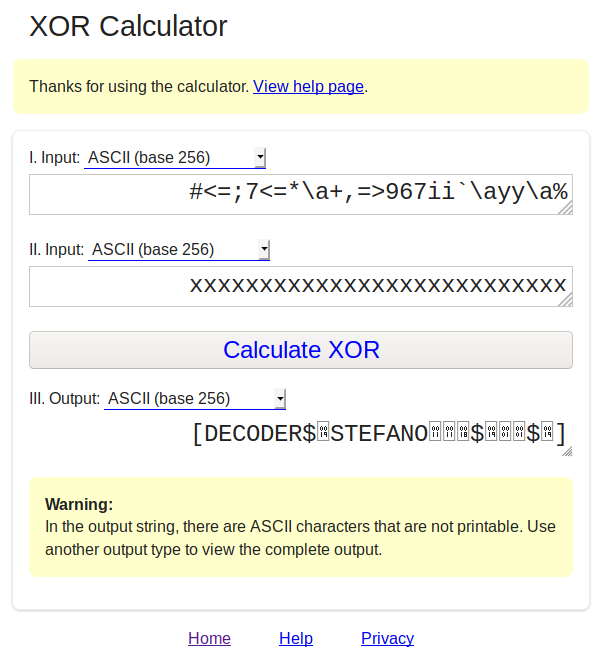
Click on the 78 with the right button and choose "Edit", change it with 63, again, right-click and "Save". Patch the executables and you can launch it and see the output in a string format, but, as already said, this is not the right flag. Ok, it seems that we have always at the same point, anyway, I think this is the right place, what I want to concentrate is the xor on the block, probably who develop the challenge want to joke with us. I decide to take the full string and try to xor each char with different values. The specific string is this:
#<=;7<=*\a+,=>967ii`\ayy\a%
Remember that I will be explaining something in a short time. Anyway, I have to write a small program or use something can help me online. There's a small web page where I can do this simple activity.
The idea is to xor the string with all the alphabet letter, I know, 26 letters, but is not so long activity, then, prepare all the string and try on the application on the portal. I'm not so lucky anyway, because I can stop at the "x" char, so, I have done the most letters of the alphabet, but is not a problem. Ok, here a screenshot of the result.
It seems to have something but we have to make another little step before because there are some dirty char inside. As usual, I try it on the HTB portal, but the answer is negative. Obviously, the characteristic of the xor is particular and there's the possibility that more than one possible char that return a set of readable string and if you have a little experience on programming in c++, you could know that the equivalent upper char should give you probably some alternative solution. Immediately I replace the series of x char with a series of X (upper) and...
Well, we have done another small step, but dirty chars appear again. Now, let me explain, what I mentioned before; if make attention to the original string, you can see three chars, that the page cannot convert... are you counting?
Well, who program in c++, see three chars and not six... these chars are "\a". In c++, some chars (special chars) are representing in the string with escaping character, the "\". Then the single character identified by a byte on the memory of the program, are represented in the string as "\a" that decoded is the "bell sound". Now, we can apply a bit of fantasy and try to guess the char (is not so complex to identify it), but let's go deeper and make another small step of program patching.
Come back on the code where the xor operation work on the string and force it to xor the source with the specific char 58h (X in uppercase). The code should be like this:
400B58 48 8B 45 F8 mov rax, [rbp+var_8]
400B5C 0F B6 00 movzx eax, byte ptr [rax]
400B5F 34 58 xor al, 58h
400B61 90 nop
400B62 0F BE C0 movsx eax, al
400B65 89 C6 mov esi, eax
400B67 BF 82 0C 40 00 mov edi, offset format ; "%c"
400B6C B8 00 00 00 00 mov eax, 0
400B71 E8 CA FB FF FF call _printf
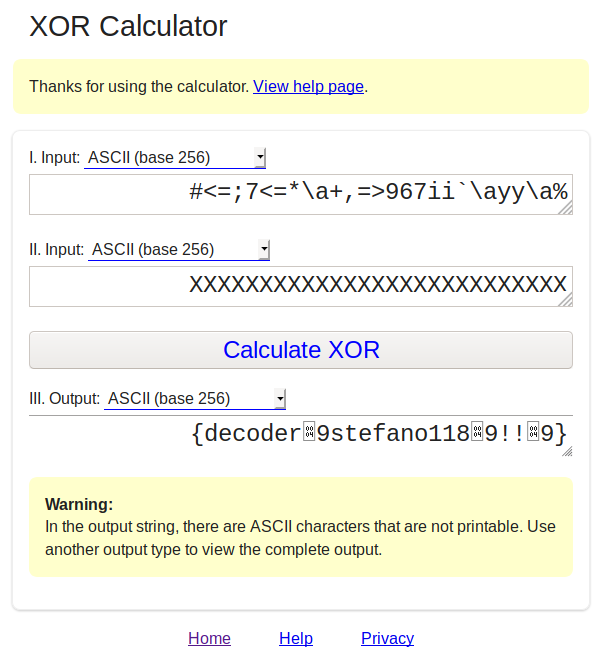
400B76 48 83 45 F8 01 add [rbp+var_8], 1Patch again for the last time and launch your final executable, the output will be:
in7rud3r@kali:~/Desktop/chal2$ ./secret_flag.bin
{decoder_stefano118_!!_}
--hit any key
That's all folks, thanks for reading!!!