LinkedIn OSINT Techniques: Part I
Linkedin users walk a fine line between giving out too little information, or giving out too much information.


LinkedIn remains the go-to social media platform for job hunters and recruiters alike. Due to the nature of the platform and the high value of potentially landing a new gig, most users found on the website are providing, intentionally or not, real and attributable information about themselves. Investigators have a wealth of information that is often verifiable with little difficulty. Users walk a fine line between giving out too little information, or giving out too much information which may be detrimental to their, online and physical, safety and privacy.
This guide will contain two sections with this first iteration focusing on some of the “quick hits” that can be found on a user that might not have a fully fleshed out account. The second guide will focus more on exploiting experience, positions, and other information found in a more robust LinkedIn account.
URL

The URL associated with a LinkedIn profile will always be available by default, however it will not always provide exploitable information. By default, a URL will be generated from the first and last name of the account. Unlike other platforms, this URL will automatically update when users change the first or last name on the account. Unfortunately for accounts that only show the initial of the last name, this usually does not uncover the full last name unless they have customized their URL to include it.
Users may create these “custom” URLs (linkedin.com/in/#USERNAME) for their account which is more easily remembered, doesn’t change with each name change, and can be treated just like you would treat a username in many cases.
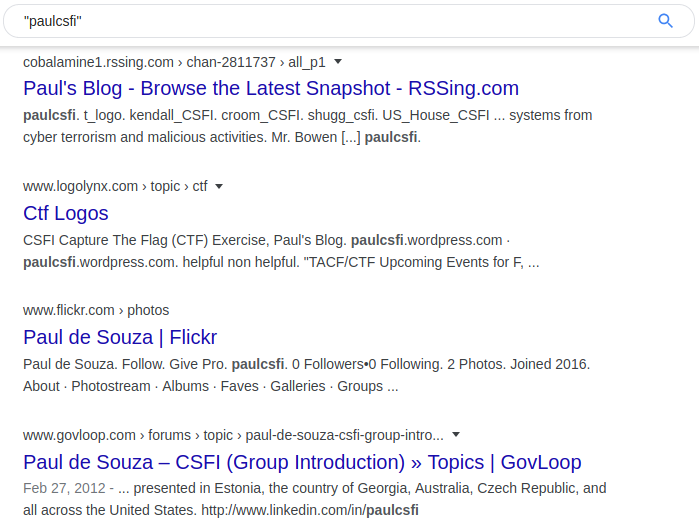
Our above example is a custom URL pulled from a LinkedIn account that can be treated like a username. Running this through Google uncovered a number of additional platforms to look into for information gathering. The results provide us with personal blogs and other information that provides easy jumping off points on our target due to the reuse of this URL as their username on other platforms.
Banner Photo
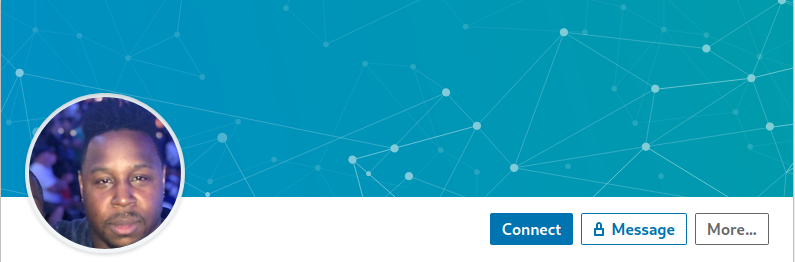
Like many other social media sites, LinkedIn allows its users to upload a large photo at the top of their page to act as a banner or cover photo. This banner can be exploited like any other photo with reverse image searches to see if the user also uploaded it to another site. I must note that it appears LinkedIn does strip any pertinent metadata from photos and other files uploaded to the site, so no EXIF data will assist you here.
Banner photos can also be analyzed for any relevant information that might appear in the photo, such as the user’s workspace, industry-specific equipment, notable locations or office spaces, etc. There is no need for any special tool to view the image, simply right click the banner and click view-image. Be advised that this does not work on the generic cover photo. At this time, I was unable to find any way to obtain the full-size banner photo uploaded by the user.
In our above example, our user has a banner photo, however it is one created by default for users that have not yet uploaded their own. Doing a reverse image search on the image returns a large number of other LinkedIn accounts with the same default image. Although this is a dead-end, it is good for investigators to familiarize themselves with any default images so they do not chase leads that go nowhere.

Profile Photo

On the left side and below the banner photo will be the user’s profile photo. Profile photos help us identify the person behind the account. Although it is usually considered poor OPSEC to upload a personal photo of yourself behind an online handle on most sites, many LinkedIn users freely put their faces out there. Be wary of AI-generated profile photos as well as those that may be stock images or pulled from elsewhere. Usually, a bit of sleuthing coupled with reverse image searches can clear up most cases and may help you find other places online the subject might have used it. Additionally, be sure to look for clues within the background or on other items within the photo that might help drive the investigation.
Using our above target as an example, we will see what information we can extract from only his profile photo. With all photos, we always want to obtain the largest, uncropped version of the photo as we can. Right-clicking on the photo and selecting “View Image” will give the below image.

We now have the uncropped version, but what if we needed a larger version, perhaps something where we needed to visually inspect details in the background, or in this example perhaps the text on the awards? We can navigate back to the profile and add “/detail/photo/” to the end of the URL. (ex https://www.linkedin.com/in/davidcameronofficial/detail/photo/) This will open up a larger version of the photo similar to the one below.

Much larger, but still cropped. Right-click this new photo and click “View Image” to finally get the below.

We can now get a better view of the awards, at least enough to attempt to translate some of the text. The large word on the certificate appears to be ДИПЛОМ (Diploma). I do not know enough about the language to make a reasonable guess regarding the text on the trophy. Knowing that the user has come from a country that using a cryllic script can help us narrow down our starting points.
Name (First, Last, Former)
All LinkedIn accounts will contain, at the very least, part of their first and last names that will appear directly below the profile photo. How much of a LinkedIn user’s name you may view will depend on their privacy settings and whether or not you have any connection to the user. This can vary from very locked down (LinkedIn User) to partial (Full first name with only initial of last name) to fully open (Full first and last names). There is also the option to add a former name which is sometimes used for nicknames, online aliases, or perhaps maiden names. This does not appear as often, but when it does it will be displayed in parentheses. It is worth noting that the former name does not appear to contribute to anything in the URL structure like the first and last names do.
Our above example shows us a user who has their last name hidden due to their privacy settings. However, there are a few things we can look at to uncover the full last name. Firstly, looking at their custom URL, we can make an assumption regarding their last name.

But what if we wanted further confirmation, or perhaps we didn’t have a user with their last name visible in their custom URL? We could also look into the rest of their page and look for clues that might confirm the last name such as files, endorsements, etc.
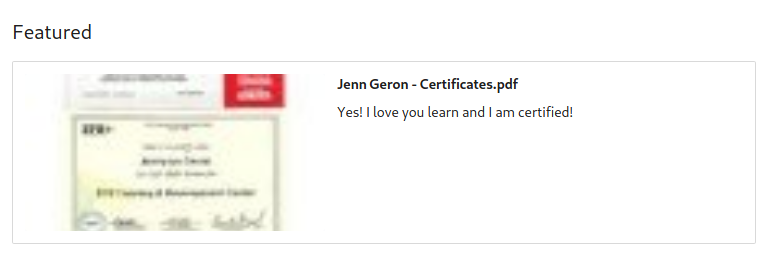
The screenshot above comes from the same user’s profile. It appears that they left their first and last name as the filename in the pdf they uploaded, confirming our prior assumption. This example shows how inconsistent settings on an account can be useless for privacy if they do not lock down other areas as well.
Headline

The headline will appear below the user’s name on a profile and is also a required field. By default, this will be pulled from the initial work or education information provided by the user on signup. This has to be edited separately from the work and education experience, which means that a user can delete their initial work or education experience and if they should forget to update their headline it may still contain this information. In addition to this initial headline, users may also edit this information to contain information that they want others to see first and foremost. This might include relevant professional certifications, security clearances, past or current work or school, etc.
The above user provides their current titles, however it is their security clearance information that is more interesting here. We can see that they have two related clearances that are specific to the British government. Without knowing the user’s location information, we could generally assume that the user is in the United Kingdom or perhaps in an overseas territory or a friendly country. This drastically narrows our searching area.
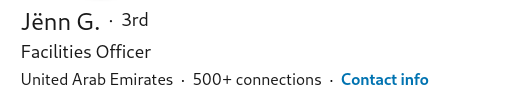
Location

Below a user’s headline and before their number of connections will be their location. This is another required field, though be sure not to put too much faith in this as users may choose whatever they wish here without any validation. Additionally, users may change this as they see fit any number of times. This can be as broad as the country or as defined as a city or metropolitan area. Your target’s location data can easily help narrow down the field of potential matches to varying degrees, but should be verified utilizing other points on their profile when possible.
Unfortunately, the handy tricks for exploiting via zip codes appear to no longer be supported by LinkedIn. However, with a bit of research we can sometimes narrow down their location even further. Using our above example, we can see the user has set their location as “Amsterdam Area”. Going off of the Amsterdam metropolitan area, we can see that this is quite a large area for searching, especially if we only have the information in the photo above to utilize. However, if we cross-reference the location with the user’s title and company we can narrow that down to a much smaller area.
First, let’s use their title to make a few assumptions. They are a CEO. Is a CEO likely to have their office at a small branch office? Unlikely. Are they going to live hours away by transit in the suburbs due to a lower salary or to save money? Possible, but also unlikely that they would be based too far away from their office. So we are assuming they are going to be near a major office and likely not too far out commuting wise.
Doing some quick research, it appears that ING Group has its headquarters in the South-East area of Amsterdam. A global headquarters would be a likely location for a CEO to have an office in. Knowing this we can start looking for information on our subject among people databases and look specifically for results that are within a reasonable commute from this office. This gives us a more narrow starting point than just “Amsterdam Area” which may contain multiple cities in the local commuting area.
Connections

The number of connections will appear after the location information on a profile and may or may not be viewable depending on the target’s privacy settings and your connection to the target. By default, a target’s connections will be open to 1st-degree connections, so if possible be sure to connect with your target utilizing a well-crafted sock-puppet. If the information is viewable, investigators may click on the blue hyperlink to open the list of connections, otherwise it will appear as plain black text and not be clickable.
Clicking on the link in our above example, we can get a quick overview of all of the target’s connections. Below is a snapshot that summarizes them quite well in terms of location and field.
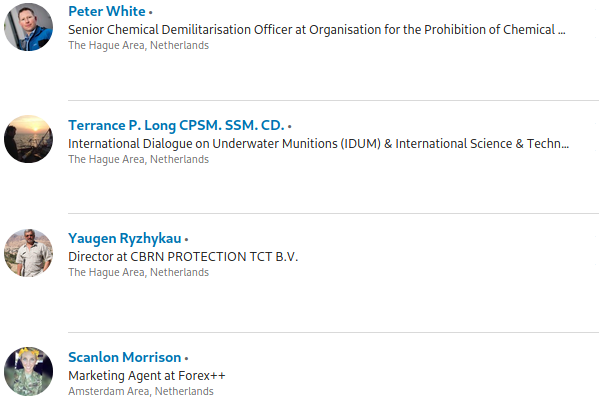
Based on their connections, we can assume that the user is likely based in the Netherlands as they state in their location. Additionally, looking at the positions of their connections, it appears that they likely come from a military background or are otherwise associated with CBRNE and related munitions work.
Contact Info
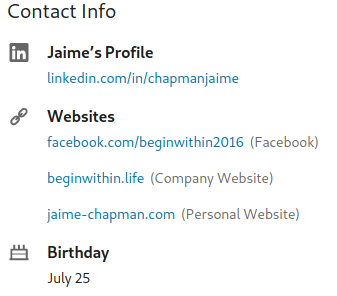
Following the location information will be a link to display a user’s contact info that will display via a popup. Exploiting contact info can be hit or miss depending on the amount of information provided by the user and if you are a 1st-degree conneciton or not. Despite the name of this section, it may contain far more than just contact info. This section will contain, at the very least, the profile URL. It might also include the user’s phone number, address, instant messaging handles, birthday, as well as URLs to their personal and professional websites. It is also worth noting that, by default, the LinkedIn email address is shared with all 1st-degree connections. Not everyone knows to change this so it might be beneficial to add a target if you are able to do so.
The target in our above example provides a number of websites and social media accounts that allow us to spider out and collect further information on them. Should we be searching our target of one of many people searching websites, we could use the birthdate given to narrow down our possible results.
About

Some Linkedin profiles might contain additional information in their about section that does not occur further down in the experience section of the profile. Like the headline, this is a freetext area of the profile that allows a user to input anything that they feel pertinent to let other users know. For this reason, you might find valuable information such as URLs, alternative email addresses, additional pertinent locations, past and current work information, as well as hobbies, etc.
For users with robust about sections this might appear to look something like an objective or biography statement that might appear on the top of a resume, giving investigations a quick snapshot of a user and their background. Additionally, users may update this section more or less often than their education and experience section. This might result in differing, or even conflicting, information among these sections.
In our above example, we have a good example of a robust about section. This user states they are primarily based in Germany, but they have also placed talent in France, Netherlands, Czechia, UK, and China. They also state they were originally in a London-based agency and then went to the German one to stand it up. Knowing this, we would be able to start off looking for German-based data on the person, while also looking for British-based data for historical (and possibly family) data.
We would also know not to immediately cast out data coming from the other named countries as they have a history of work in those areas (although it appears to be remote).
Interests
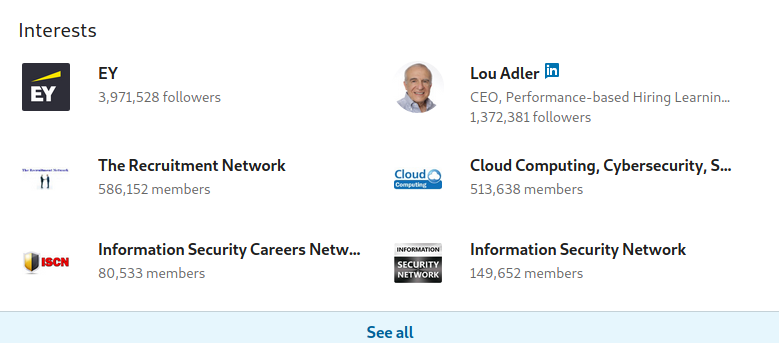
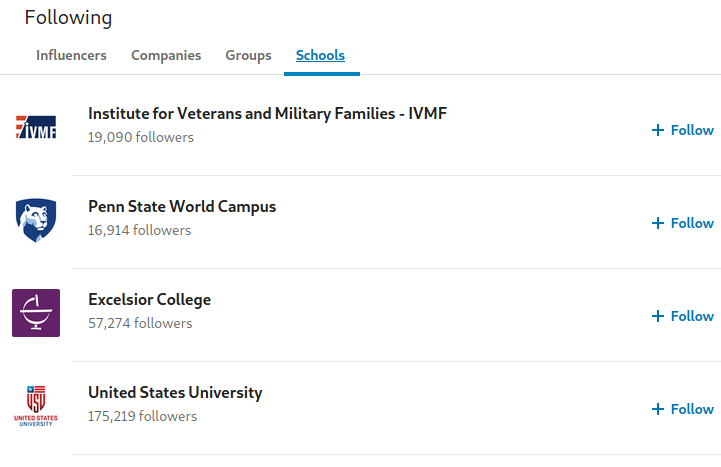
The interests section of a profile can contain useful information when the user does not fill out their experience or school sections. It may contain a list of influences, companies, or schools a user is following. Additionally, it also contains groups that the user is associated with. All of this can provide information on what field the user is now or previously in, or even what companies and/or schools the user is associated with. By default, only a portion of these interests are shown, with the rest being available by clicking “See all”.
In the above example, we can see a few interests that might suggest the user is involved in Information Security and might be associated with Earnst and Young, or have an interest in working there. Clicking on the “See all” we can gain additional supporting information.
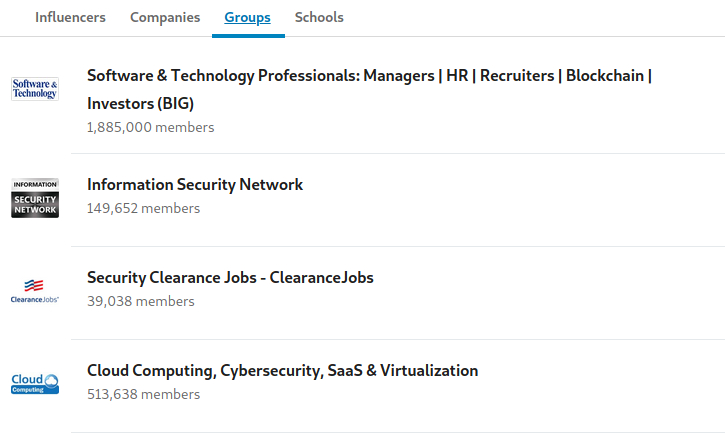
Taking a look at the groups they are members of, we see additional InfoSec groups (among those shown above), as well as a group for the website ClearanceJobs. This would help us narrow down their likely location to being in the United States, and might suggest they are or previously were associated with government or military work and have a clearance with active status. Clicking on the tab of schools also adds credibility to this assumption, with one of them being for Veterans and Military families.
Conclusion
We have just begun scratching the surface of exploiting LinkedIn for OSINT, however you should be able to tackle most accounts with a sense of confidence. In order to give you a running start I have created some simple OSINT bookmarklets and an OSINT attack surface map which can be found over on my Github. Additionally, be sure to keep a look out for the second section of this guide which will go over additional points that you can exploit in regards to a target’s education, work history, and more. Should you have any questions feel free to reach out to me on Twitter.
