OSINT - Scraping Deep Web Databases with Python
Learn how to scrape deep web databases with Python for OSINT investigations.


Scraping deep web databases enables you to search numerous databases at once (compared to searching one at a time on each website) and allows you to conduct several searches on a database simultaneously (i.e. search 20 names at once).
SIDE NOTE: There are databases that have a public API for searching their content, this article focuses on databases that do not offer an API.
Scrapping an Open Web Website
It is worth considering the difference between deep and open web databases. The website for the news service NPR is an example of an open web database in that it is a database of NPR articles.
If you want all NPR articles that mention the word “internet”, you could search from within the website or search outside the website by using google (by googling “NPR.org” and “internet). Both methods will give you a list of articles mentioning that word.
By comparison, the Miami Dade county property records database is deep web. If you want the property records for people in the county who are named “Smith”, you can go to the website to search but google won’t find your results.
Note that if you do want to scrape an open web database it is relatively simple. If you want to scrape NPR articles mentioning “internet”, first use the website’s search function. This brings you to a page of results. Notice that the URL changed. The homepage url was ” NPR.org”, but the URL for your results page is:
https://www.npr.org/search?query=Internet&page=1
You can write a python script to scrape the page at the URL above. This reveals the website’s URL format for searches. The keywords that were input into the search function will appear in the new url after the part that reads “search?query=”. If you want to search for any other keyword, just replace “internet” with your new keyword.
What is “Scraping Deep Web Databases”?
In order to obtain (scrape) information from a deep web database with Python, you will send a request to the database server that mimics the way the website would send a request to the server as if you actually submitted your search through the website.
One might wonder at this point why bother with python instead of just using the website. One answer is that you can use python to search lots of databases at once. Consider an example where you are researching someone and you want to find out if they legal issues. So therefore you want to search for them in court records. The manual process of searching court records would require you to search numerous databases because of the overlapping court jurisdictions and the separate databases for each of them.
How to Scrape Deep Web Databases : Using “Params”
You can use this simple Python script below, named Basic_Scraper, to scrape your database of choice. The way the script works is that you will be sending information (the parameters) to a location, which is identified by the url.
# Basic_Scraper
import requests
params = {'firstname': 'John', 'lastname': 'Smith'}
r = requests.post("http://FAKE-WEBSITE-URL/processing.php", data=params)
print(r.text)
You will need to input the url, the input names, and whatever data that you want to query. How to do this?
First, navigate to the search page for the website you want to scrape.
For this case I used a random commercial registry as a deep web database example. For this walkthrough I am using a Chrome browser, but any browser will do, the names of browser functions might be slightly different.
We want to use an html-viewer to see the html code for the website’s search function. The website has a search bar for the registry so I right-click in the text area (where you input your search term) and click “inspect.” A window opens in the browser for Developer Tools and under the Function tab the website’s html is visible with the html code for the search bar’s text area highlighted. See the screenshot below.
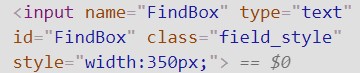
This identifies the “input” element or tag for the database’s search function, which we will use our code to simulate with the “params” in the example script Basic_Scraper. The html tells us that the element is identified as “FindBox”, which correlates to the identifier “firstname” in the example script.
Second, I type in a random search term, “Jack”, and hit ENTER to see how a sample search affects the html. On the webpage there is now a list of companies with the word “Jack” in the title. The browser’s html viewer shows that the code for the search function refreshed and the input element added something new. As seen on the second line in the screenshot below, the element has additional text that reads ‘ value=”jack” ‘.
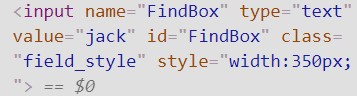
Now we know how to identify the search function’s parameter and its value. This is known as a dictionary in Python because there is a key (FindBox) and an associated value (jack). So in order to scrape this database for companies with the word “Jack”, we would change the example script’s params to read:
params = {‘FindBox’: ‘Jack’}
Third, we post this information to the database’s server with a POST request. But we need to identify a url to send our request.
Go into the webpage source code and find the “action” of the form tag in the HTML, which will read something like “action=”, followed by a url. This will identify the url that you will use to send the information. It will either give you the full url or just the end part. For example, it may read “action=/processing.php”, which confirms that the relevant url ends with processing.php. Sometimes you will merely add this onto the end of the url of the search page or sometimes you will use it to replace the last segment of that url. The final product (the url) will be pasted into the script above where it reads “http://fake-website-url/processing.php”. Leave the parenthesis in the script.
In the case of our example database, the url destination is the same as the url of the webpage we were already at. So we send a POST request to the url with our params and assign the response to the value r. It should read like this:
r = requests.post(‘http://cr.justice.gov.lb/search/res_list.aspx’, params)
From there, you can type ‘print(r)’ to see if you get a ‘200’ as a response, meaning the code was successful. Then you can ‘print(r.text)’ to get all of the response text from the server that would normally create the search results you would see on the website.
As with any python script, if it has trouble then try running it from the command line and try typing python3 instead of python and make sure there are no extra lines or line breaks (after accidentally hitting enter and starting text on a new line) in the notes after the #.
import requests
from bs4 import BeautifulSoup

#Scraping data
params = {'FindBox': 'Jack'}
r = requests.post('http://cr.justice.gov.lb/search/res_list.aspx', params)
print(r)
print(r.text)
The resulting data that you would recieve in response does have your results but it looks like this:
Below is a version of the same script with a section added on at the end to parse the data. This way, instead of retrieving masses of data, the script will only list the results for your search.
# commercial registry scraper

import requests
from bs4 import BeautifulSoup

#Scraping data
params = {'FindBox': 'Jack'}
r = requests.post('http://cr.justice.gov.lb/search/res_list.aspx', params)
html = r.text

#Parse the data
bs = BeautifulSoup(html, 'html.parser')
companies = bs.find_all('div', {'class' : {'res_line1' }})
dates = bs.find_all('div', {'class' : {'res_line2' }})
for company in companies:
    link = bs.find('a')
    for link in company:
        articleUrl = (link.attrs['href'])
        for date in dates:
            print(company.get_text(),
                  'registration date and region:', date.get_text(),
                  'registration link:', ('http://cr.justice.gov.lb/search/{}'.format(articleUrl)))
This addition parses the data so that the results list each company’s name, registration number, and a link to its file in the directory. The results appear like this:

The second section, under the title #Parse the data, uses the Python library BeatifulSoup to make the response data more understandable. BeautifulSoup is a complex tool for parsing html (among others) that has had entire books written on it, so we will not address it in this post. It is just used here to simplify the response data.
How to Scrape Deep Web Databases: Using URL Requests
The problem with the first method is that there are many databases where it will not work, due to the particularities of the site itself. Therefore, you can try a second method that often works when the first one fails.
In this method, instead of sending params to a url, you submit a url that is usually not visible when using your browser. The script would look like this, where there is a request to submit a particular url via a POST request without params identified. The script only changes in different iterations to reflect that the url changes when a different name is searched. This is explained in the walkthrough below
import requests
name = 'smith'
url = f"https://www.miamidade.gov/Apps/PA/PApublicServiceProxy/PaServicesProxy.ashx?Operation=GetOwners&clientAppName=PropertySearch&enPoint=&from=1&ownerName={name}&to=200"
r = requests.post(url)
print(r.text)
Basically this method involves using your browser’s developer tools to see what is happening behind the scenes when you submit a request to the database. For this example I am using Chrome and scraping the Miami Dade County property database.
Normally, if you use this database you would submit a name to search for associated property records. The website url for the blank search page and the webpage with your results are the same, which contrasts with open web databases described above and means that method would not work here.
Step One: Find the URL That Communicates Our Request
Here is the walk through that identifies how the database works:
1) Open the website type your search term in the search bar. In this example we chose the Owners Name search bar and typed in the example name ‘Smith.’ Then right click on the search bar and choose ‘inspect.’ Then click on the ‘Network’ tab in Developer Tools.

2) Click on the website’s search function to search for your term and you see in Developer Tools that information pops up. This shows that a request was sent to the website’s server.
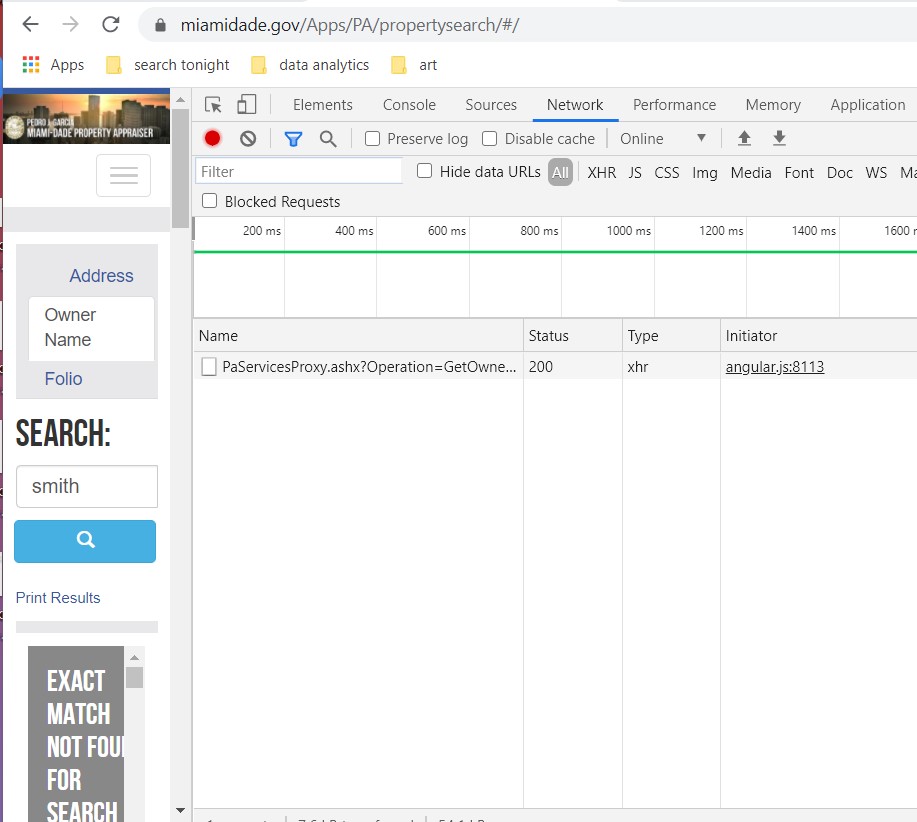
3) Within ‘Network’ the latest request is listed under the ‘Name’ header. Click on this listing to see its information pop up on the right under the ‘Headers’ tab. Under ‘Headers’ look at the section under ‘General’ and you will see something identified as “Request URL.’ This identifies the url that was sent to a server behind the scenes. The url communicates that a request for files with the name ‘Smith’ because we chose the “Owners Name” option in the search tool.

This next part is not necessary but we can scroll down to see the Query String Parameters (which we replicated in our script in the previous method above). Here we can see that the request uses the ‘Operation’ named ‘GetOwners’ and the ‘ownerName’ is ‘smith’. This information is encoded into the url from the previous step.
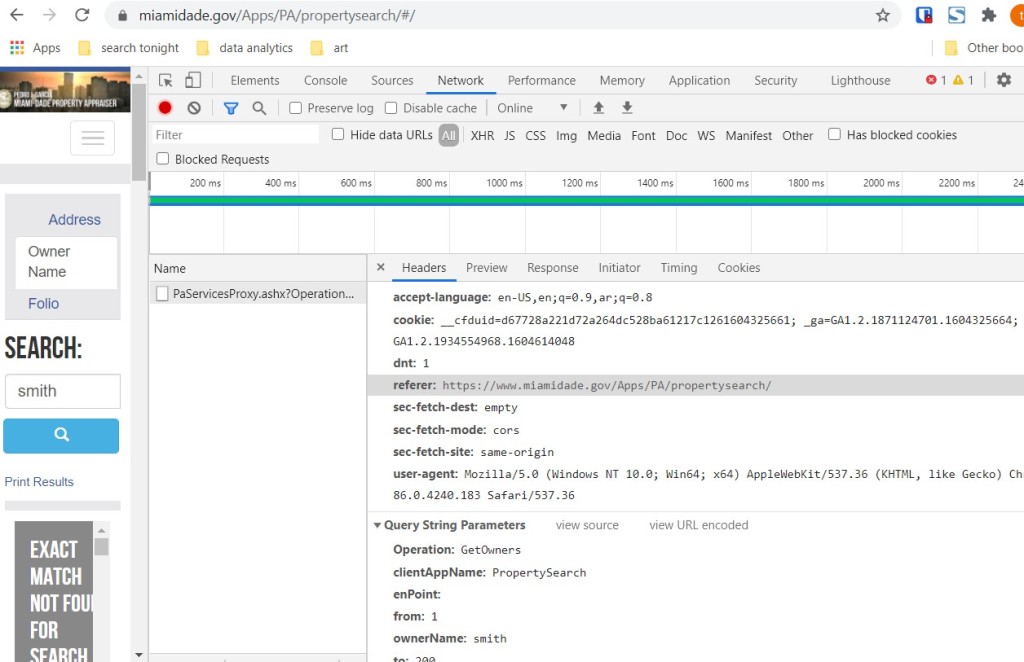
We can replicate this action by typing the same url into a python script.
Step Two: Using the URL to Create a Script
In the script below, we have looked at the url that was sent to the server that obtained results for property owners with the name ‘smith’ and identified that part of the url contains the name that we are searching (smith). So in order to submit that url, our script would read:
url = "https://www.miamidade.gov/Apps/PA/PApublicServiceProxy/PaServicesProxy.ashx?Operation=GetOwners&clientAppName=PropertySearch&enPoint=&from=1&ownerName=smith&to=200"This url will search only for results on the name “smith” (identified in bold) in the string of the url in quotes, which is assigned to the variable named ‘url’.
To make the script alterable to reflect any name we want to search, we create a variable called ‘name’ to hold whatever name we want to search. In this example I will use the name “greg”. We use an f-string to input that name in the url we are posting to the server. This way, we can reuse the script with different names and only need to change the ‘name’ variable. Here is how that looks in our code, the alterations are in bold:
name = 'greg'
url = f"https://www.miamidade.gov/Apps/PA/PApublicServiceProxy/PaServicesProxy.ashx?Operation=GetOwners&clientAppName=PropertySearch&enPoint=&from=1&ownerName={name}&to=200"
To start, look above and that we created a variable called ‘name’ with the value ‘greg’ as a string. The f-string requires that we add an ‘f’ before the first quote mark of the url. In order to input the value of the name variable in the url, we locate where we want it to go and type the name of the variable between two {}, so we type {name} where we want search term to change in every version of the url. Now, whenever we want to search a new name, we only need to change the name variable from ‘greg’ to anything else.
Step Three: Parsing JSON Results
The response data is in Json and looks like below. Every bit of data is associated with a ‘key’ that identifies it as the “owner”, “address”, etc.

To make the data a little more readable, the following script parses it to just list the names of owners. While the Beautiful Soup library is often used for scraping data that exists on the web, here we are looking at data sent to us i response to our Post request.
In this case, the response is in json (as is usually the case) so we use the json library to parse the json-coded data. This turns the data into a Python dictionary, which uses key-value pairs. Therefore ‘response’ is the dictionary created by json.loads() function and we use the keys MinimumPropertyInfos and Owner1 to drill down to the info we want, the owners’ names.
#Property Records Scraper
import requests
import json
name = 'smith'
url = f"https://www.miamidade.gov/Apps/PA/PApublicServiceProxy/PaServicesProxy.ashx?Operation=GetOwners&clientAppName=PropertySearch&enPoint=&from=1&ownerName={name}&to=200"
r = requests.post(url)
response = json.loads(r.text)
records = response['MinimumPropertyInfos']
for record in records:
print(record['Owner1'])
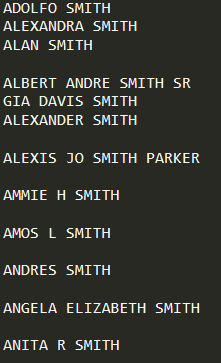
print(record['Owner2'])By choosing to weed out the owners’ names with the “json.loads()” function we can choose to focus on the property owners (look at the last 3 lines of the script) and we get results that look like this, a list of names.
It is also worth noting that this second method was necessary because the first method did not work on the Miami Dade County property records database used as the example here.
