Pokémon GO OSINT Techniques: Part I
Pokémon GO has millions of users, this article will teach you how to gather location-based OSINT on Pokémon Go users using various methods.


Released in July 2016, Pokémon GO quickly became one of the most popular games of all time with millions of users spread all over the world. As the game relies heavily upon user location for playing there is a wealth of location-based information that the game utilizes to display specific points of interest on the over world map.
Investigators may exploit such publicly obtainable information from a user’s screenshots on social media or by adding them as a friend in the game in order to gather additional intelligence. This OSINT guide will be split up into two sections. This first section will focus solely on exploiting the different types of screenshots that Pokémon GO players commonly post to social media. The second portion of the guide will focus on ways to exploit information from accounts that users have befriended in-game.
Part I: Exploiting Screenshots
The most likely way of obtaining information on a Pokémon GO user would come from their in-game screenshots uploaded to another social media platform. Users are not shy about uploading their screenshots to show off their rare Pokémon, recently visited Gyms, or the map of a new area they visited while on vacation. Although users can take a screenshot of any in-game action I will only be covering common screenshots which may provide information useable in an investigation.
Overworld Map
Much of the game mechanics revolve around the overworld map in which the player’s avatar walks on a map rendered to replicate the real-world locations that the user is in. The overworld map may also display the player’s username in the lower-left corner, however we are going to cover that later on in the second section of this guide. Instead, we are going to analyze the map itself to narrow down a user’s location at the time of the screenshot.
As Pokémon GO utilizes OpenStreetMaps (OSM), this should be your main mapping reference as the routes, buildings, and other mapped information should be near identical between the two. When trying to compare the game’s overworld map to real life it is imperative that you have additional information to help narrow down your area. Using just the overworld map itself without anything else will make it near impossible to locate the specific area. Instead, I highly recommend looking at neighboring posts by the user to see if they mention a city or post photos of nearby Pokéstops or Pokémon gyms.
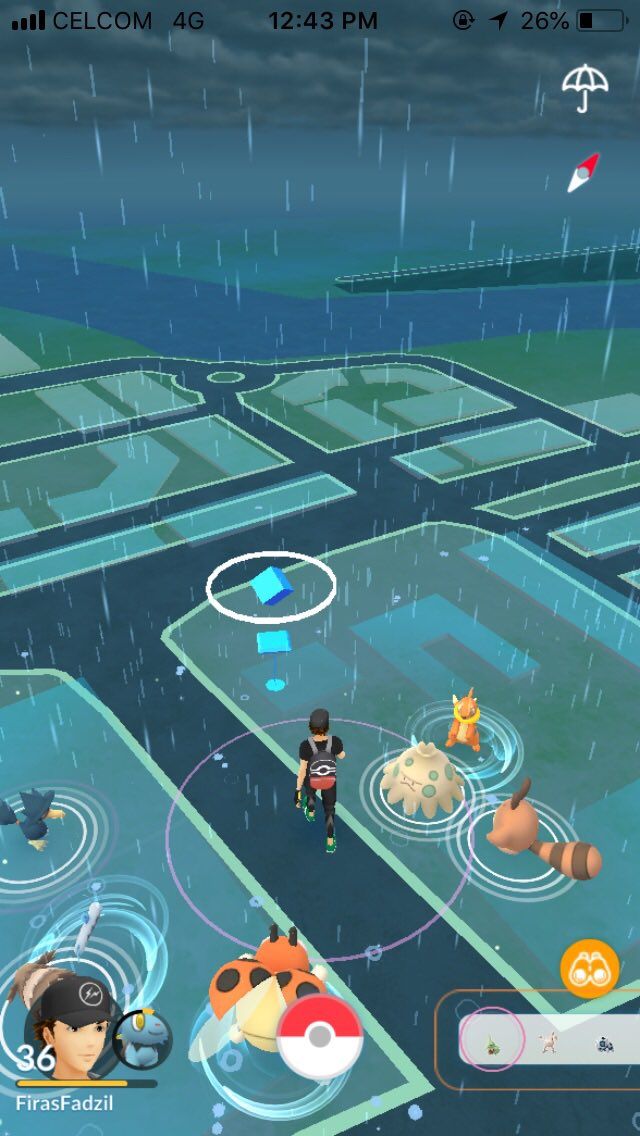
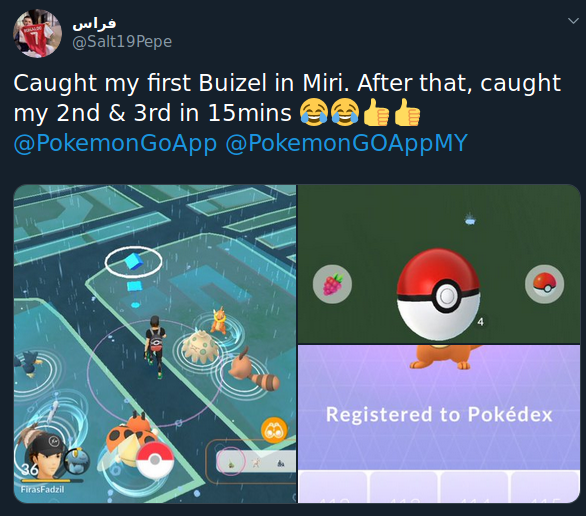
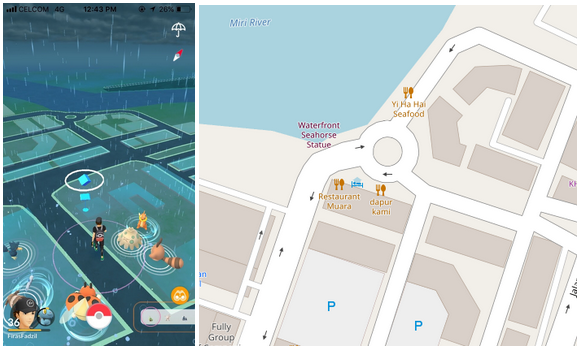
In our above example, we can see that the user posted a screenshot of their game while on the overworld map. The tweet in which they included the above screenshot mentioned being “in Miri”.
After a bit of Google Dorking I was able to determine that "Miri" was likely Miri, Malaysia. I then navigated to Miri, Malaysia in OSM and began looking for jumping-off points within the user's screenshot. Following the river in Miri I scanned for a roundabout nearby and was able to quickly locate the area on OSM here. Below are the two maps side by side for comparison. Note that the uniquely shaped buildings appear identical in both maps, this is the major reason for suggesting OSM over any other mapping service when cross-referencing Pokémon GO maps.
Pokéstops
Pokéstops are the floating blue cube or Pokéball-like icons (sometimes with white rings around them to indicate the user has never visited them before) that are scattered across the overworld map. These stops can be “spun” by players in order to obtain items or gifts to send to other players. Pokéstops correspond to real-world points of interest such as signs, monuments, etc, with new ones added or updated by users on a regular basis. On the otherworld map Pokéstops may help narrow down a user’s location if there is a unique spread of them that can be cross-referenced to one of the online Pokéstop maps such as Pokélytics or Pokémap. If a user selects an individual Pokéstop, a new screen will open that stops a photo of the Pokéstop location as well as the name and a short description, both provided by other players.
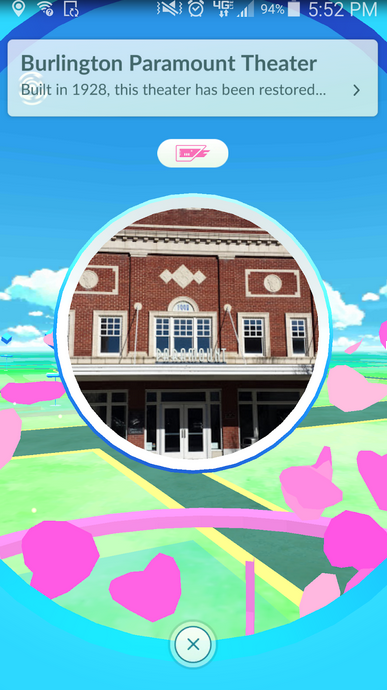
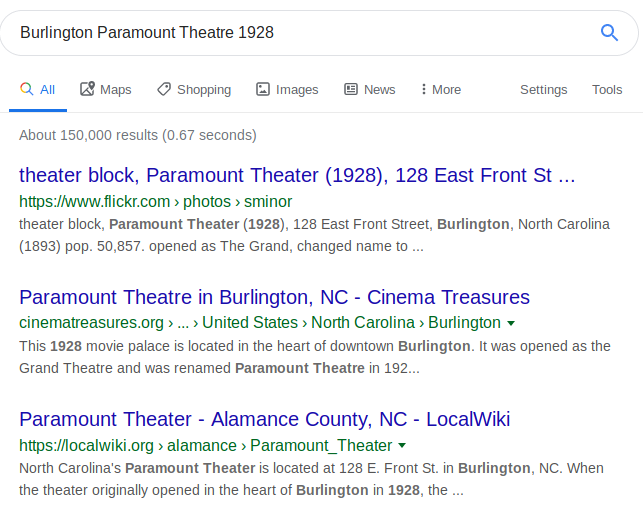
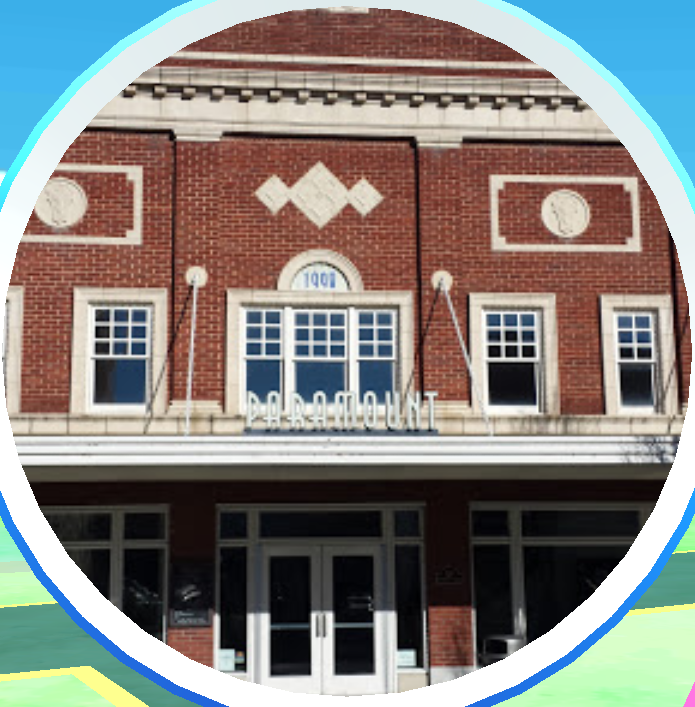
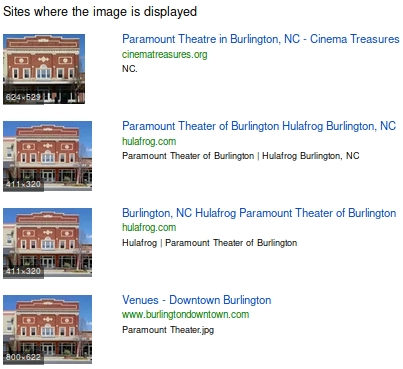
Our above example shows what a Pokéstop looks like when a user clicks on it. This screenshot gives us a cropped photo of the building, as well as the name of the building (Burlington Paramount Theatre”, and the description includes the year the building was constructed (1928).
Doing a general search of “Burlington Paramount Theatre 1928” gives multiple results for a theatre in North Carolina.
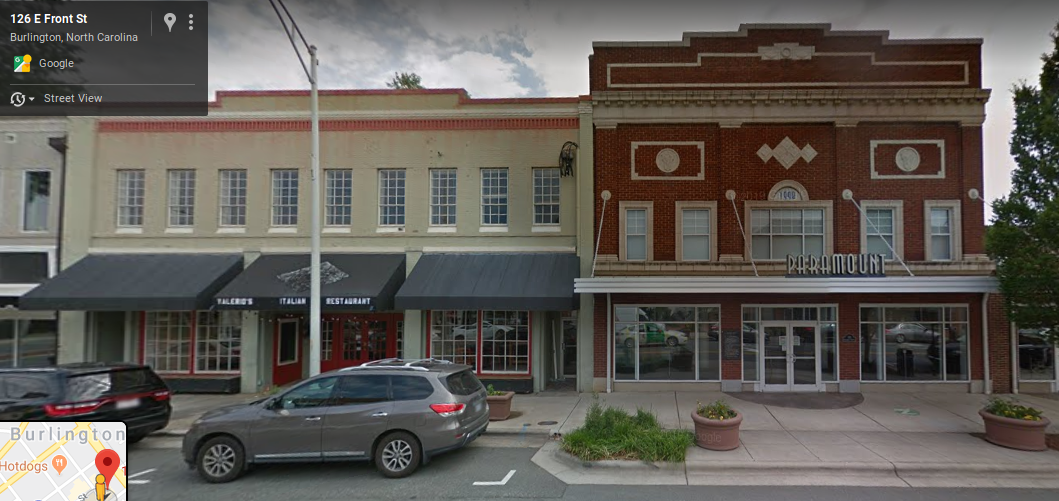
Pulling the address from the first result (128 East Front Street, Burlington, North Carolina) and throwing it into street view from Google Maps (at 36.0934714,-79.4364187) shows us the same building front as the photo.
As the location title and description are user-generated it is not always enough to find the point of interest in the real world. In such instances another route we can try is to do a reverse image search on our above Pokéstop example. Doing a normal search for it on Google and Yandex returned only results of other Pokéstop images.
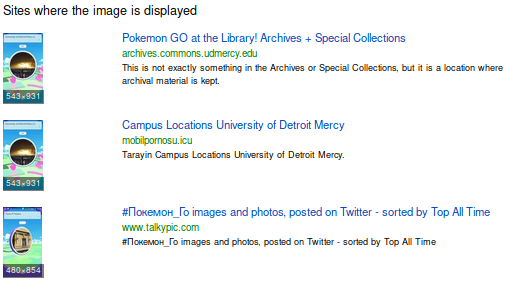
Rather than running a reverse image search on the full photo we will crop it down to just the image containing the building we want to locate.
Running our cropped image through Yandex provides us with much better results this time around and confirms that it is indeed the same as the one we found in North Carolina previously.
Pokémon Gyms
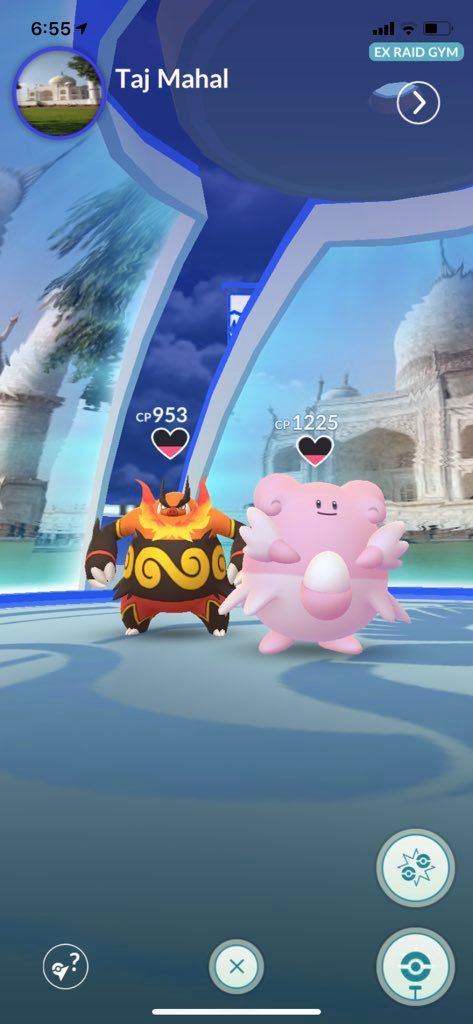
Like Pokéstops, Pokémon Gyms also appear on the overworld map, however they display as larger icons and may be blue, red, yellow, or gray to denote the color of the team (or lack thereof) that currently controls it. Users may battle other players in the gym or leave their own Pokémon in the gym to defend it. When selected, the gyms will display the Pokémon in the gym as well as the gym name and an image of the gym point of interest both in the mini photosphere in the top left as well as on the background of the gym. Some gyms may also show that they are sponsored or ex-raid eligible on the upper right side.
For the most part, investigating a Pokémon gym location will be identical in technique as a Pokéstop with the name of the point of interest and the photos of the gym being used to narrow down a location. For our above example I am going to assume everyone can find the Taj Mahal by Google Dorking so I will not bore you with the steps to find it via the name alone. Instead, let's take a look at doing a reverse image search. We already know from Pokéstops that uploading the full image likely will not work. Skipping that we can move to the cropped small image of the gym as our first try.

Google came back negative and Yandex provided results of a similar building in Indonesia, but not what we are looking for. This is likely due to the size and overall quality of the image. Next, we will crop out the larger image from the background of the gym.

This is not ideal for a reverse image search, with such a small image and the Pokémon health bar overlapping our photograph, but still worth a try especially for more notable landmarks. Google once again let us down, though it at least identified the image as being a tourist landmark, while Yandex came through with matching results.

EX-Raid Passes
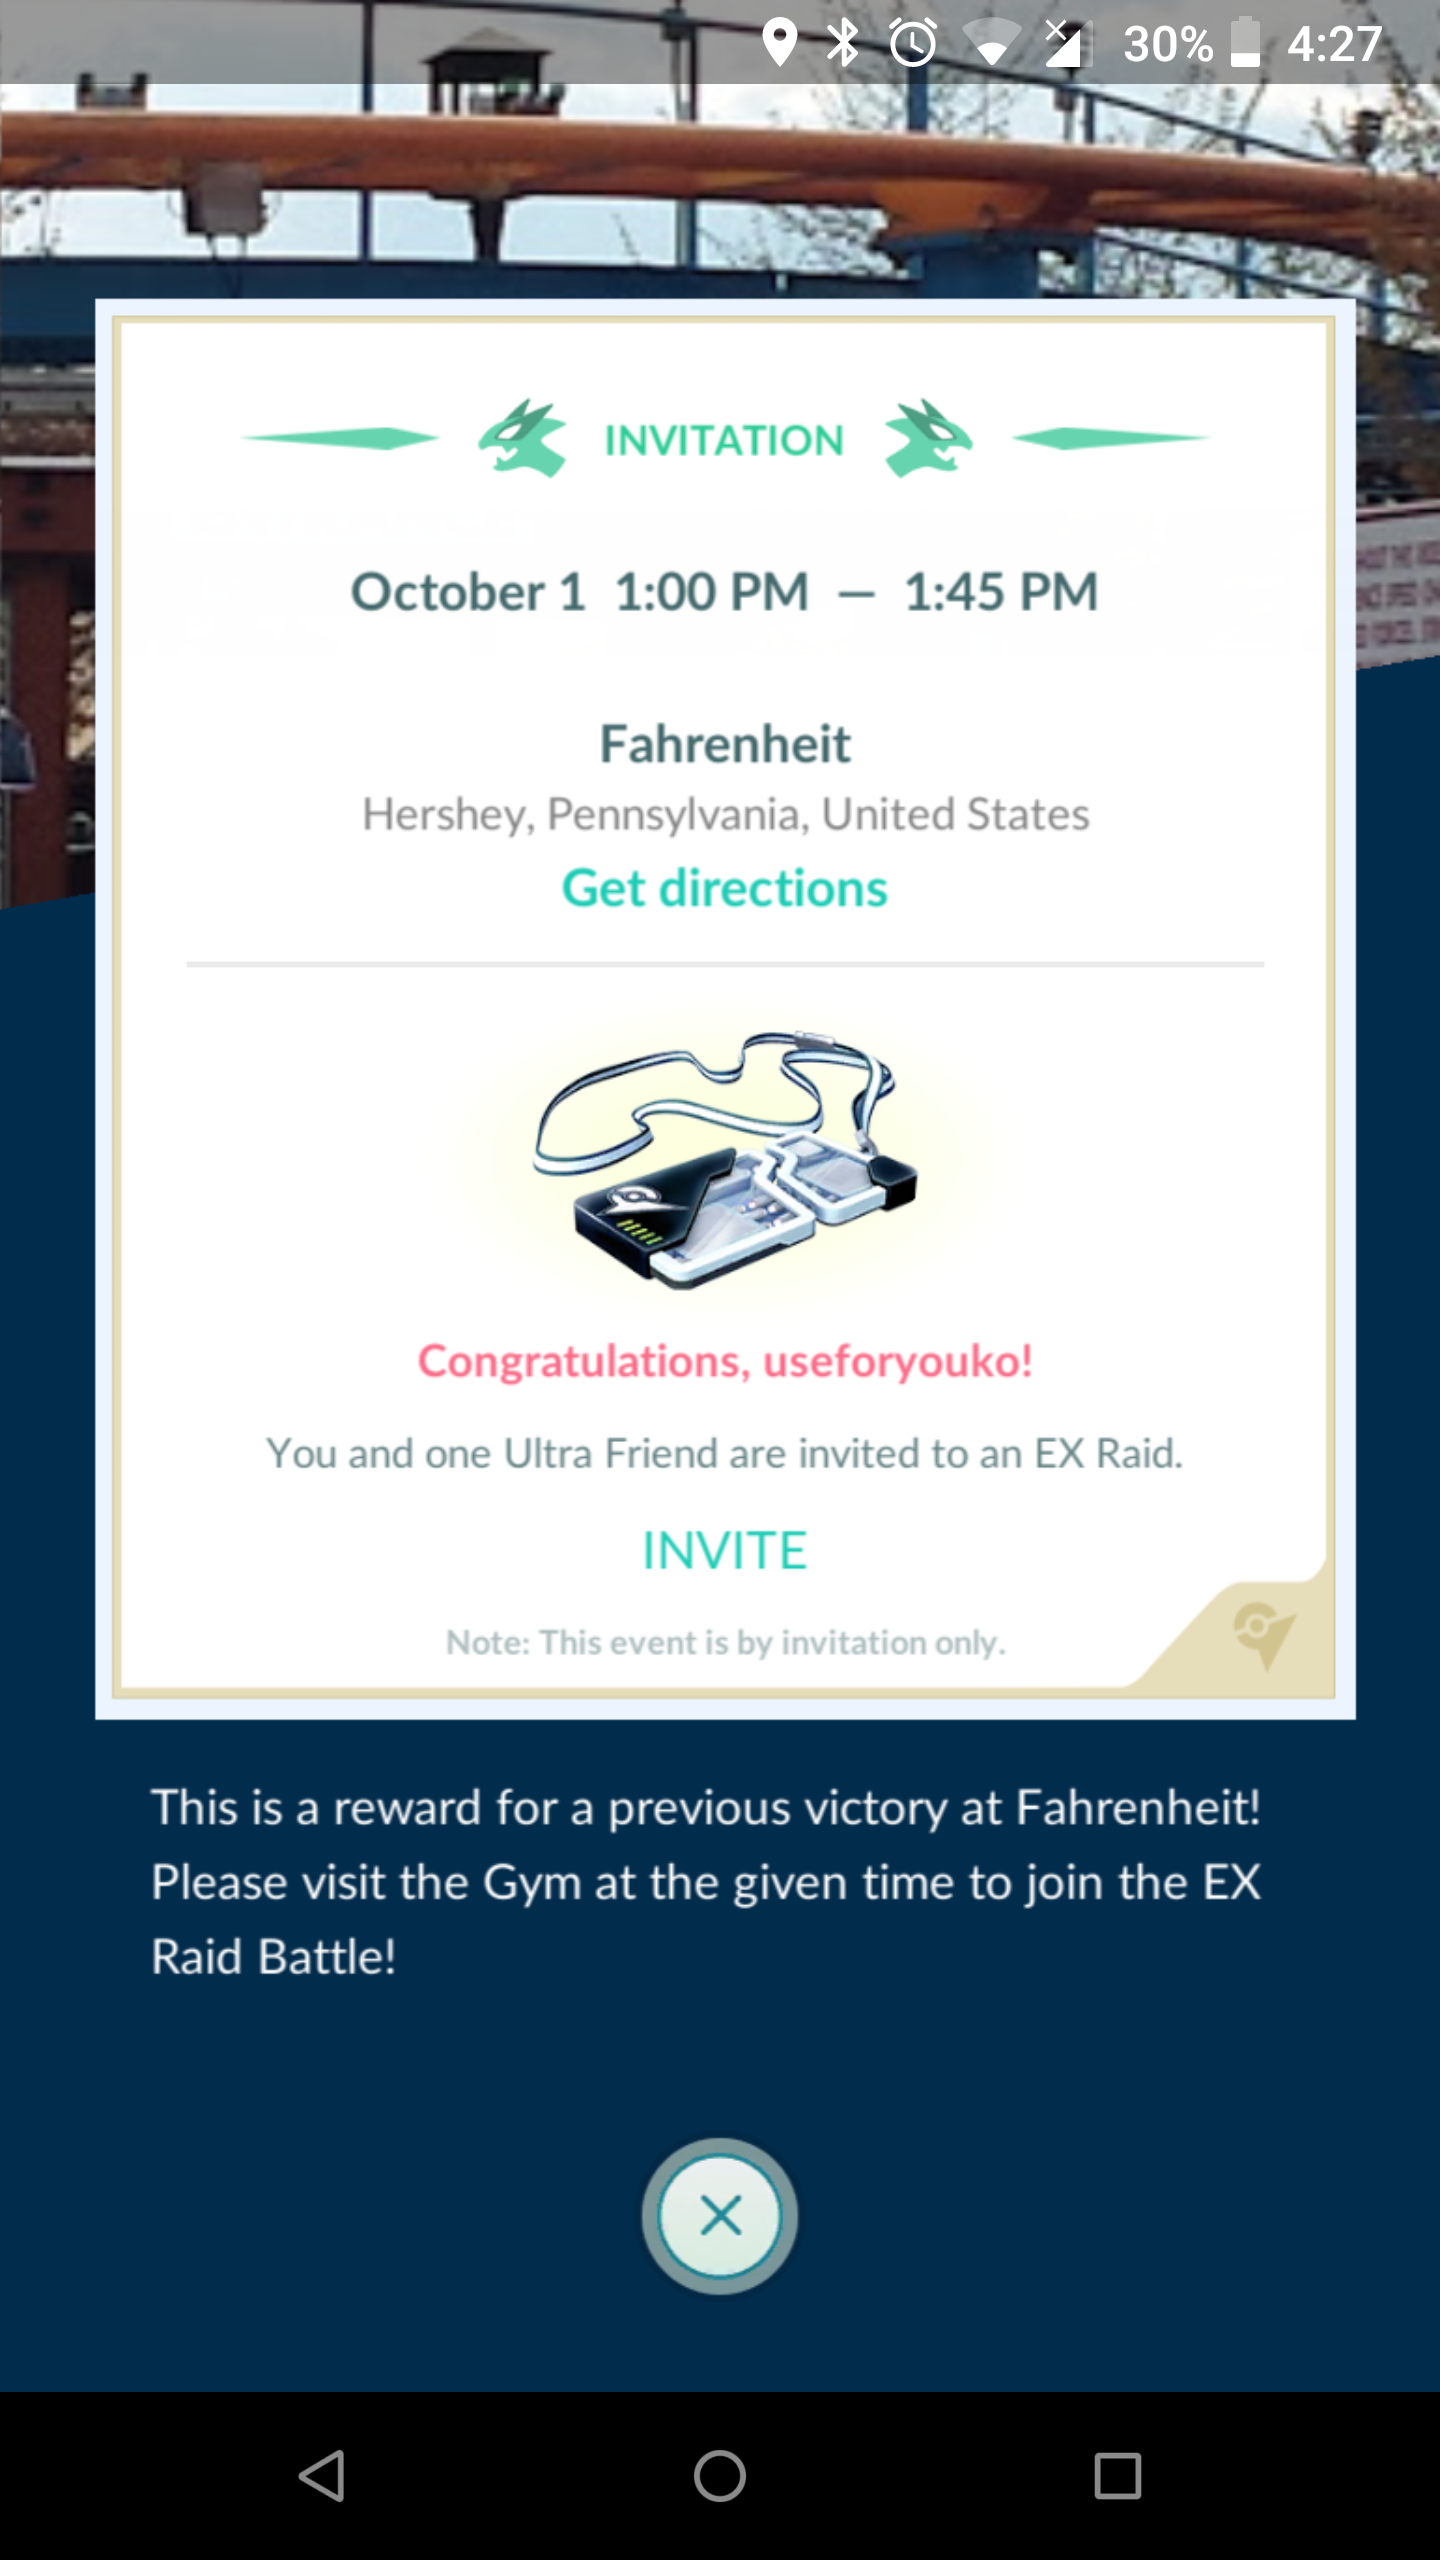
Players that win a battle against a computer Pokémon at eligible Gyms may also be rewarded with an EX-Raid Pass. These passes allow a player to return to that same gym at a predetermined time and fight a rarer and more powerful Pokémon together with other players. Screenshots of a user’s EX-Raid Pass provides a lot of valuable information such as partial photo of the gym the EX-Raid will be at, the date and time of the EX-Raid, the name of the EX-Raid gym, the city and country of the gym (not always), and finally the username of the player which received the EX-Raid Pass. The best part about users that screenshot their Ex-Raid passes is that you now know the time and place that they will likely return to the area for the EX-Raid. This makes it easier to narrow down the potential pool of subjects if you are able to surveil the same location during the Ex-Raid window.
Reverse image search results for the above example came back negative, even with the photo cropped down. This comes as no surprise as there is almost no useable information to match in the sliver of the remaining image. Using the location information along with the gym name and what we can make out of the photo, which appears to be a track of some sort, appears to be a better avenue.
Google Dorking with "fahrenheit track hershey" returned results that suggest a rollercoaster named Fahrenheit in Hershey Park.
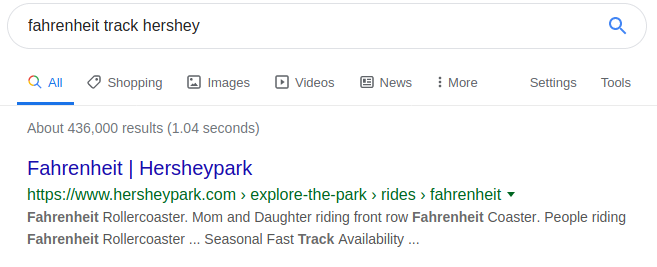
Looking at photos of the rollercoaster, the color-scheme and connection between the red and blue track pieces confirms this as a match to the location seen in the photo behind the EX-Raid invite.

Gym Badges
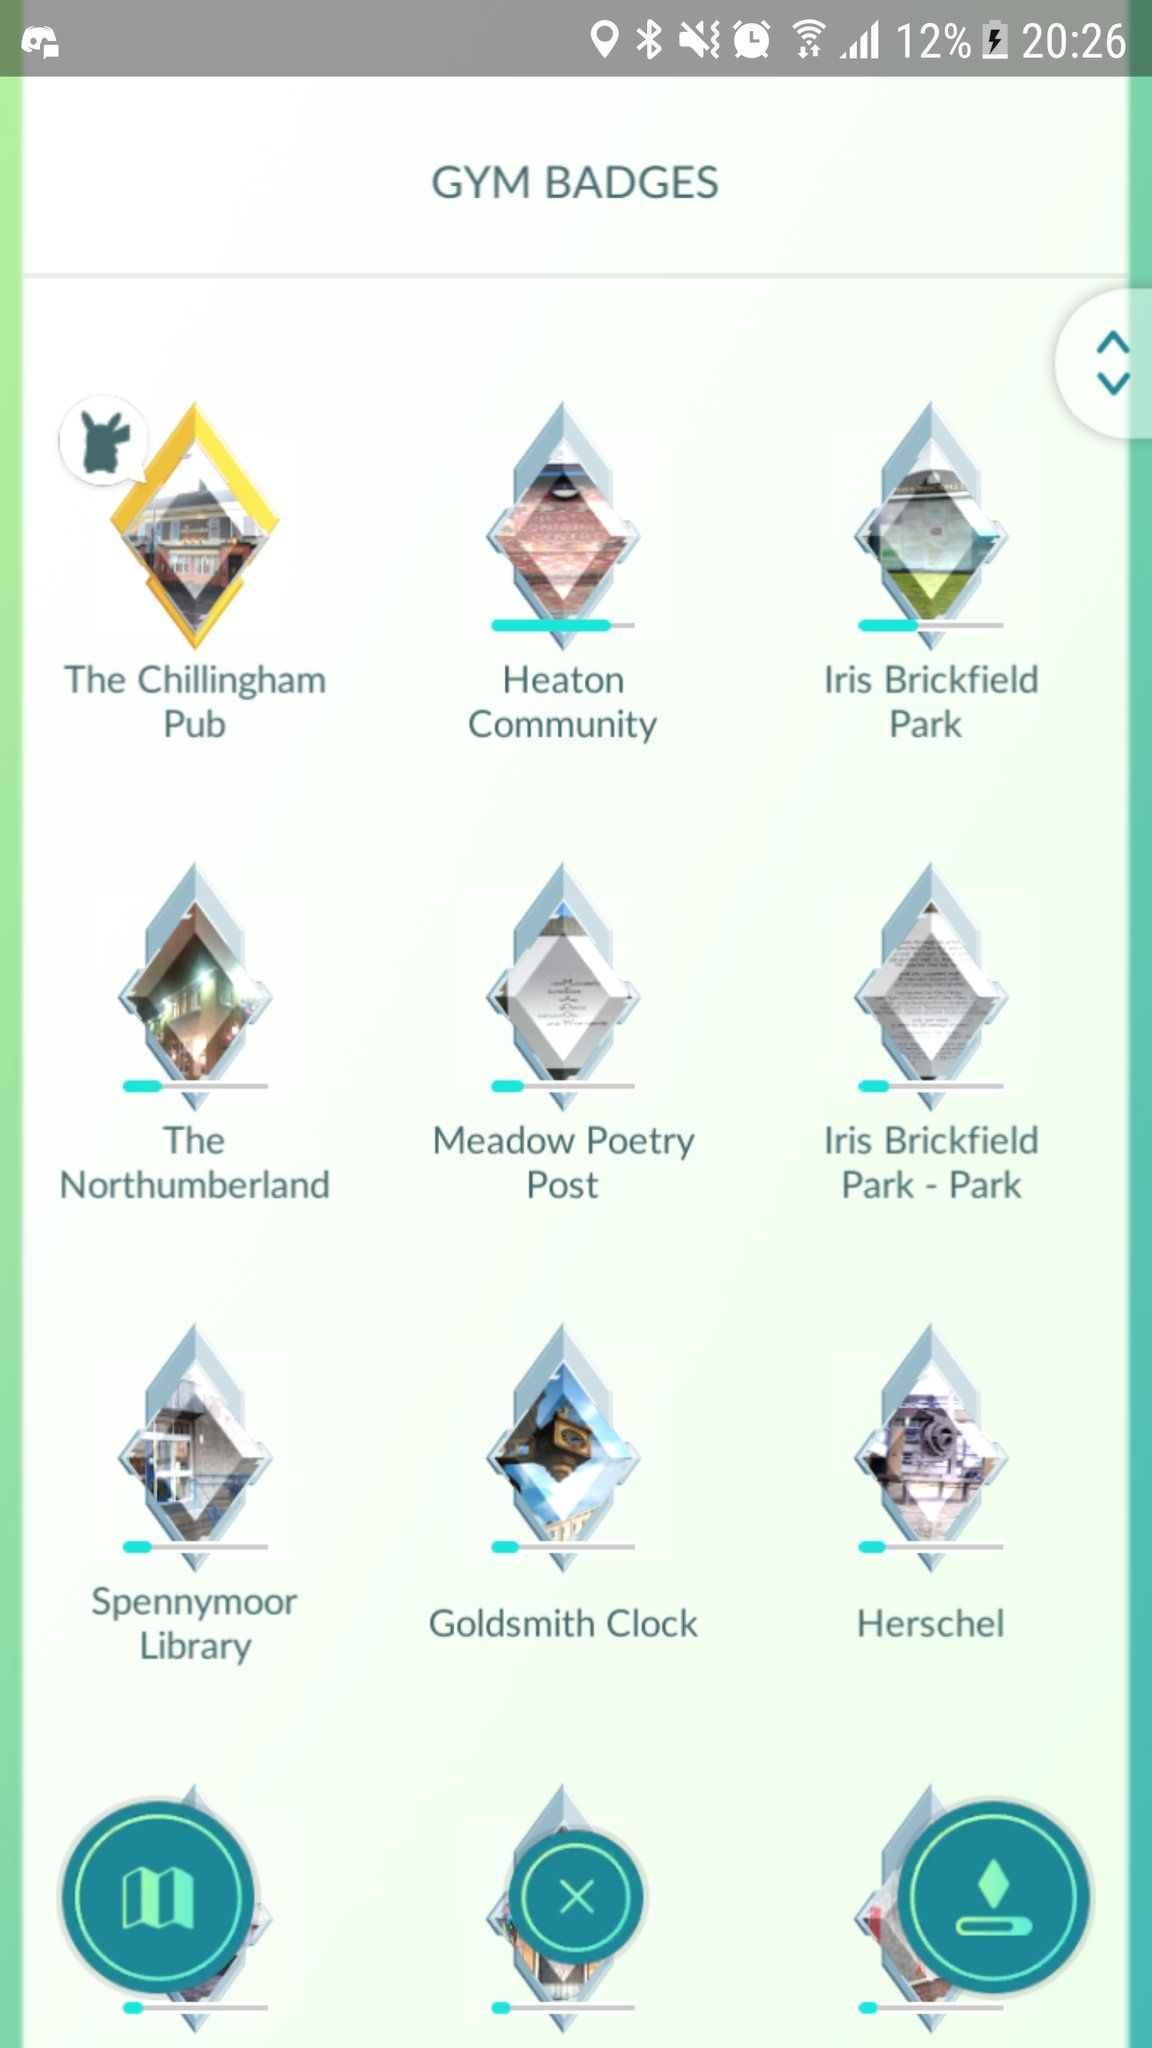
The more a player interacts with a gym the more points they get for it. These points correspond to different badge levels (bronze, silver, gold). There are two different types of screenshots corresponding to Gym badges. The overall screenshot (such as in the above example) showcases gym badges in order of most recently visited by the user. This view will display the most recently visited gyms, their badge level and points bar, as well as the gym names. They may also contain an icon indicating the user currently has a Pokémon defending the gym, or if they have an upcoming EX-Raid in one of the gyms. Clicking on any one of these specific gym badges will display a more detailed version of that badges such as the one below. This view will show a larger photo of the gym, the gym name, the user’s total activity at that specific gym, as well as the individual Pokémon defending it if applicable.
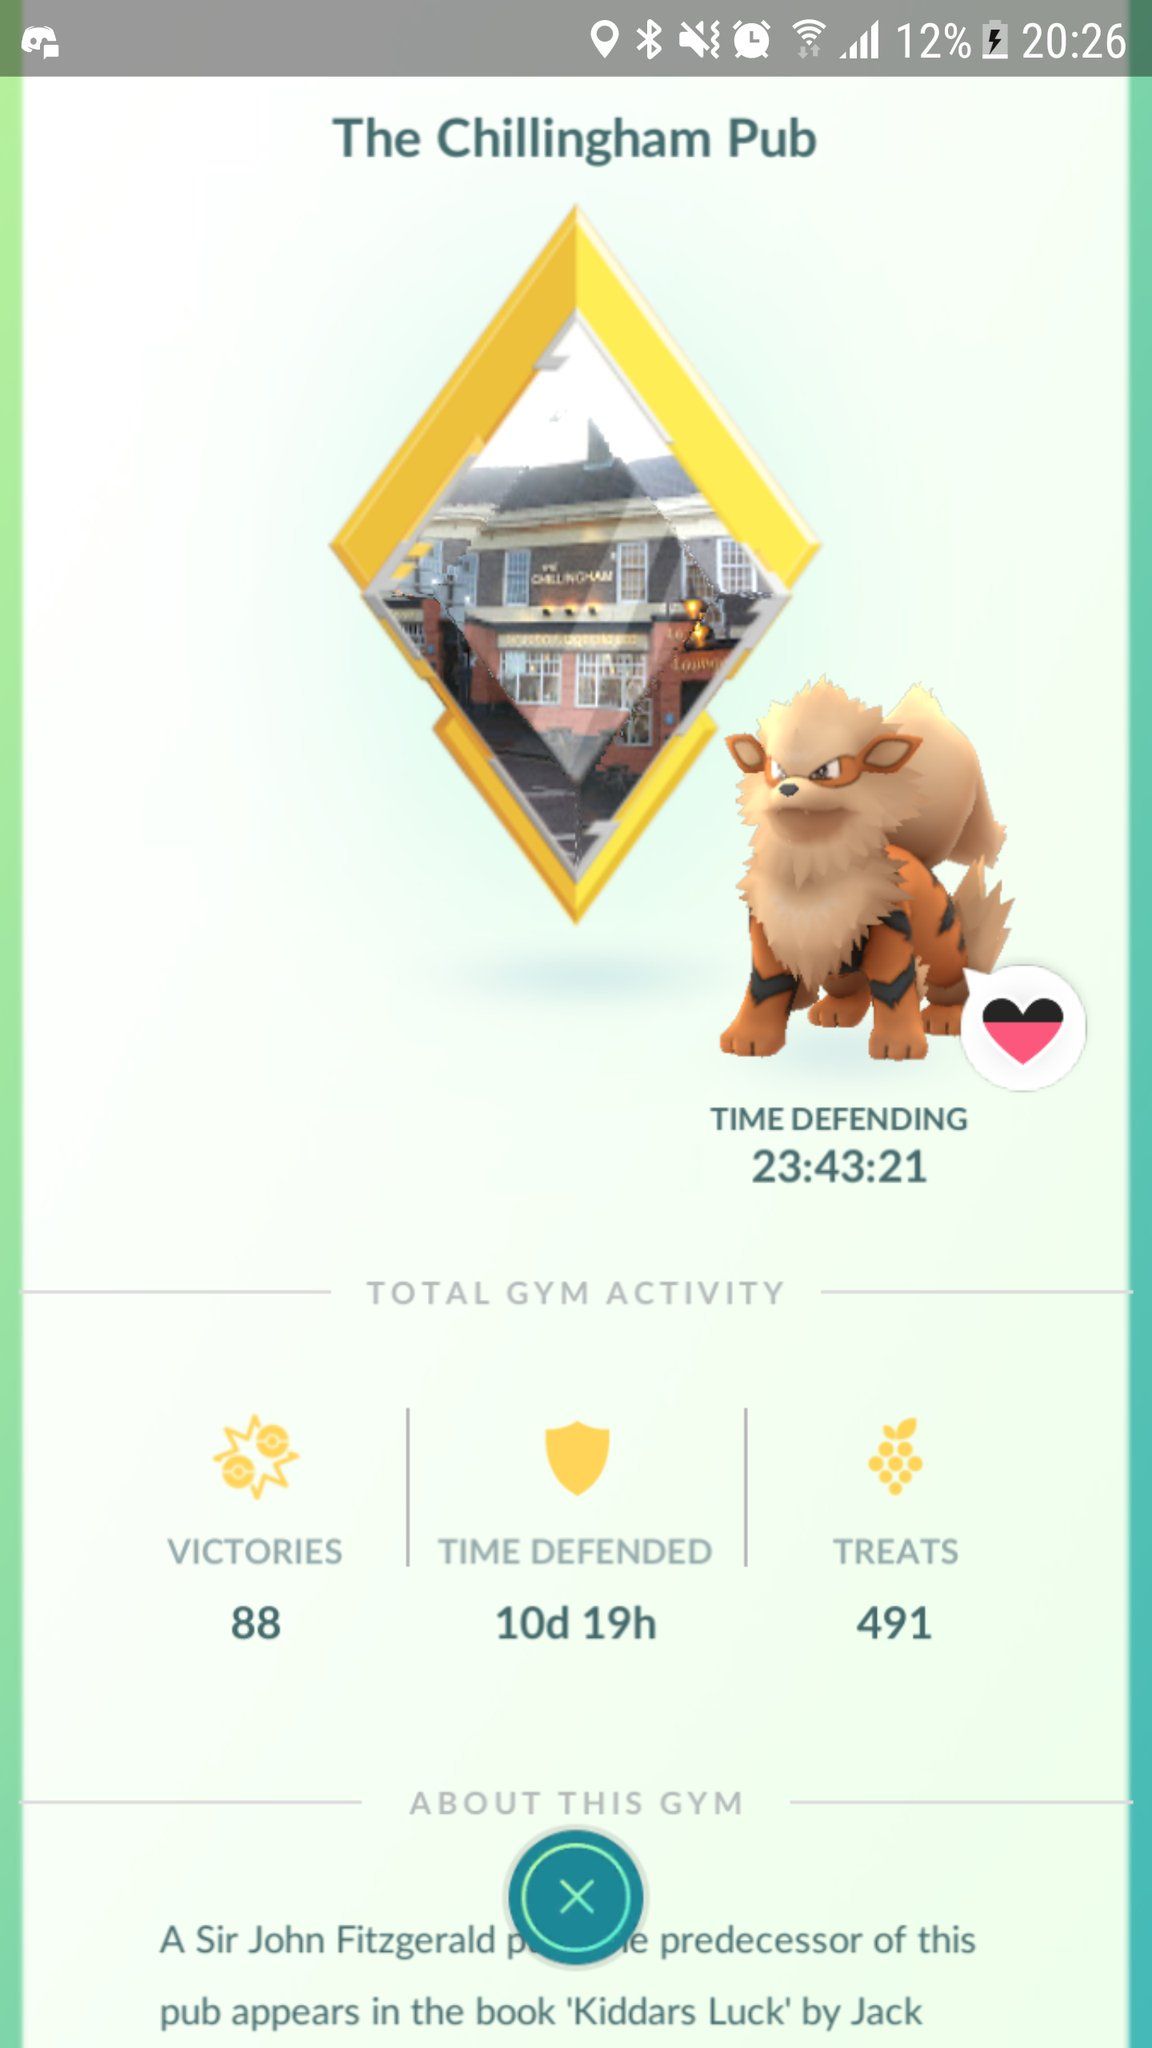
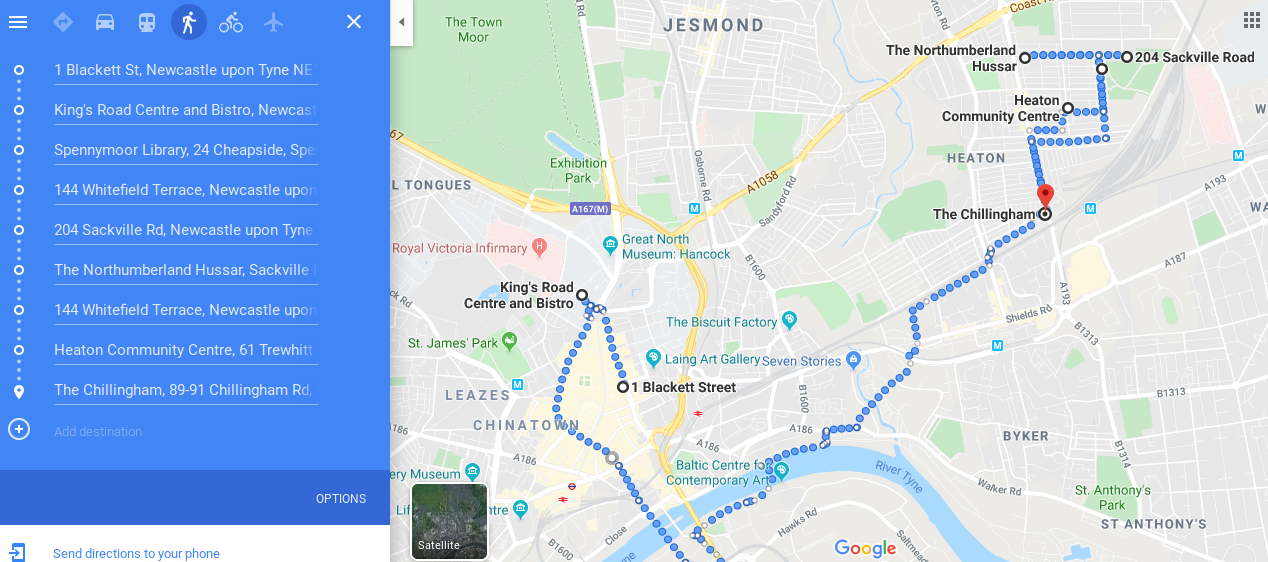
Knowing the recently visited and most interacted with gyms of a player is valuable information for reading pattern of life. Unless the user is spoofing their location, gym badges could show the route recently or commonly taken by the player in their everyday routines. In our above example, we can see that the most interacted with gym (based on it being the only gold level one) is a pub. The user might work at this pub, visit it often, live near it, or pass it regularly on their way to work and/or school. The first step to mapping this out would be to locate the pub on OSM and cross-reference it on Pokélytics or another Pokéstop map of your choice if needed to confirm the photo images match on the gym badges as on the Pokélytics map (be aware that not all are there). Also keep in mind that this will not be an exact science as these gym names can be added, deleted, or changed over time. Using these two resources I set out to individually locate and map out as many of the 9 most recently visited gyms visited as I could find.
After mapping them out it became apparent that although the user has interacted with the Spennymoor Library enough to reach silver level, it was an outlier compared to their other commonly and recently visited gyms which were all around the same area. Additionally, based on the location of one of the gyms, which was on a University campus, this may be the user’s route to an from school. Below is an ordered walking route mapped on Google (with Spennymoor Library cut off at the bottom).
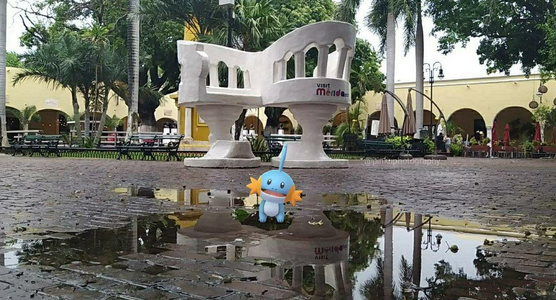
Pokémon Snapshots
These are not technically screenshots but are instead photographs enhanced with augmented reality that allows players to take a photo of their real-world surroundings with any of their caught Pokémon. As with any other photo, standard OSINT practices apply such as looking for contextual clues within the image and running it through a reverse image search. It is worth pointing out here that in most cases the Pokémon overlay will not hinder the use of a Yandex reverse image search, though Google can be hit on miss depending on how much of the image is covered by the Pokémon.
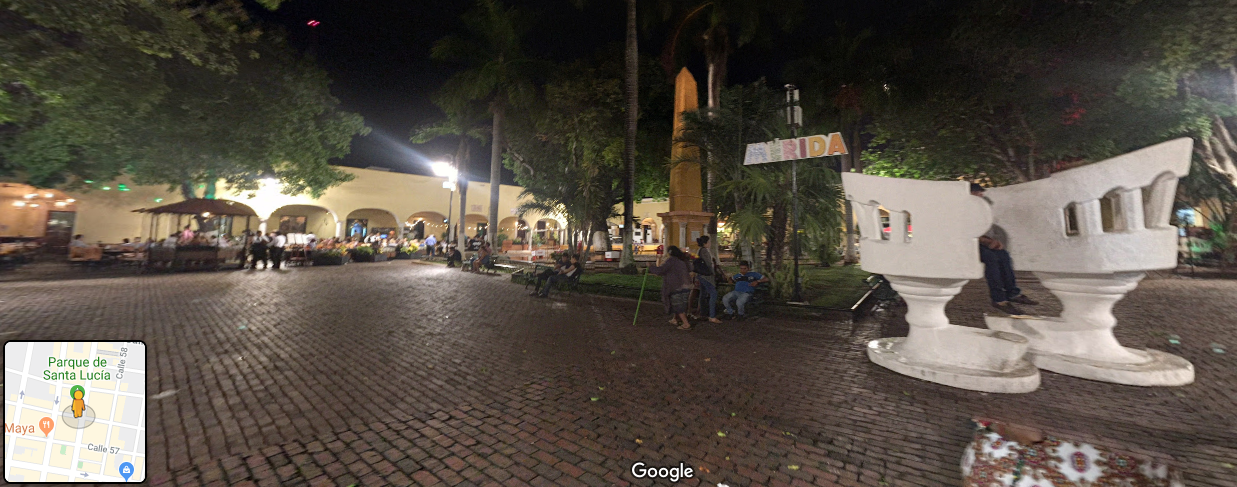
Our above example depicts two chairs with the text “Visit Merida” on one of them. Top search engine results for “Visit Merida” all point back to a Merida in Yucatan, Mexico. At first glance this area appears to be a match based on the architecture in the background of our snapshot. A reverse image search using Google found no matching photos while Yandex pulled matching images confirming our initial results.
Additional searching in Merida for a Santa Lucia Park gives us the final location (20.9710505,-89.6225523) of where the snapshot was taken.
Caught Pokémon
It is not uncommon for users to screenshot and share recently caught Pokémon, especially when they find one that is newly released, regional, or otherwise rare. Information that may be found on Pokémon screenshots includes the Pokémon name (by default) or nickname (if the user changed the default name), the general area in which it was captured, and the date on which it was captured. Different types of Pokémon spawn in different real-world environments. Additionally, some Pokémon are only found at certain times of the year during events, or in very specific parts of the world (aka “regionals”). As this can affect the usual spawning locations it is always a good idea to cross-reference any dates to check for any events that might have occurred at those times. Such screenshots may allow investigators to place a user in a certain area on a certain date. Some might also contain additional information, such as showing that the monster was received by trade from another user rather than captured on their own.
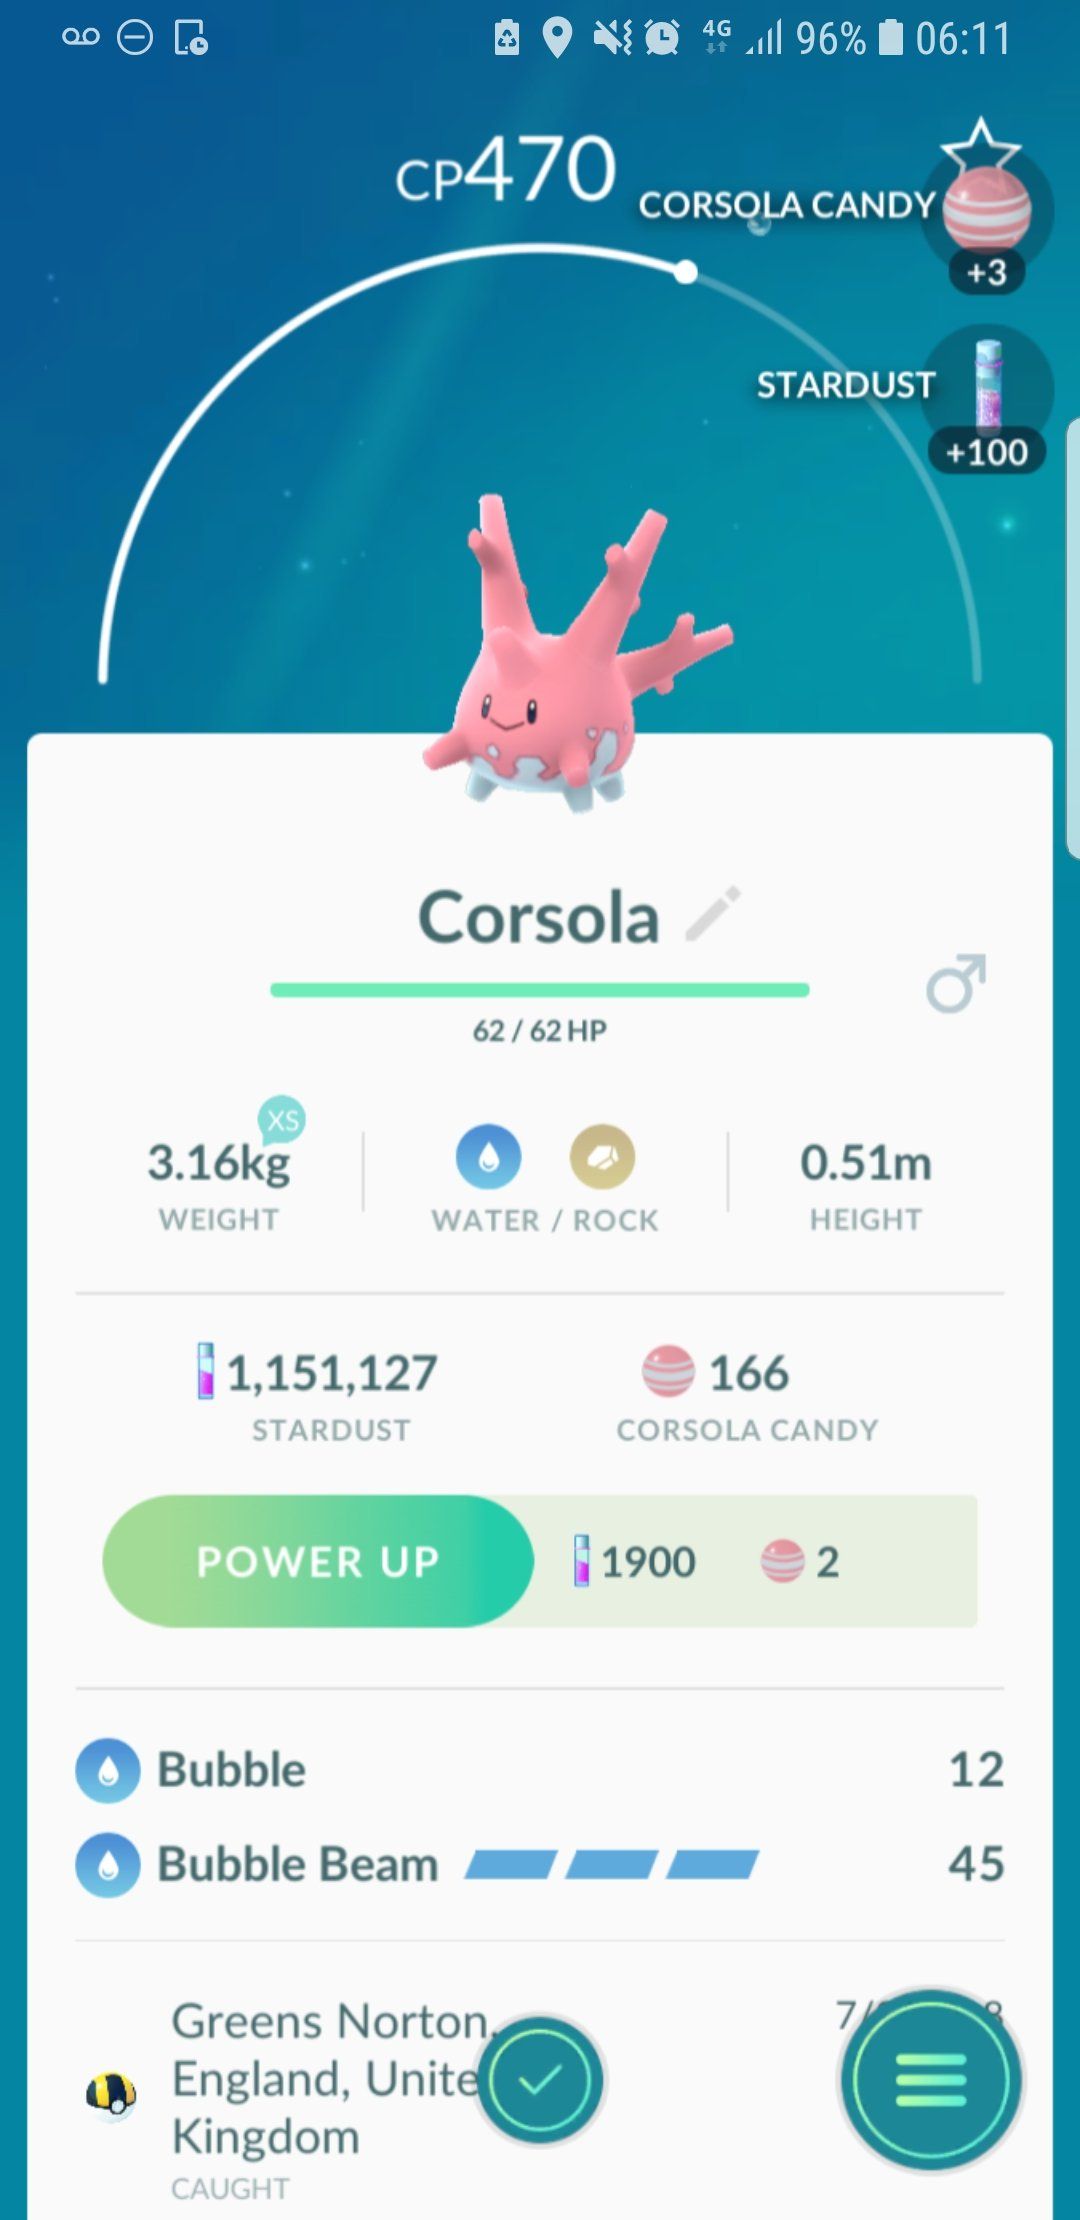
Our above example shows a screenshot of a Corsola caught in the United Kingdom sometime during July 2018. We can reference a list of regionals here and here to see that Corsola tends to have a limited area to regions close to the equator. Had the user not posted the bottom portion of the photo showing the caught location and caught date we might make a possible guess on the location in which they caught the Pokémon based on their usual spawn location. However, looking at the caught location we can see that it was in fact encountered in the United Kingdom, far away from the usual spawn points. Referencing this list of events and doing some Google Dorking I looked for events that occurred in July 2018 (what could be seen in the screenshot) and discovered that Corsola was available in the United Kingdom for a limited time per this article. Combining everything together we can now say the user which posted the screenshot above was in Greens Norton, England, UK on either July 3 or July 4, 2018.
Stats
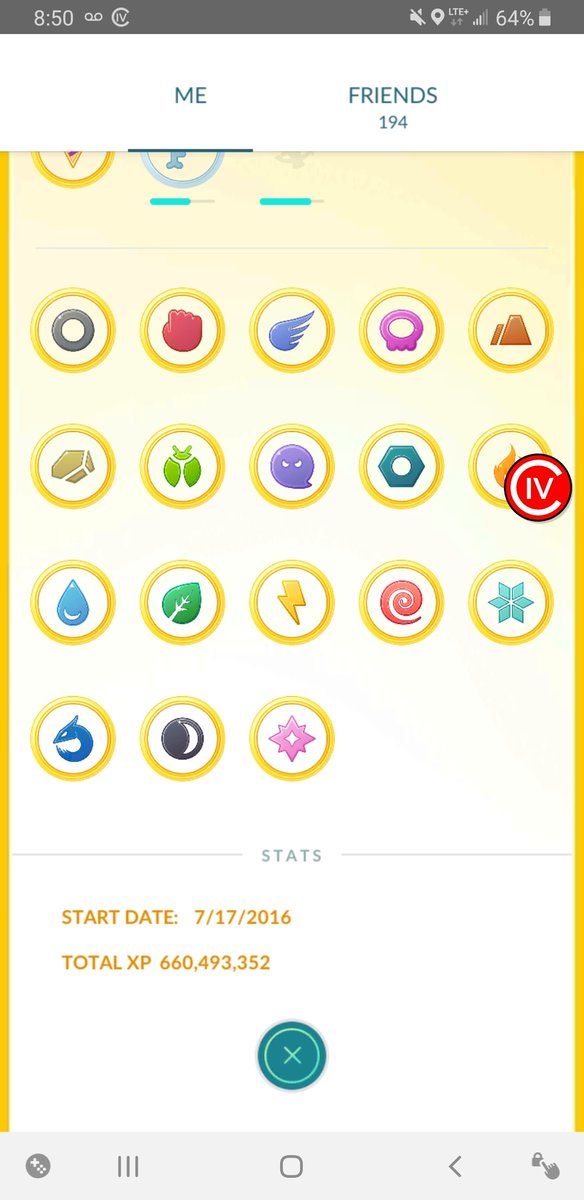
Users that screenshot their profile may also include their stats section which shows when their account was created as well as their total amount of XP (experience points). This section provides some pattern of life information and helps an investigator determine how long the account has been open as well as how active the user is.
In our above example we can see that the user created their account on the 17th of July. This tells us the user has an older account, as the game first came out in July 6, 2016. This join date might also assist in narrowing down the user’s country or region if it corresponds with the “day one” release date for a particular area. The user may have been a few days late to the party if they were in the United States, however it is also possible that they are a day-one player from Canada, which had their initial release on July 17, 2016. For a reference of release dates by country, see here. (For those wondering, the player is indeed a day one player out of Canada as confirmed by his Twitter)
Next, looking at the overall amount of XP tells us that this user is a very hardcore player as it takes 20 million XP to reach the current max level of an account (level 40). This user has played enough to theoretically level up several accounts to that level already. You can find a chart mapping XP to trainer level here.
Part I Conclusion
Now that you’ve learned how to extract a great deal of information from any number of Pokémon GO screenshots, I hope that you can put these skills to use during your next OSINT investigation. Keep in mind that for the most part these methods of investigation are not limited to Pokémon GO and can be applied to nearly any investigation in which an image or screenshot is available. Be sure to keep an eye out for the next portion of this guide which will focus on how to exploit information from Pokémon GO accounts that you have befriended in-game. As always, should you have any questions please feel free to reach out to me on Twitter.