Leveraging Street Art in OSINT Investigations
Street art can be one of many ways of geolocating an image, in this article we deep dive into street art OSINT!


Though it might not always be the case, the presence of graffiti and other forms of street art can be helpful to an investigator seeking more information about a photo or video. Street art can be one of many ways of geolocating an image, particularly in instances where the artist is well-known or maintains a social presence. As street art is often temporary and subject to change via removal, tagging over, or defacement from another artist, it also provides a point of reference to compare to other photos of the same area in order to determine the approximate date in which a photo was taken.
The examples below should assist in learning some of the basic processes for geolocating or analyzing photos or videos containing graffiti and other forms of street art for an OSINT investigation. Keep in mind that although I may not mention them specifically, many traditional OSINT and GEOINT techniques will work on street art.
Artist
Sometimes, identifying the name of the artist can be all that is needed to find out where their work is located via their social pages or personal websites. Many artists will sign work with their signature, or the piece may entirely consist of their alias such as in a tag. Additionally, some artists have styles that are easily attributed to them when found in the wild due to their repetition of characters or themes as well as unique materials or techniques. Should a user not have their work posted on their own pages, you might have luck searching their graffiti name in hashtag form or see if their account is tagged in any posts by another enthusiast. You may also try your luck in running the artist’s alias at an online graffiti database.
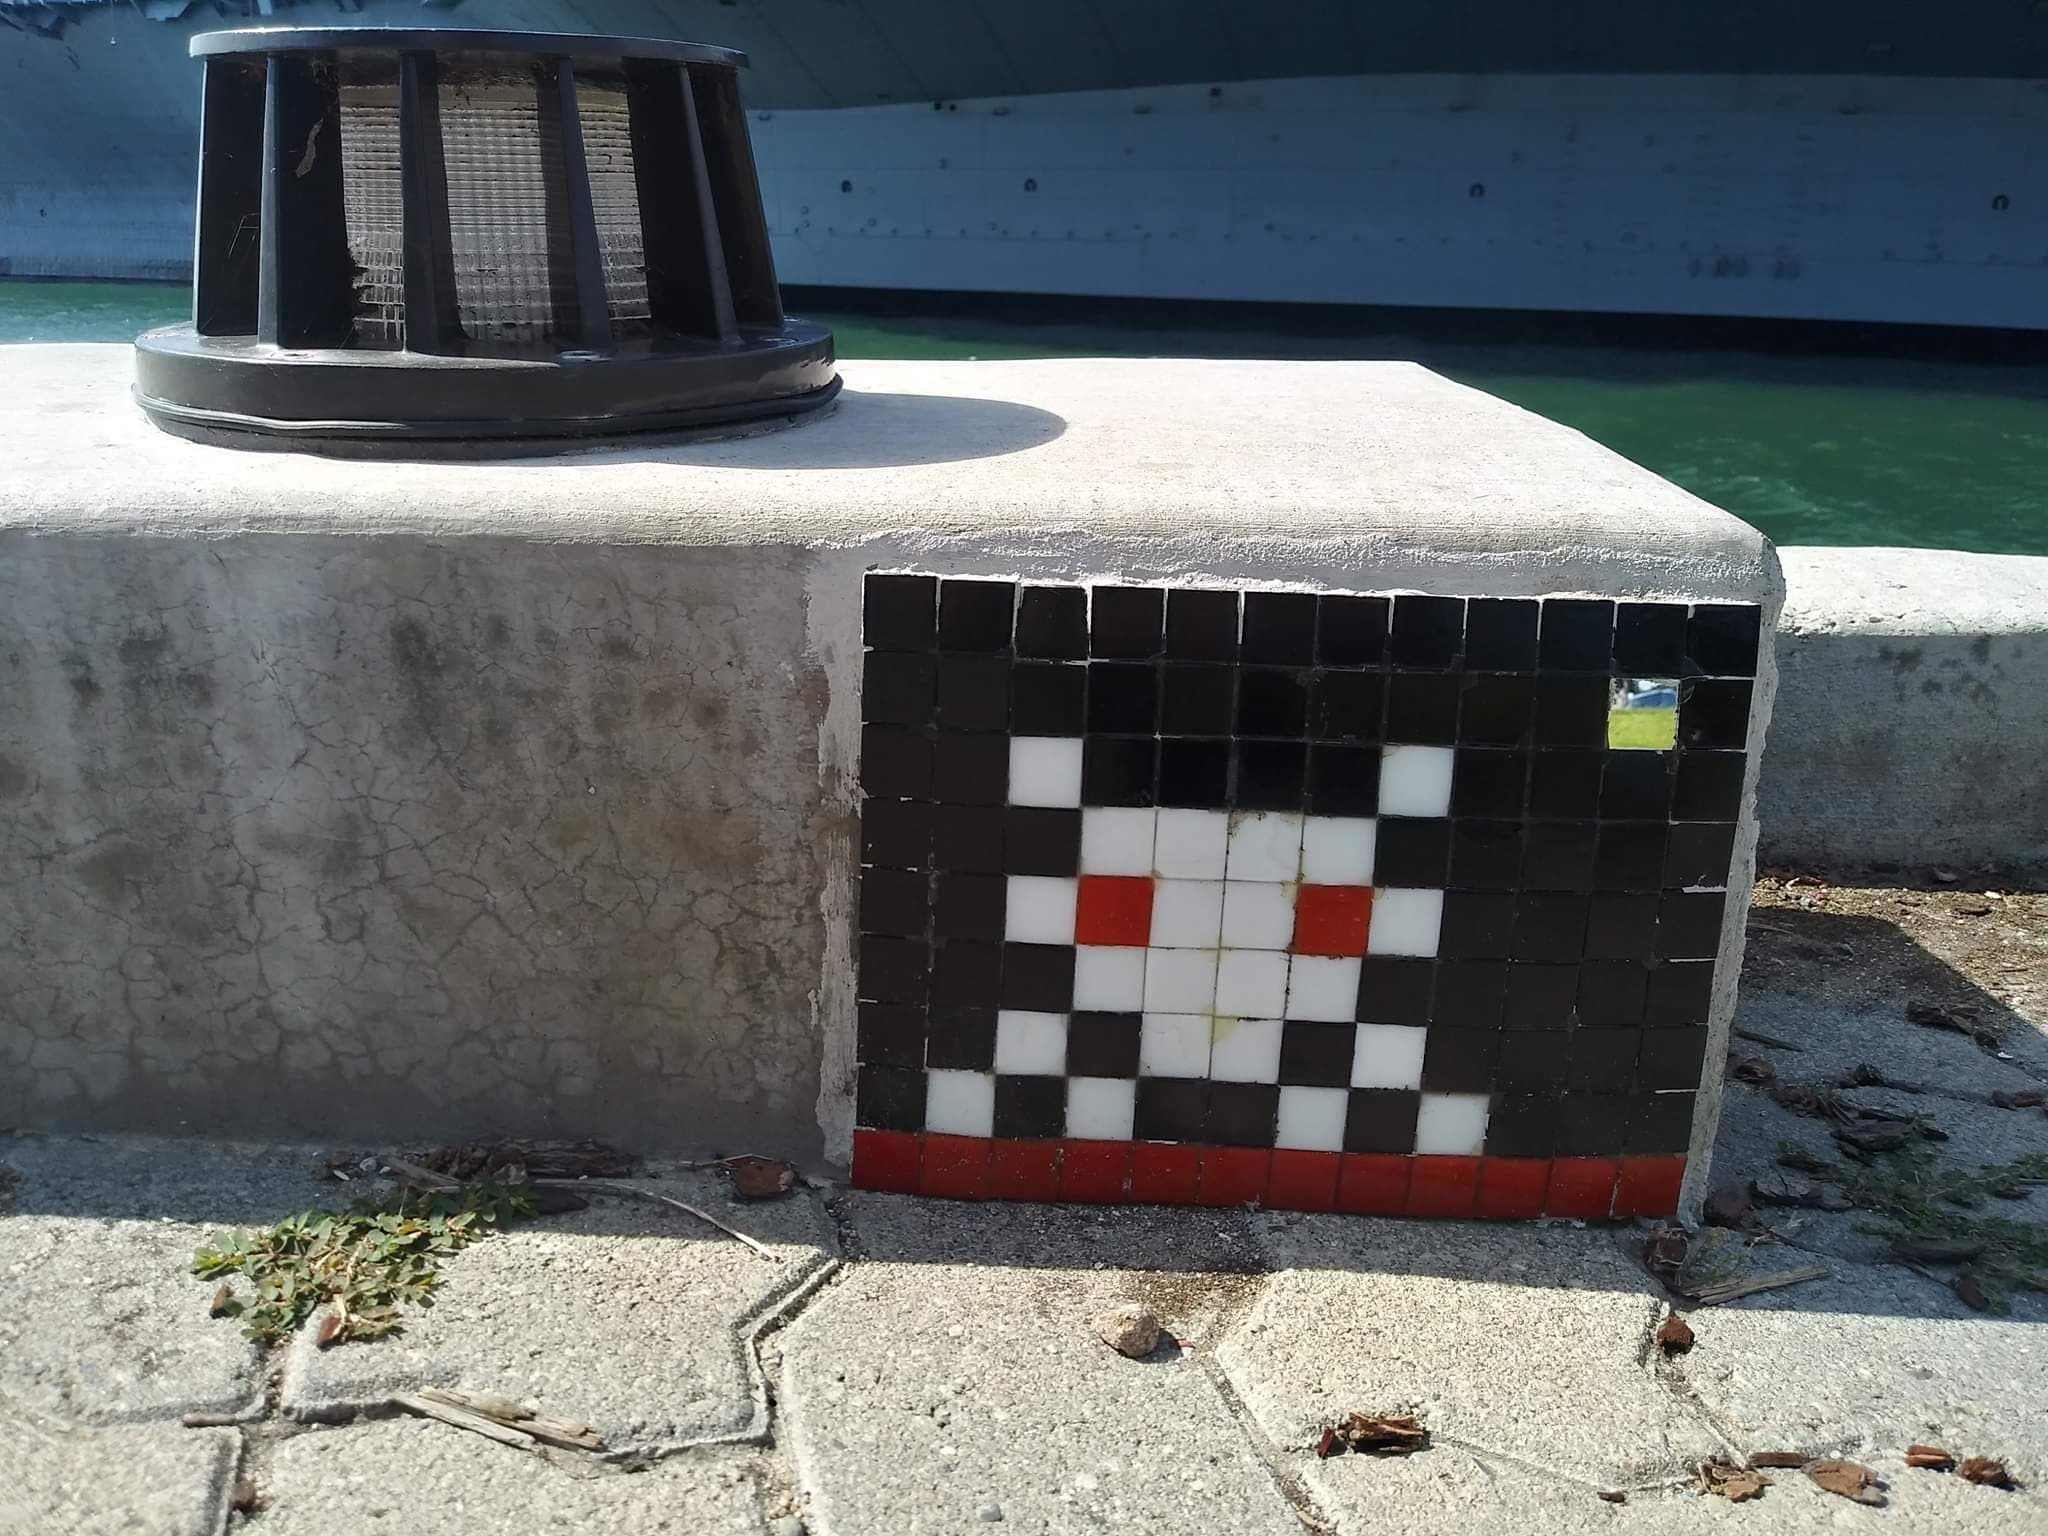
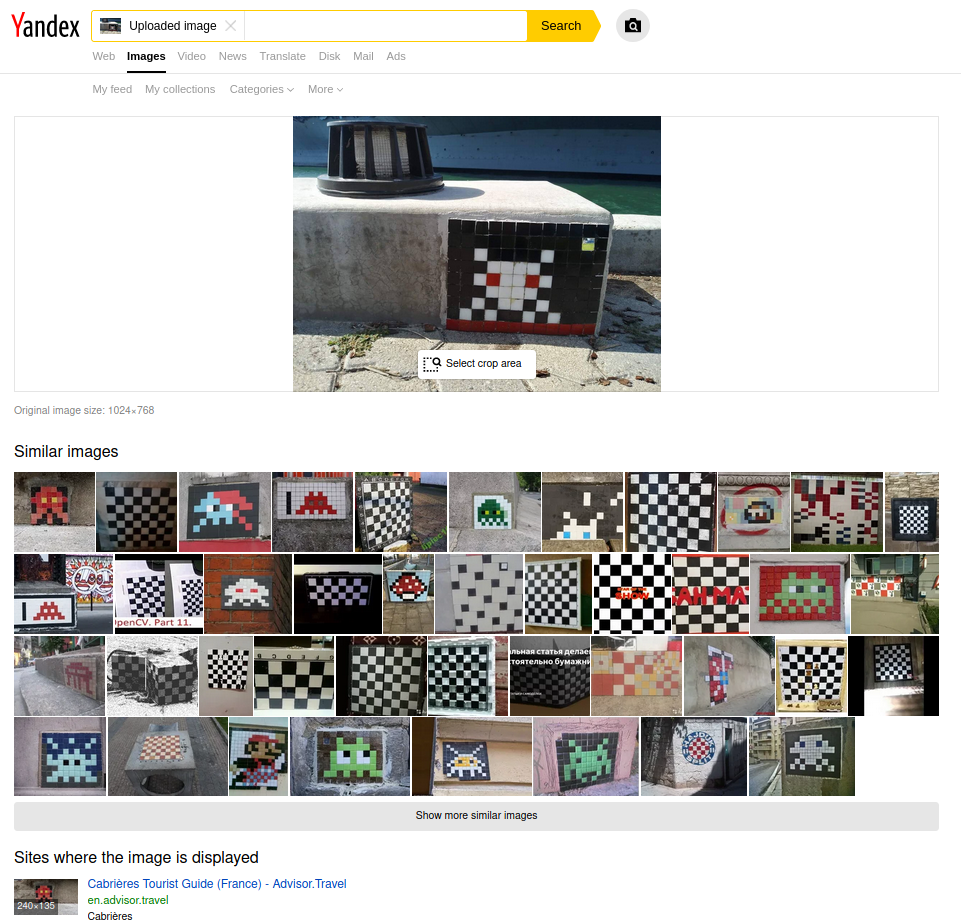
Looking at our above example, there is no signature or other indication of who the artist is. We can do a few things here. Reverse image search from Google came back with nothing, however Yandex provided us with similar pieces likely by the same artist, though no exact matches.
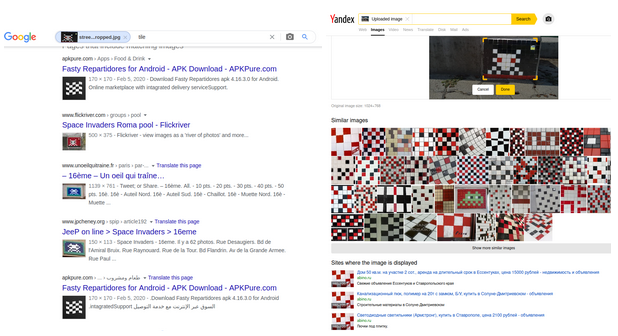
We can crop down the image to just the piece and do a reverse image search once more. This allows Google to find similar pieces, but throws Yandex off entirely.
Going off of the similar matching artwork, we can see that the artist is likely a French artist called "Invader" based on the suggested matching images.

Should there be no results from a reverse image search, one could describe the artwork in detail within Google or another search engine as well. We see that this artwork is not created using traditional spray paint or markers, but is instead composed of small tile pieces. We can do a simple Google dork of “pixel tile graffiti” “graffiti tile artist” or “graffiti mosaic artist” and all with return results for Invader.
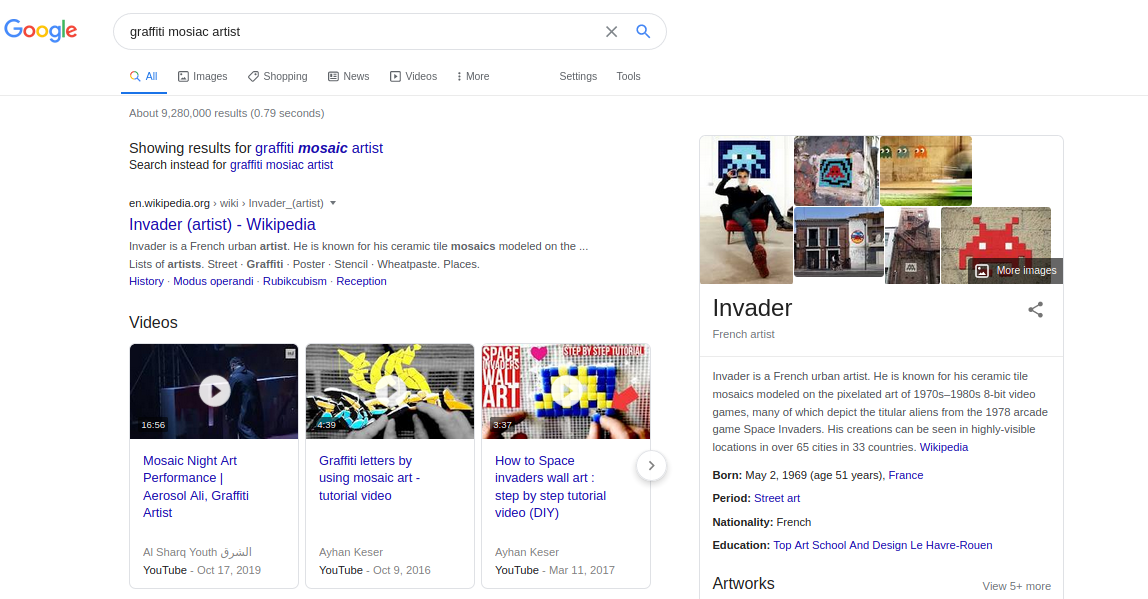
From here, we can confirm that Invader has many pieces that closely match the subject and style of our initial photo by looking at their associated images. This matches up with our earlier information collected from the reverse image searches.
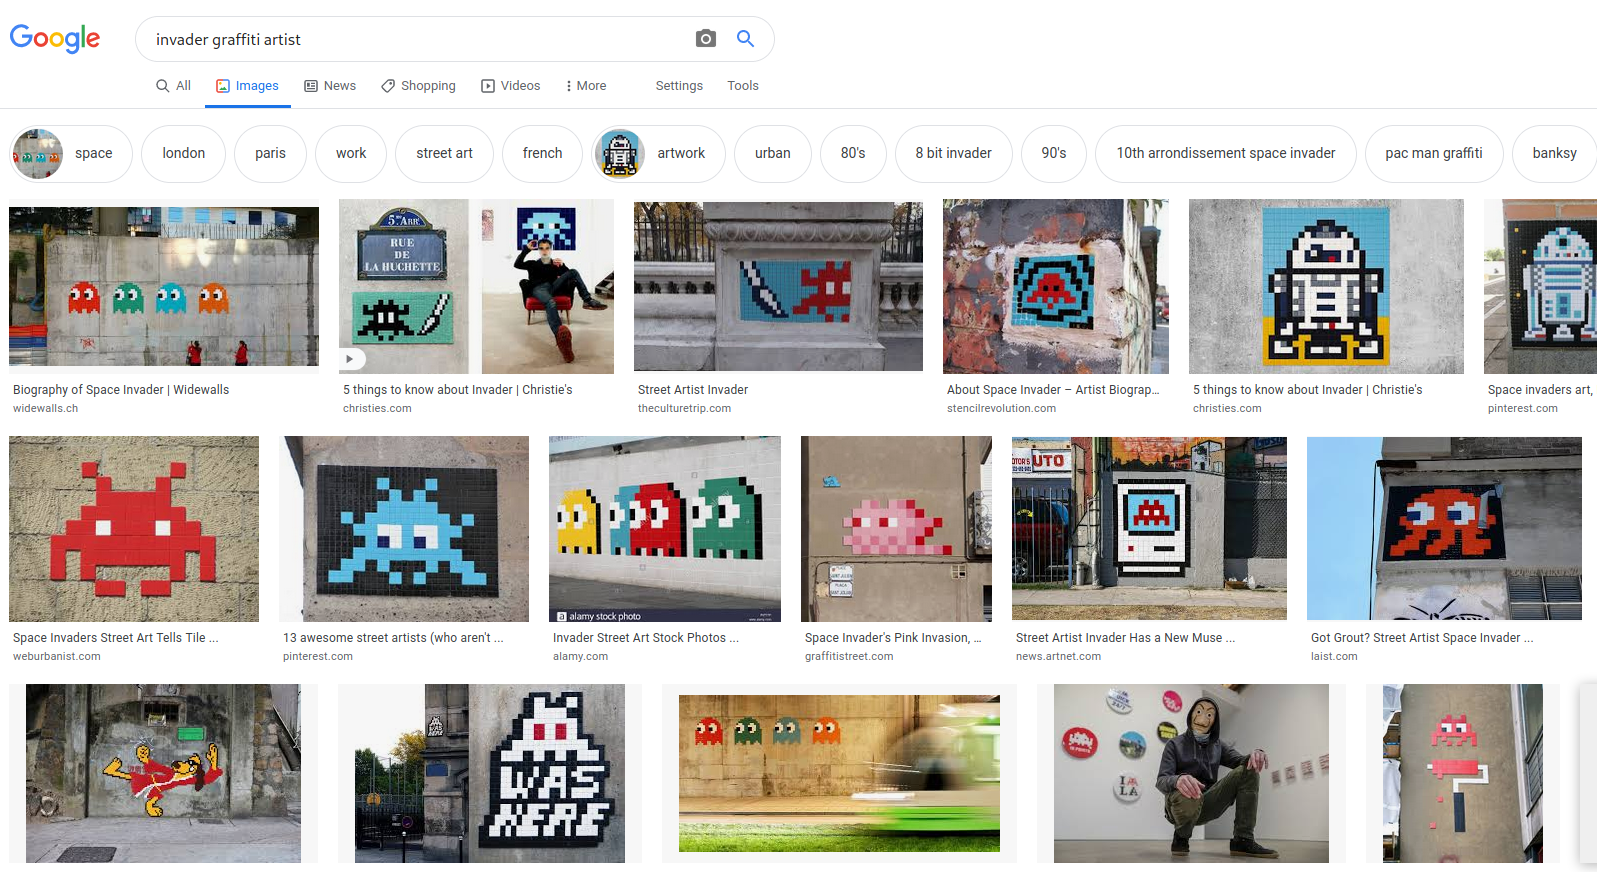
Going through Invader’s Instagram, there are a great deal of photos. On a first glance I was unable to locate the specific piece we began with. We know that one piece appears to be missing or out of place in the photo and can see some wear on the white tiles. Other than that, it is difficult to determine how long ago this piece was created as ceramic tiles will likely hold up well even exposed to the elements. Switching gears, I decided to go through the cities listed on Invader’s website to try and narrow down to the city level.
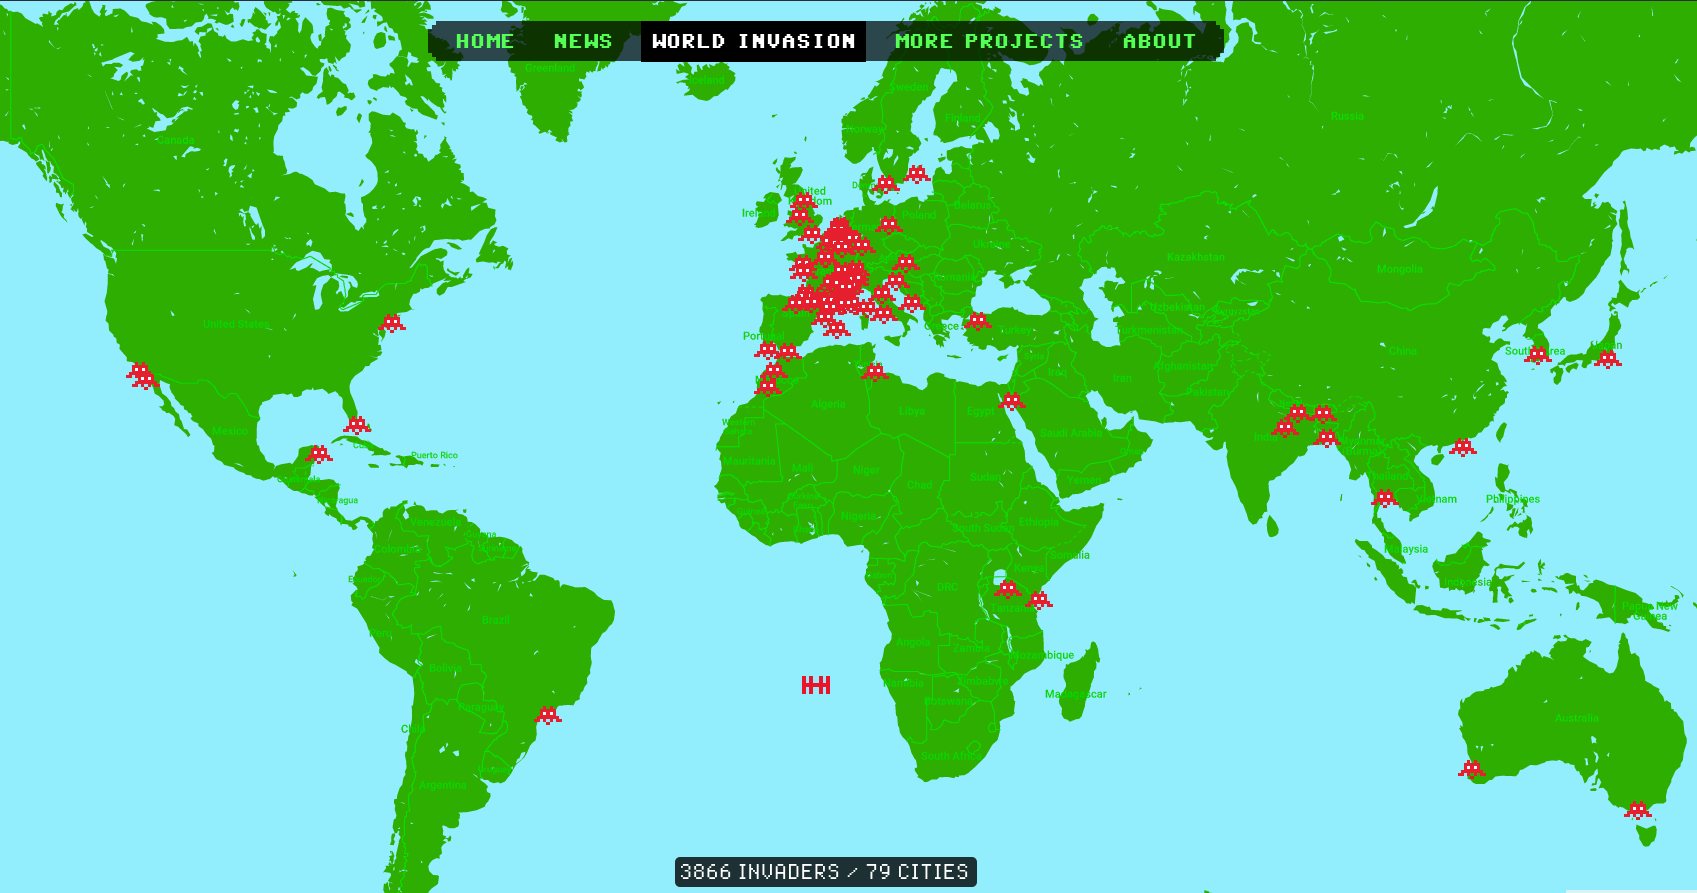
After flipping through the map, focusing first on those near bodies of water as we can see in the background of our photo, I was able to determine that the image was taken in San Diego. Going back to Google, I can add in the city to a Google Dorks of “Invader San Diego Graffiti”.
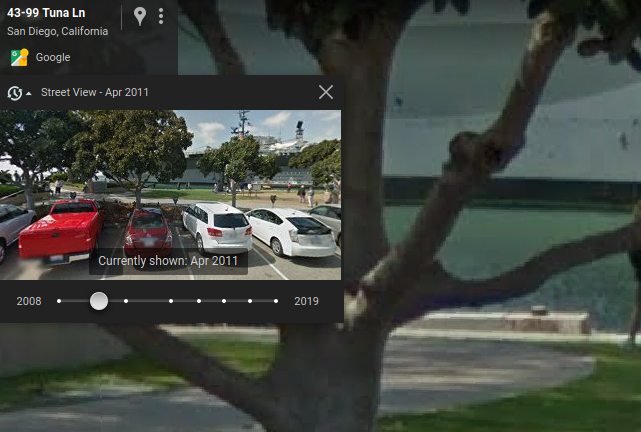
Based on news releases, we can see that the piece was put up in 2010. We can also geolocate the original photo to Tuna Harbor Park, across from the USS Midway Museum, based on this website. We now know where the photo was taken, but how about when? Well, we know it had to be sometime after it was installed around July 2010. After that, things get a bit shaky because it appears that the original piece was removed at some point.
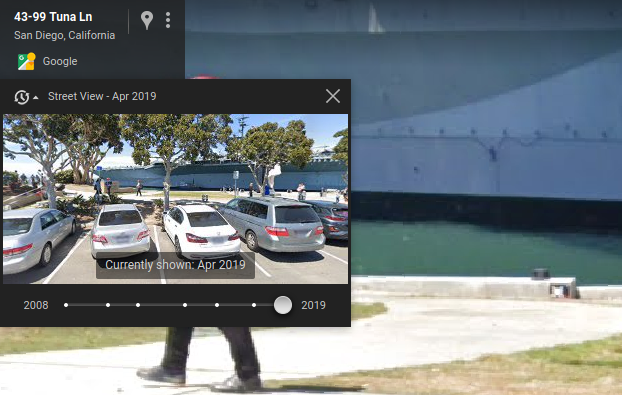
We can see that in April 2011 the piece was no longer there, though you could still see the space where it was previously installed.
Flipping through the dates on street view, we do not see the artwork appear again until April 2019, with the last photo showing it missing being in April 2018.
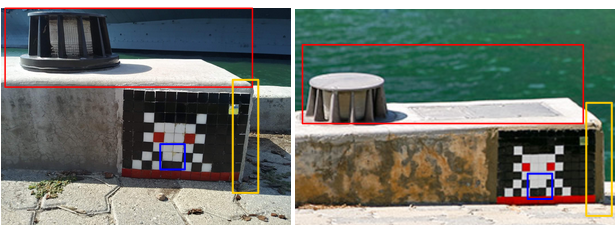
Comparing the image from Invader’s website to our example image, we can see that the top of the concrete structure differs in the two photos. Additionally, it appears that the tilework in our example photo (left) is shifted further to the left on the concrete structure whereas there is more space between the edge and the rightmost tiles in Invader's original photo (right). Additionally, the two center tiles are shifted from the right one being lower in our sample image to the left one being lower in the original taken from Invader’s website. We can also see that the while tiles in our photo has wear that might not have occurred in the very short time span of the original piece being up and having been removed.
Based on the above, we can say that our example photo is likely not the original, but likely the remake put up sometime after April 2018, putting the time of our photo sometime between this date at the present.
Artwork
The artwork itself can also give clues to where the photo was taken based on reverse image searches or by looking for local iconography, terminology, or symbolism. This can be hit or miss depending on the artwork and how well-known the piece or artist is. Keep an eye out for localized flags, phrases, colors, and terms that might provide a general point of reference. Identifying any characters in the artwork may also assist in locating the artist or finding additional references to the piece online.
As a side note, also keep an eye out for any indications of gang affiliation within the imagery. Larger gangs have representation worldwide, spotting gang imagery within graffiti can assist in narrowing down possible locations based on any known gang territories. Finally, take note of how worn the piece currently looks at how exposed it is to the elements, as well as any presence of defacement, removal, or overlapping tags or stickers, in order to gather a baseline of how old the work is.
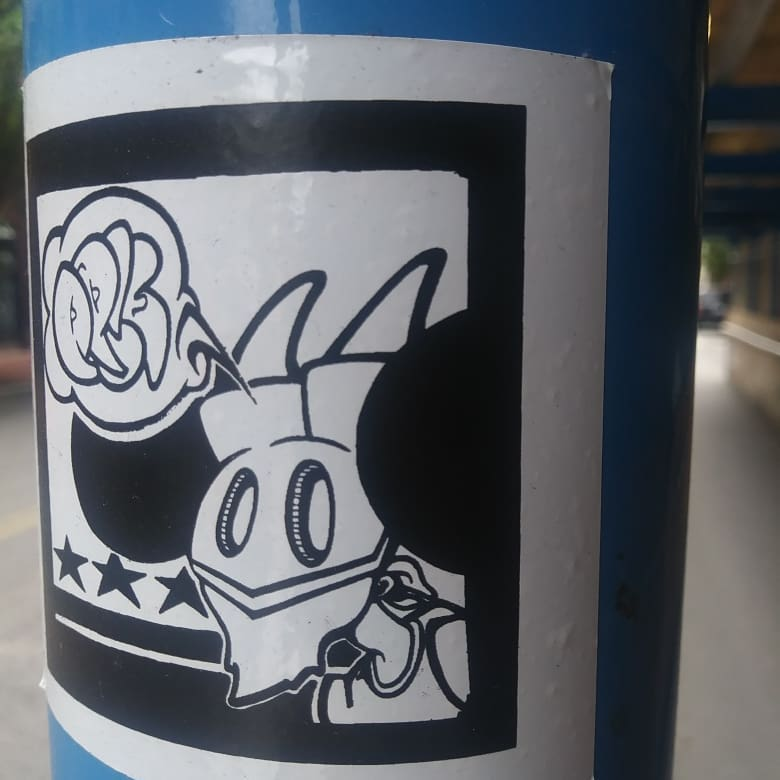
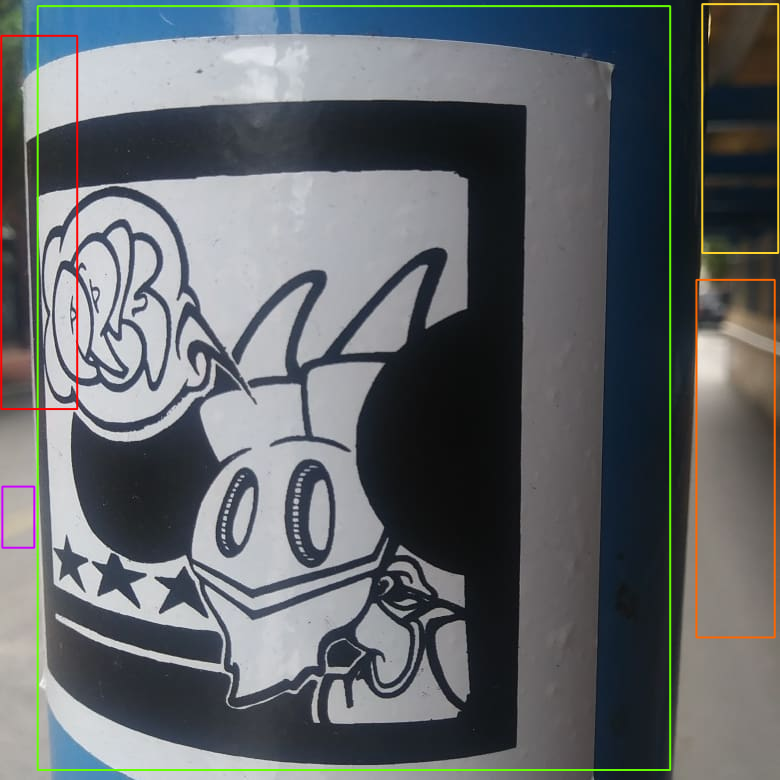
Our above example nearly caused me to not get this article written up in time. I saw the flag imagery and thought it made a great example for this section, but didn’t realize how hard it was going to be tracking down. Anyways, lets take a look at what we have to work with. First off, we have this… horned, mouse, robot bandana-clad creature. What appears to be three or more stars in a row with two stripes below it (possible flag), and some ambiguous text, perhaps PP!E, PP!R AP!C, etc. The sticker itself looks rather new, though it does have some edges coming up. There appears to be little dirt or other weathering, suggesting that the piece has not been up too long or exposed to the elements. Perhaps it is under a covered area?
Despite some cropped reverse image searches and some extensive Google Dorking, I exhausted many hours on and off trying to get some sense of information from either the creature or the text, both to no avail. Instead, I decided to focus on the flag. Now, looking at the spacing of the stars, it is not possible to rule out to chance their being more than three, with others hidden behind our character. After all, we see the stripe extends further behind the character. That being said, we do not see any stars behind the character on the right side, and the stars are spaced close together. Based on this and other stylistic observations of the design, I ruled out the flag of Chicago as a contender. I ended up feeling most confident about the flag of Washington, D.C. as it seemed to most closely match what we can see on our example.
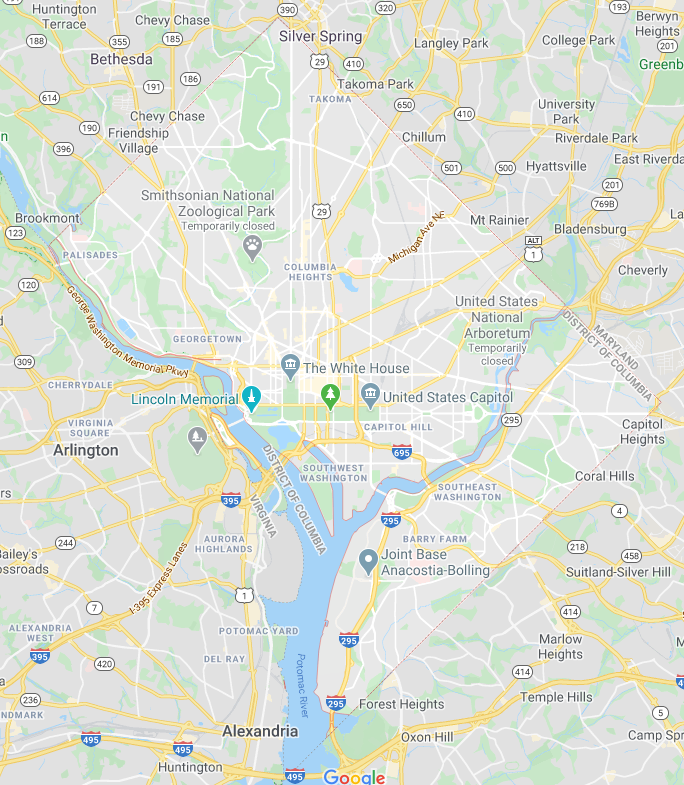
Looking at a map of Washington D.C. shows me that although we might have a possible area defined, that it will likely still take a great deal of time and effort to locate this image. This is also based on the assumption that the artwork is in D.C. After all, even if that is the D.C. flag the artist may be traveling and placing their slaps in locations across the nearby suburbs or even in different cities entirely. Going back to the photo, I marked some observations which I felt might help narrow the location down further.
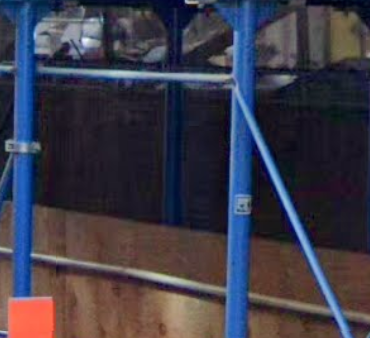
First off, we have this blue pole or post that the sticker is on. In the background, we can see that the area the photograph was taken in was covered, this could be an overpass or, as we see similarly colored blue structures on the ceiling, perhaps scaffolding for some type of construction (since matching colors) or maybe a decorated area of an underpass or bridge? Looking to the right, we see a walkway and perhaps a handrail. On the left we can see what appears to be a street and on the upper left perhaps a red-bricked sidewalk and some foliage. Finally, we can see a yellow divider line for vehicle traffic. It is important to note that based on the distance from the divider to our post, as well as the divider to what appears to be the sidewalk, that this is likely a smaller road and not one with many lanes. A yellow divider would not be present on a one way street, and four lanes would likely not fit in this space from what we can see.

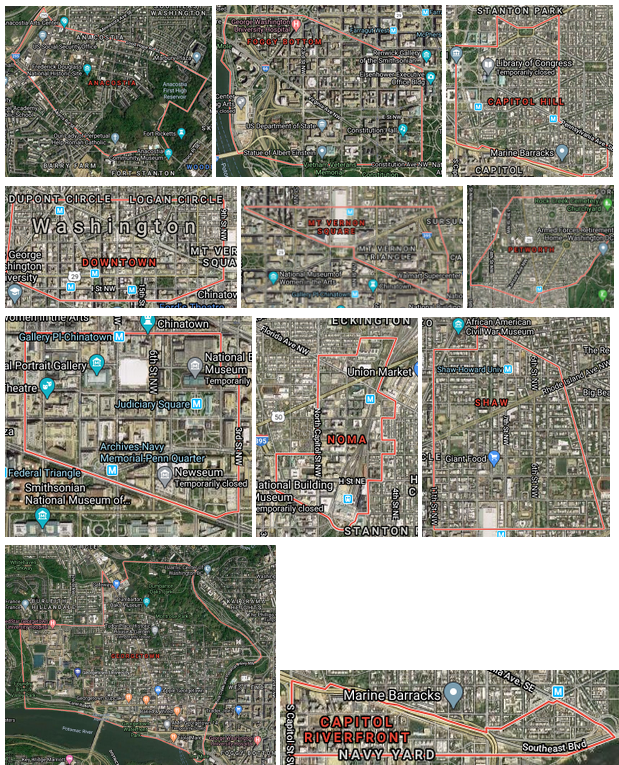
That helps a little, we now know that it is likely on a smaller road with some blue pole(s), possible construction and possible red brick sidewalk on the opposite side of the street. I started off by going through each listed neighborhood in D.C. to see if they had red brick sidewalks like in our photo. Thankfully for me gray sidewalks appeared to be the norm, though the following neighboorhoods were found to have a good amount of red brick sidewalks per satellite views: Anacostia, Capital Hill, Capital Riverfront, Downtown, Foggy Bottom, Georgetown, Mt Vernon Square, Shaw, NOMA, Chinatown / Penn Quarter and Petworth. These are still large areas, but it does narrow it down a bit more at least.
Lots of these neighborhoods were closer to the center of the city, so I started there and took to street view looking for blue color underpasses or construction scaffolding near smaller streets. I had so many false positives that I nearly lost hope. However, I noticed that based on these false positives I was looking in the right places and our original photo was likely under scaffolding as many photos show that the construction often has plywood on the edges along with a handrail similar to our example photo. I also saw that blue seems to be a popular color for the set up construction or scaffolding.
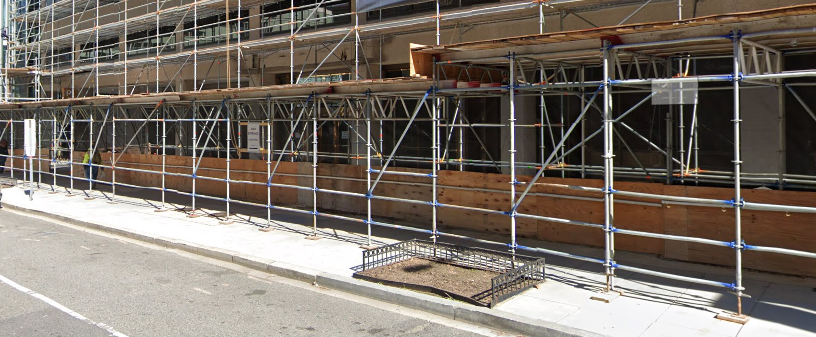
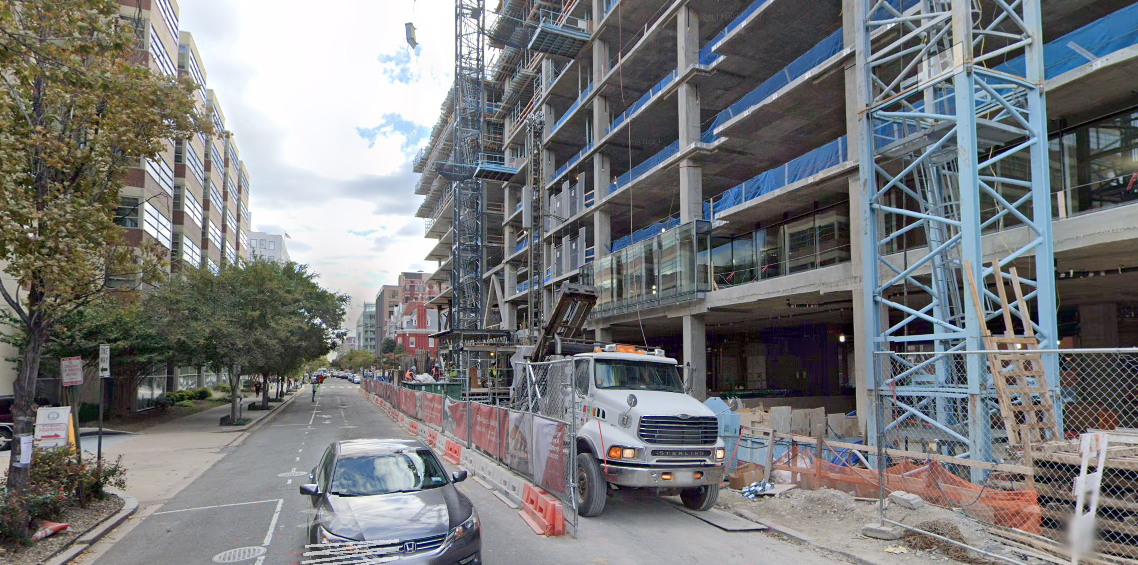
Wandering around Google Street View, I located the above photo. It seems that the scaffolding that covers over a walkway near a construction site matches the blue color of the post in our example. Digging into additional sites, I was able to determine that this color scaffolding seemed to be a local favorite of a construction company known as Clark Construction. I was able to go through their website and associated D.C. projects and then cross-reference the nearby street views. Eventually, I found a match for our example photo from nearby their project at 800 K Street.
The nearby area shows that everything matches our initial assumptions, with the exception of the street size which appears to be a four lane with one lane under construction.
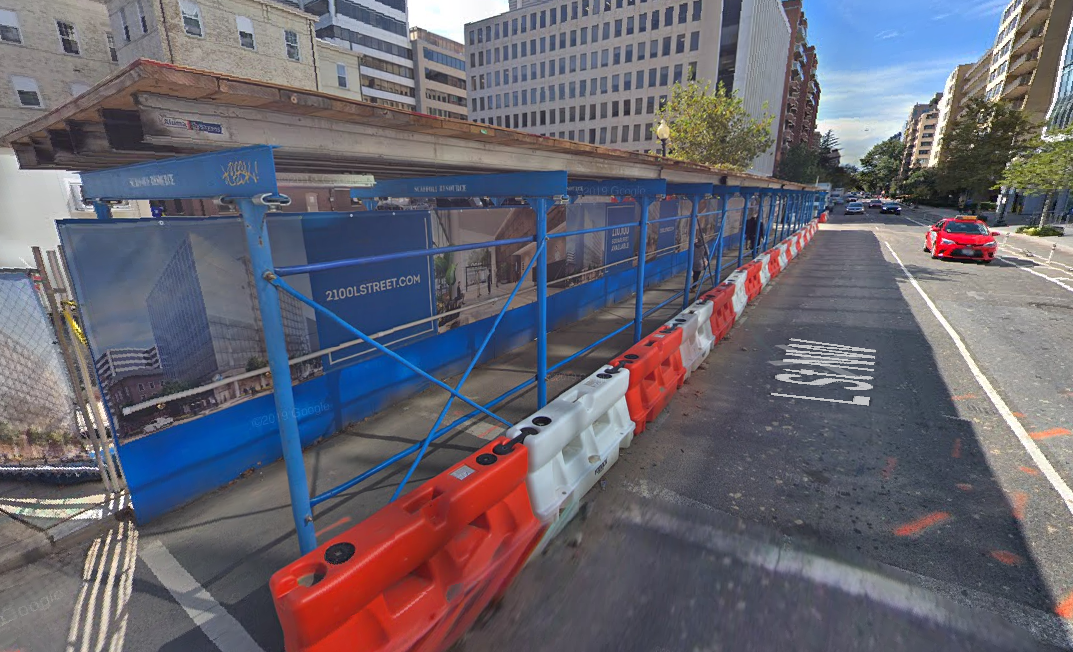
Had we not had our initial clue of the Washington D.C. flag, it is certain that we would never have been able to geolocate the above photo. Next is to try and approximate the time in which the photo was taken. Based on their website, the construction company states that construction was completed in 2019, however it does not give an exact date, though another source states it was completed in the end of 2019. Without any other points of reference, we can only say that the photo was taken prior to 2019.
Canvas
The canvas is often the most under-exploited bit of information of the three, but keep in mind that the item(s) in which the piece is created on can offer clues as to the general location. The biggest OSINT benefit to analyzing the canvas is that it offers great insight into the time in which the piece was created. Take special note of materials and any overlapping objects, whether stickers or other pieces of graffiti.
Some items that are frequently used as a canvas for street artists, such as small signage, may be easier to replace than to clean up. Any signs of defacement, removal, or tagging over can help build a chronology for how the canvas changed over time. Temporary structures, such as those associated with construction, may have a short time frame of being up while more permanent structures in high traffic areas may have multiple images within Google Street View for comparison.
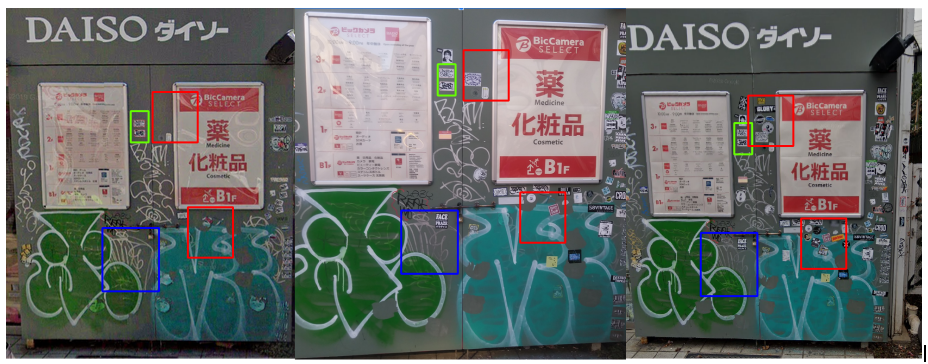
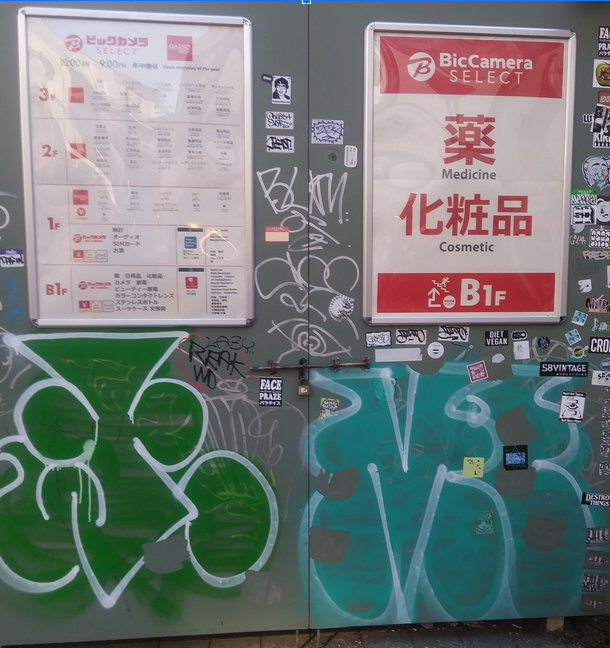
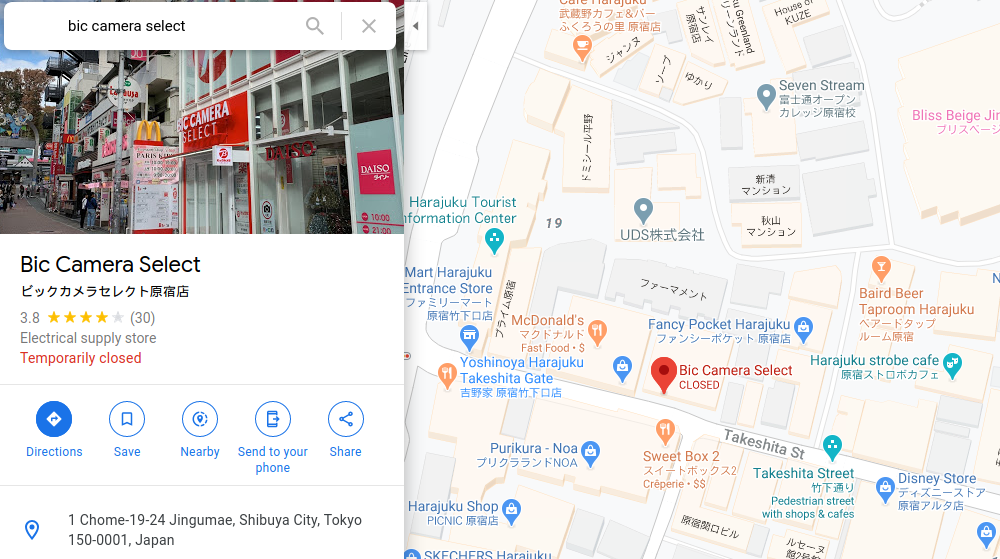
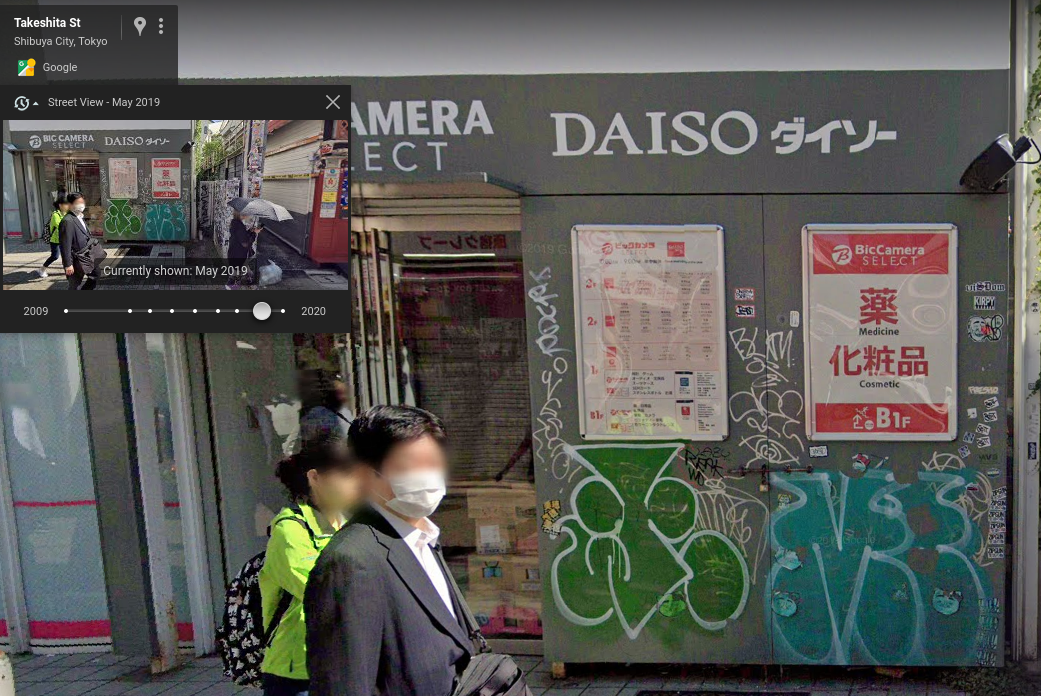
Our above example shows what appear to be locked doors or panels with two signs on the front of them. The signage provides enough information to quickly determine that the photo was taken in Japan, despite the large number of English stickers. These stickers also suggest that this is a heavily trafficked tourist area in Japan, one that would bring in outside street artists that use non-Japanese slaps.
It comes as no surprise that a reverse image search came back with negative relevant results on Google, Yandex, and Bing. Searching results for “Bic Camera Select” in maps immediately take us to a location on Takeshita street in Harajuku, Tokyo. This meets our earlier notes about being a touristy area popular with westerners.
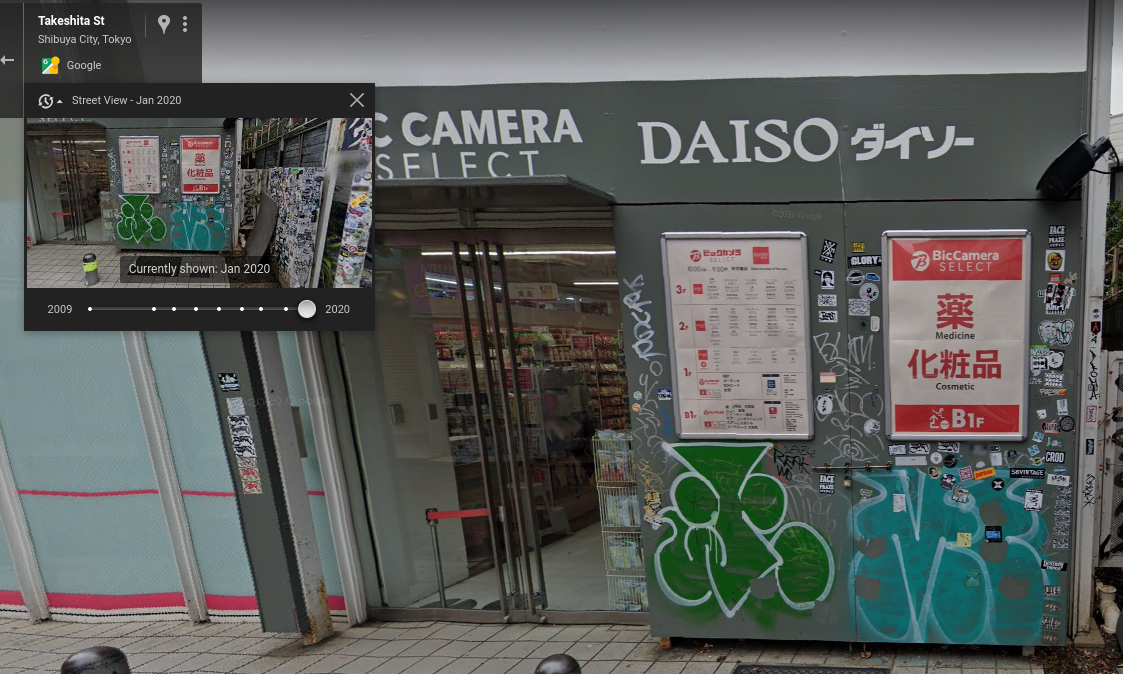
A quick look at the most recent street view confirms that this is the correct store based on the signage and matching street art on the most recent photo from January 2020.
Similar to our first example, we can determine when the photo was taken by looking at known photos of the same area. We can see that the current set up with the two panels / doors was created prior to January 2016. It didn’t take long until both panels saw a significant amount of street art on their surfaces. Below is a comparison from January 2016 to December 2016.
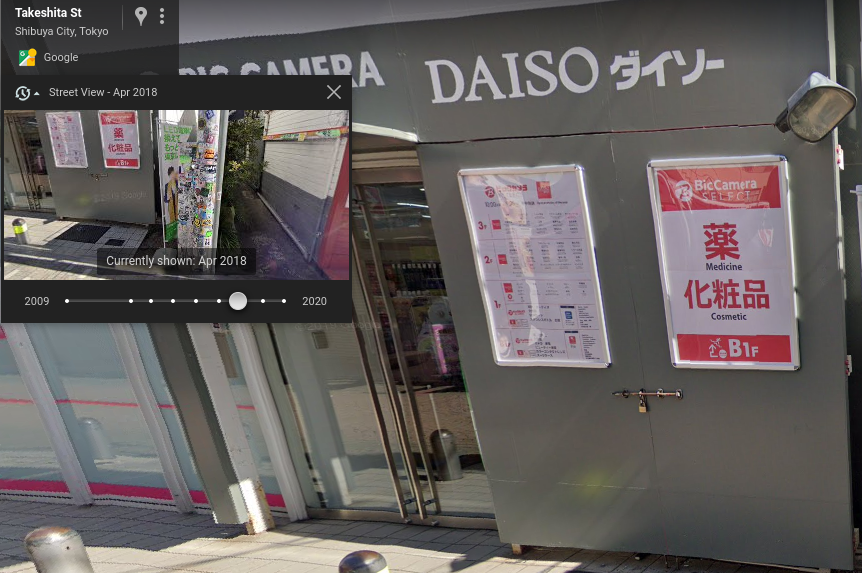
We do not see a photo depicting the shift in paint that matches our photo until April 2018. We know this is a high traffic area that is known for street art, so it is likely that the below photo was taken recently after the repainting as there is not any sign of street art on the panels.
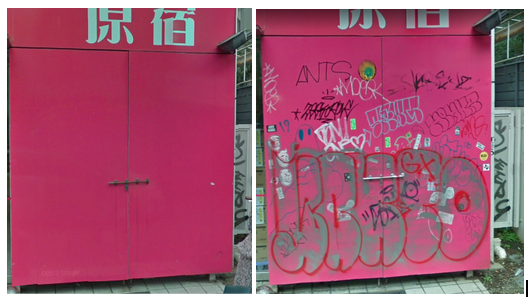
The photo from May 2019 appears to show us something closer to our original example image. Pay particular attention to what appears to be kitty stickers under the two large green colored pieces on the bottom of each panel. We can see here that they were added BEFORE the paint was sprayed on top of them Additionally, we can observe overspray on the bottom of the left sign.
Now we can compare this May 2019 image (left) to the last photo from January 2020 (right) and see where our example image most matches up on the timeline. You may want to open the area up in Google street view to be able to see all of the details. There are a few points that should be noted between the two.
The first is the absence of our kitty stickers. In our first image it appeared that two had already fallen off or been removed by someone. By the later photo, all of the stickers are gone, suggesting either they were intentionally removed or all of those stickers had poor adhesion and finally fell off on their own. We can also see that between these photos, the same lock was used based on the remaining sticker residue on the front of it (not too terribly surprising considering the short amount of time elapsed). It is also worth noting that the green overspray on the bottom of the frame shows us the frame was reused although the sign in the frame on the left was replaced with a different version. Finally, note the two stickers to the right of the frame on the left and how their red borders have faded over time.

So where does our example photo fit in on the timeline? It would fall somewhere between the two above, but likely closer to the second photo than the first based on the fading of some of the artwork. Putting the three side by side, we can see that in our original example (center) the stickers to the right of the left sign that has lost most of the red color on their edges, whereas the first image from May 2019 still shows much of the red coloring. We see a similar level of fading on the white tag behind the green tag on the left. The presence of the many new stickers on the photo of January 2020 panels show us that our example must have occurred prior to the last photo.