TryHackMe: Sakura Room Walkthrough
Sinwindie's technical walkthrough of the OSINT Dojo's 'Sakura Room' challenge on TryHackMe. Come and play!


The OSINT Dojo's Sakura Room on TryHackMe is designed to test many different OSINT skills and techniques. This official walkthrough will help point you in the right direction if you get lost. Before you read any further please understand that although the flags will not be provided in this walkthrough, that it will contain the exact steps required to solve the room.
I have done my best to redact any flag information, but be aware that some screenshots may contain spoilers, so look ahead at your own risk. I highly recommend trying to solve the challenges on your own and only consulting this guide when you are truly stuck and have exhausted all other research avenues.
Are you a visual learner? If so, an accompanying video walkthrough can be found here.
Task 1: Introduction
Objective: Task 1 is simply to give you some background on the room and make sure you have read the instructions.
Question 1: Are you ready to begin?
Process: You can find the flag for the first question listed in the background and instructions in the Task 1 section.
Task 2: Tip-Off
Objective: Task 2 provides a short synopsis of the fictitious cyber attack that occurred on the OSINT Dojo. The task provides an image file that was saved from the attack and asks you to analyze the file for any breadcrumbs that might lead you to finding the perpetrator.
Question 2: What username does the attacker go by?
Process: You can find the flag for the first question by analyzing the photo provided in the background section. Click on the link in the background section to open the photo in a new browser window.

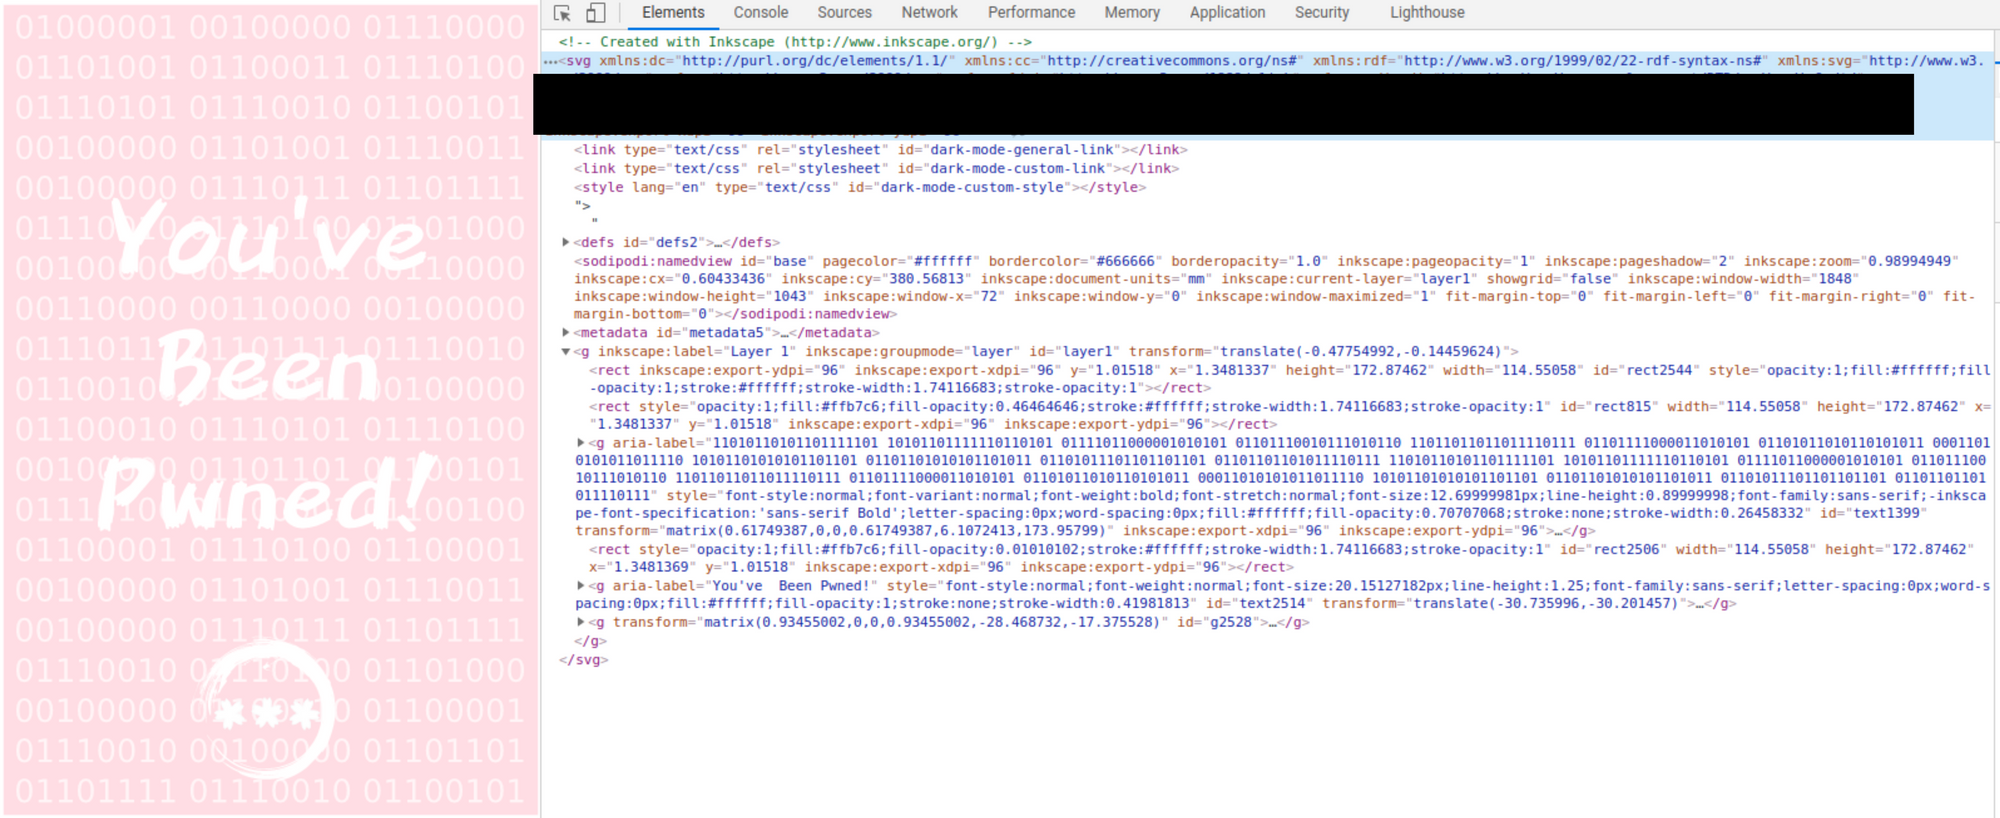
Looking at the image we can see some binary in the background of the image. If we translate this binary into plain text we get the following: "A picture is worth 1000 words but metadata is worth far more". This suggests that our answer can be found somewhere in the metadata of this file. If we look at the file extension, we can see it is a .svg file. So right-click the photo in the browser and select "Inspect" to open the element and show us some underlying metadata of the image including the software used to create it, some technical specifications, as well as file path it was saved to, which contains a username of our target. This username shown in the file path is the flag for Question 2.
Task 3: Reconnaissance
Objective: Task 3 mentions that the attacker made an OPSEC mistake and reused the username found in Task 2 across other social media platforms. Knowing this, we need to locate other sites they used the same username on.
Question 3: What is the full email address used by the attacker?
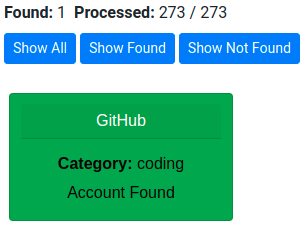
Process: You can find the flag for Question 3 by doing a username search for the target's username on Whatsmyname.app or other similar username lookup tools. Running the username through this tool we get one result for an account on Github.
Navigating to the Github profile, we can see a few of their repositories.
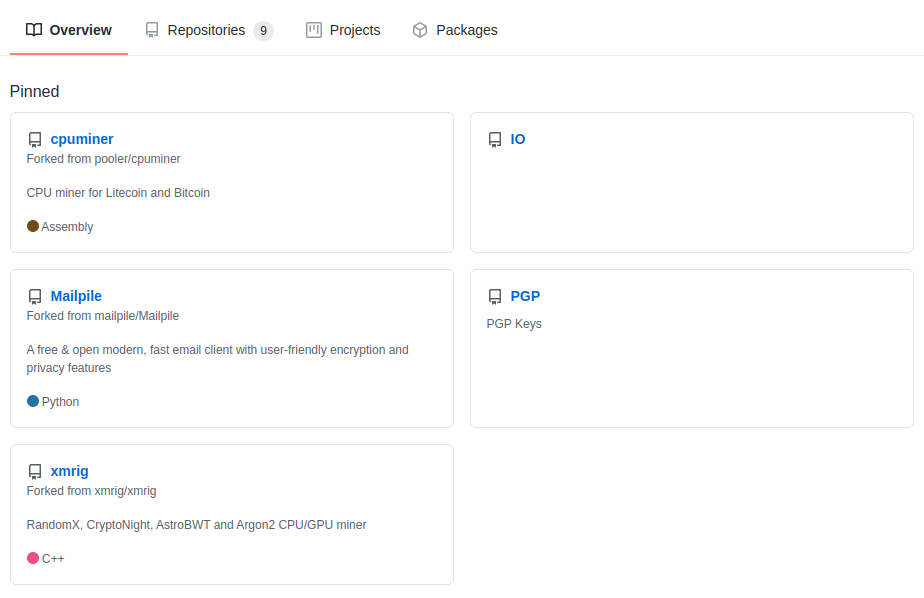
As we are looking for an email, the PGP repo is what we are going to check first. The only file here is one called publickey. If we open it we can see a public PGP key for the user.
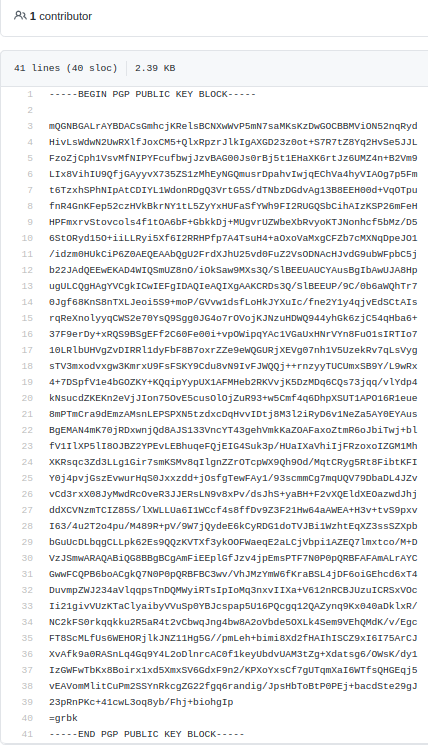
Copy the entire PGP public key block and save it with a .asc file extension. We can then extract the target's email using PGP software like Kleopatra or by using the Linux CLI by typing gpg --import and the filename you saved it as. This will provide us with the email the attacker provided to create the PGP key. This email is the flag for Question 3.

Question 4: What is the attacker's full real name?
Process: The Github account will only contain our target's first name, so we will need to search elsewhere to answer this question. Searching Google for the username we found in Task 2 gives us a single result for a LinkedIn page. This LinkedIn page is public and will provide us with the full name of the attacker which is the flag for Question 4.

Task 4: Unveil
Objective: Task 4 states that the attacker is aware that we are investigating them, and that they are now attempting to cover their trail so that we cannot locate them. We will need to look into removed data to gather additional information.
Question 5: What cryptocurrency does the attacker own a cryptocurrency wallet for?
Question 6: What is the attacker's cryptocurrency wallet address?
Process: You can find the flags for both of the above questions by digging deeper into the Github account located in Task 3. Click on Repositories at the top to open all of the repos owned by this account.

We see a few different repositories that reference cryptocurrency, but we are going go into the ETH repository. The only file is one called miningscript, which contains only one line.

If we click history on the right above this line, we can see that the file we are viewing was edited. The edit history shows two commits to this file, one for create, and one for update. The update commit is the one we currently see above, which is an edit of the original one. Clicking on the Create miningscript entry will show the original file created by the user which contains the cryptocurrency wallet address (Question 5 flag) and the cryptocurrency mining pool used by the attacker. Navigating to the URL of the cryptocurrency mining pool referenced in the file will provide the flag to Question 6.
Question 7: What mining pool did the attacker receive payments from on January 23, 2021 UTC?
Question 8: What other cryptocurrency did the attacker exchange with using their cryptocurrency wallet?
Process: The flags for the above two questions can be found by looking for a blockchain explorer that shows the public transactions for the cryptocurrency wallet we found in the above Github repository. A simple Google search will provide many options for blockchain explorers for this specific cryptocurrency. Plugging the attacker's cryptocurrency wallet into one of these blockchain explorers will show the related public transactions.
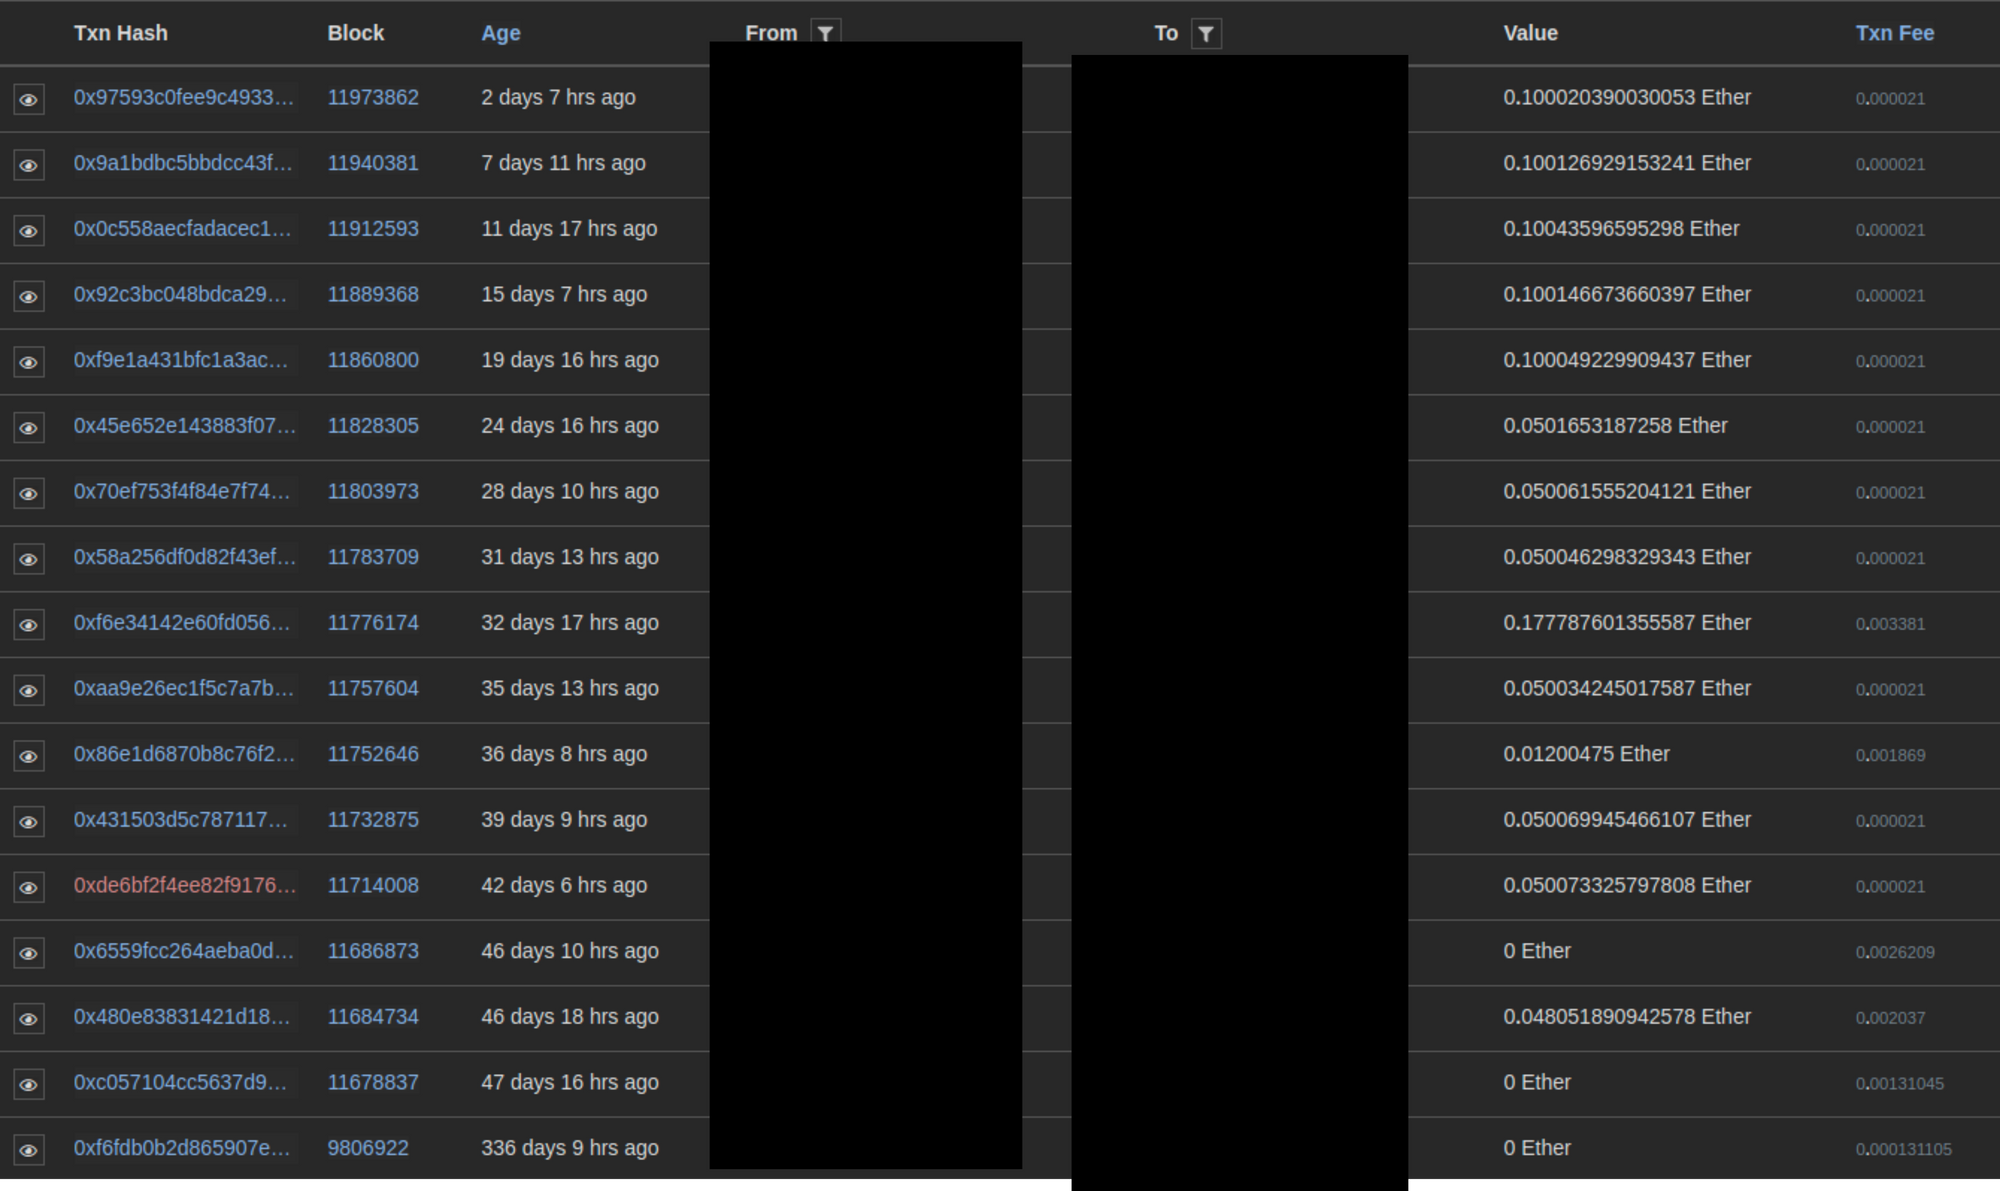
Looking through the list of transactions related to our attacker's cryptocurrency wallet we can see the details which include the timestamp as well as the sending and receiving wallets. For well-known wallets, the blockchain explorer may include the name of the wallet owner which may pertain to mining pools, cryptocurrency exchanges, etc. Both flags for Question 7 and 8 can be found in the transactions list.
Task 5: Taunt
Objective: Task 5 provides new information about the attacker, and provides a screenshot of correspondence between the attacker and the OSINT Dojo. We need to leverage the information in the screenshot in order to locate the attacker's Twitter account and pivot from there to find more information.
Question 9: What is the attacker's current Twitter handle?
Process: In order to find this flag we need to first download the photo of the conversation from the link in the background section.
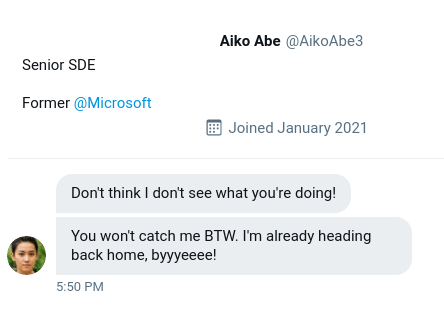
The question is asking for the user's current Twitter handle, which suggests that it might not be the same on that we are shown in the photo. If we do a search in Twitter for the target's username in the screenshot we can locate posts where the target introduced themselves to Twitter prior to changing their username. This will show us their current username, which is indeed different from the one shown in the screenshot. This new username is the flag needed for Question 9.
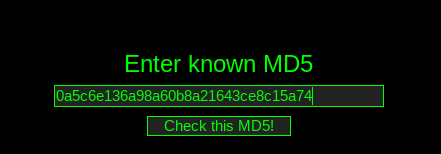
Question 10: What is the URL for the location where the attacker saved their WiFi SSIDs and passwords?
Process: Using the Twitter account we located in Question 9, we will need to look through the target's posts to find our next pivot point. If we scroll down we see a post referencing AP (Access Points), that contains a photo with an MD5 hash as well as the text "Regular WiFi and Passwords".
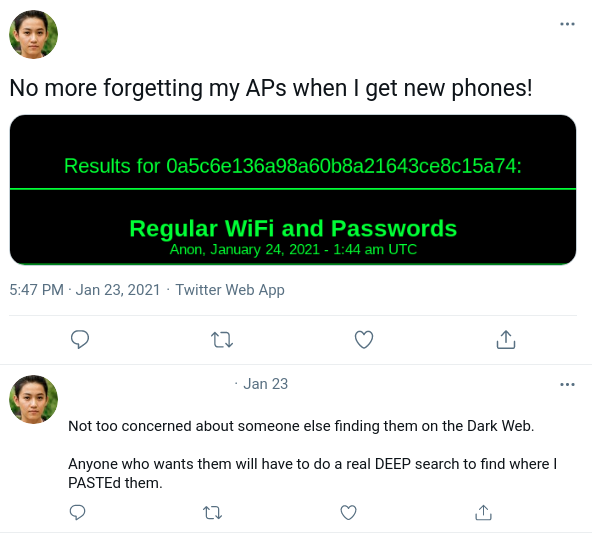
Our target also comments on their post and states that someone trying to find this information will need to look on the Dark Web, and that they would need to do a DEEP search to find where the target PASTEd them. The user is referencing the .onion site Deep Paste, which is a paste site similar to Pastebin. If we fire up the Tor browser and navigate to Deep Paste we can scroll down to the "Search Pastes" link and search by the MD5 hash provided in the Twitter screenshot. The search result will navigate to the page where the attacker saved their SSID information. The URL of this page is the flag we need for Question 10. (Note: The Deep Paste site comes up and down and has multiple mirrors, if you are having trouble with this question the hint will provide a screenshot with all the information needed to complete this question)
Question 11: What is the BSSID for the attacker's Home WiFi?
Process: Once we find the search results for Question 10, we can view the target's SSIDs and passwords saved to Deep Paste.
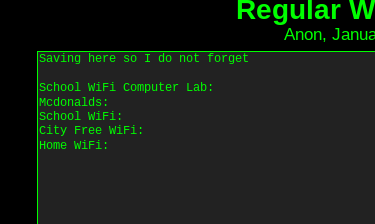
Using the SSID associated with the Home Wifi line, we can pivot to Wigle and plug that associated SSID into their search bar to locate a result that matches.

Zooming all the way in to the dot where the SSID result is located will show the BSSID needed for the Question 11 flag.
Task 6: Homebound
Objective: Task 6 tell us to look closer at the Twitter account from Task 5. It seems the attacker is trying to flee and return home to where they assume they will be safe from law enforcement. There are multiple clues left in the attacker's Twitter account that let us know the route they took and their possible home destination. We will need to utilize new information from the Twitter account as well as old information from the entire investigation to answer the final questions.
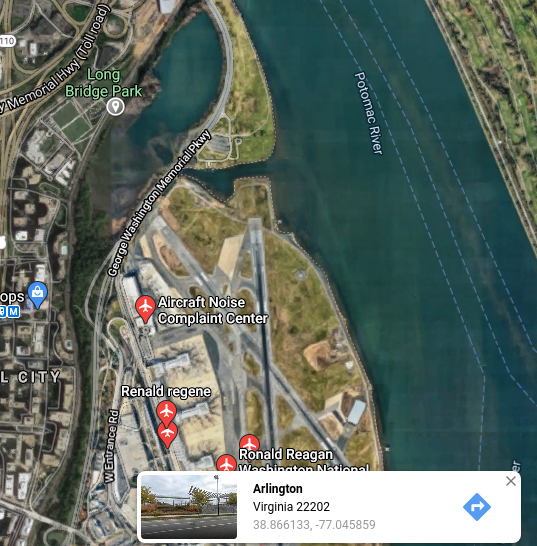
Question 12: What airport is closest to the location the attacker shared a photo from prior to getting on their flight?
Process: Going back to the attacker's Twitter account, we need to scroll until we locate a post with a photo and the text: "Checking out some last minute cherry blossoms before heading home!" Geolocating this photo will allow us to obtain the flag for Question 12.
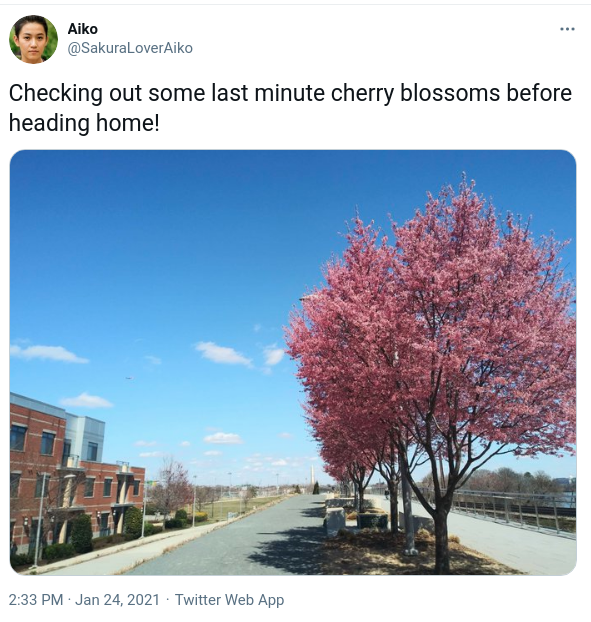
In the center of this photo we can view a large white obelisk in the distance, which is the Washington Monument in Washington, DC, United States. Using the location of the water and train tracks on the right side of the photo and the Washington Monument in the distance, we can geolocate this image as being in Long Bridge Park in Arlington, Virginia, United States. As we can see based on the photo below, the closest airport is just across the water from this park. The flag for Question 12 is the three letter airport code for this airport.
Question 13: What airport did the attacker have their last layover in?
Process: Continuing through the attacker's Twitter posts, we can see another one posted with a photo and the text "My final layover, time to relax!" We need to locate what airport this image was taken inside in order to get the flag for Question 13.
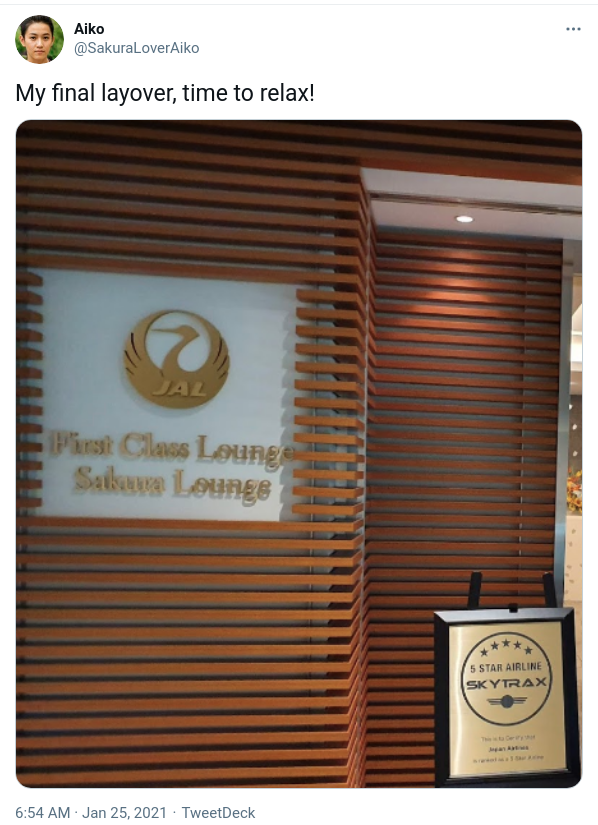
If we run this image through Google's reverse image search, we can get a few different results.
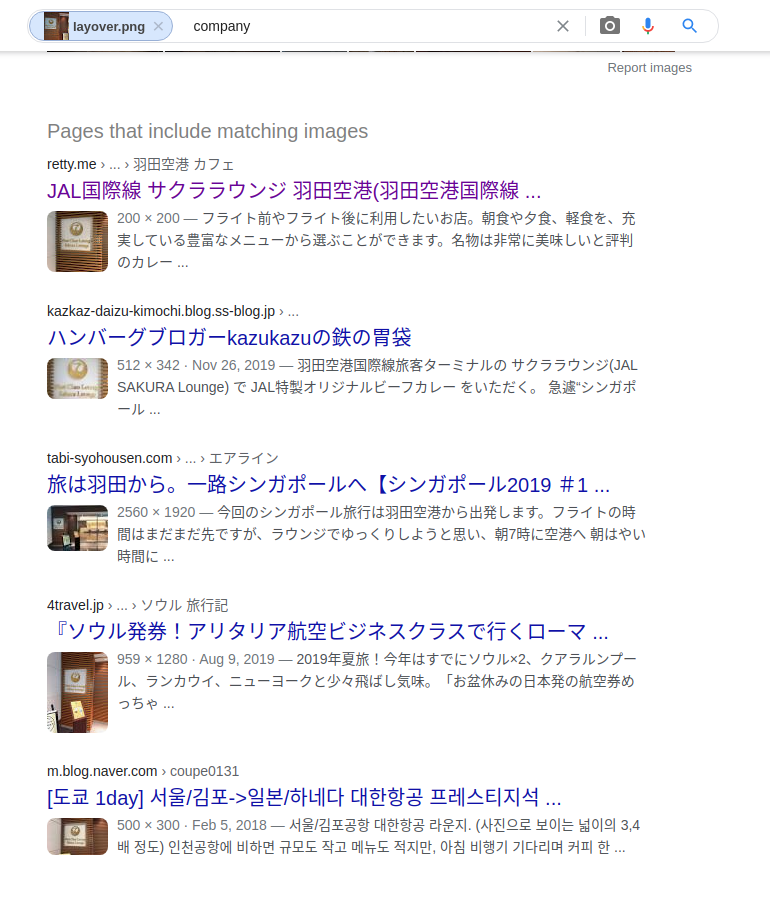
Clicking on the first link will give us a Japanese language page that contains a matching photo of the one our attacker posted.
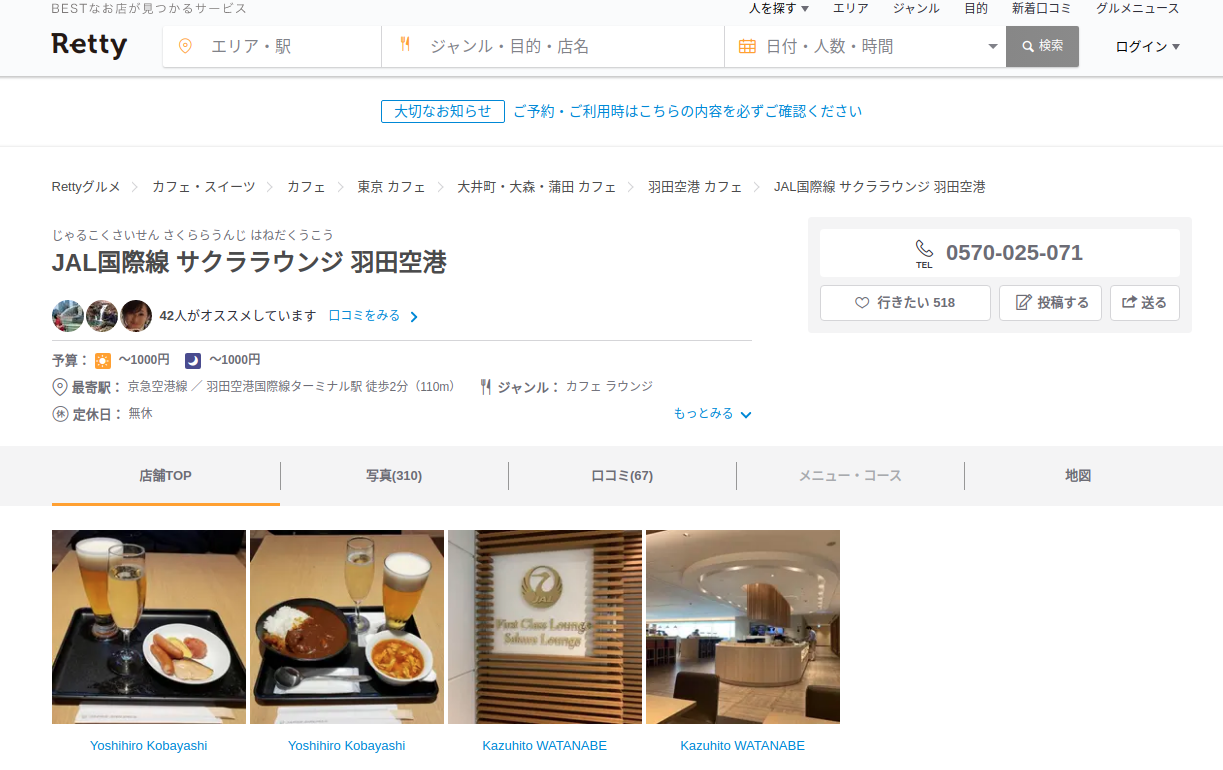
Translating this page will show us which airport this specific lounge is in. We can then lookup the three letter airport code for this airport in order to obtain the flag for Question 13.
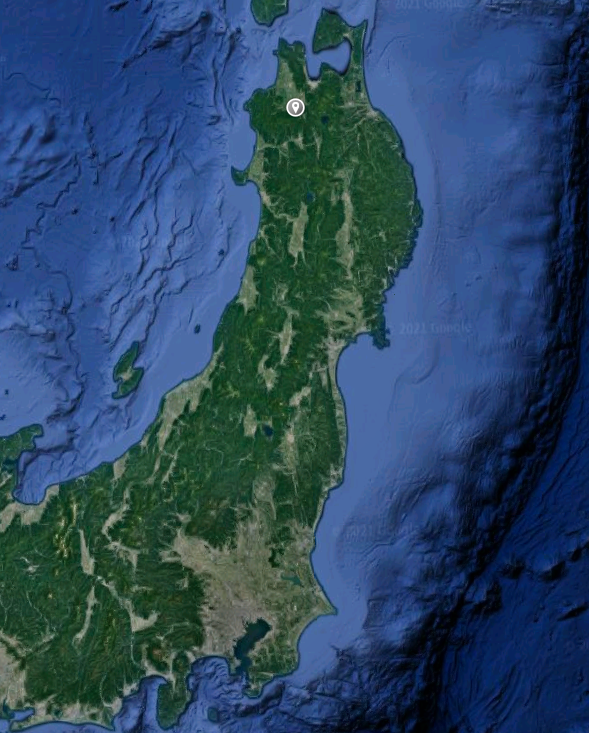
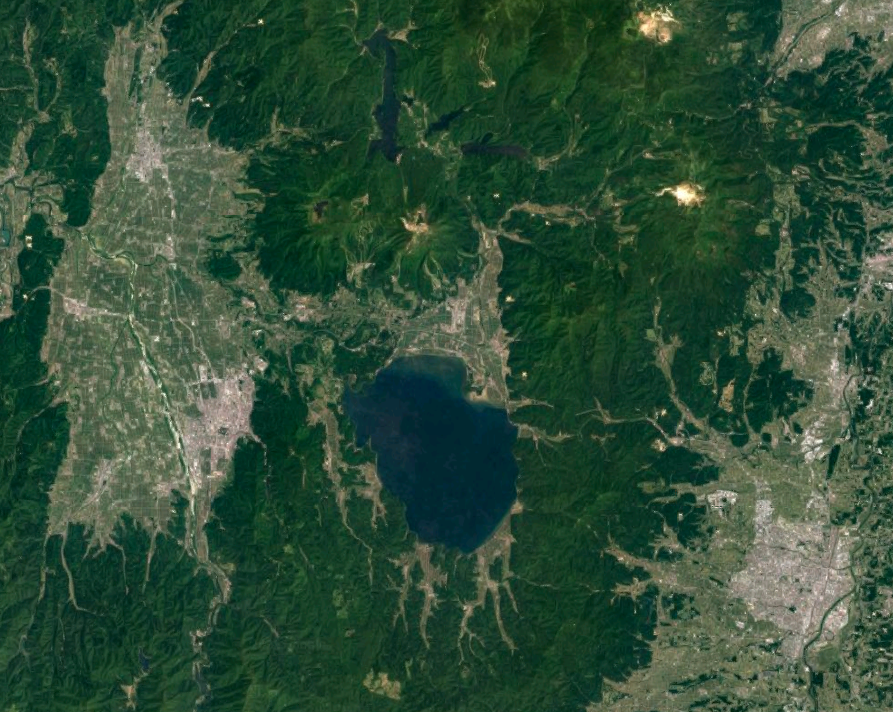
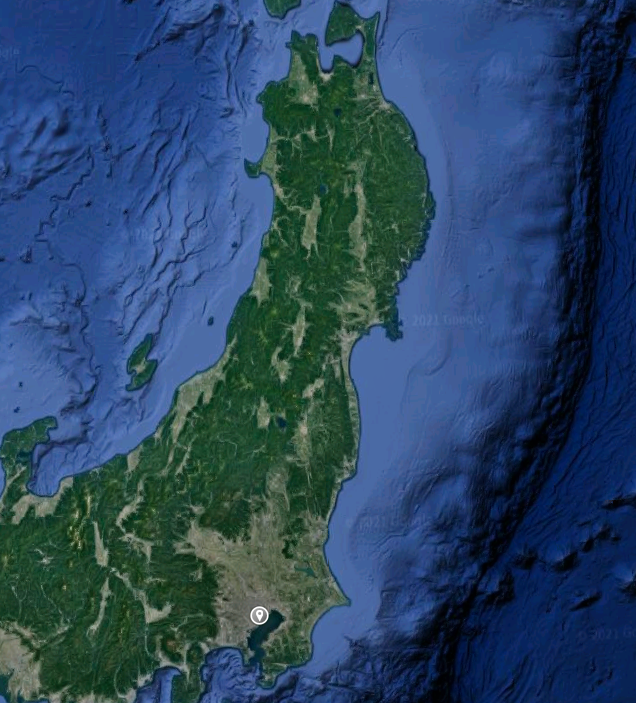
Question 14: What lake can be seen in the map shared by the attacker as they were on their final flight home?
Process: The attacker also posted a photo on their Twitter account that appears to be a satellite view of their flight path and includes the text: "Sooo close to home! Can't wait to finally be back! :)"
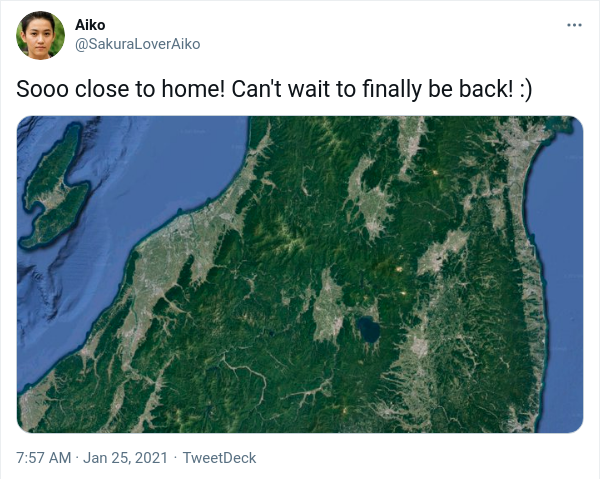
Using the location of the airport identified in Question 13 as a starting point on Google Maps, we can see that it is below the area show in the attacker's new photo, suggesting that their final destination is further north from the airport they had in their layover.
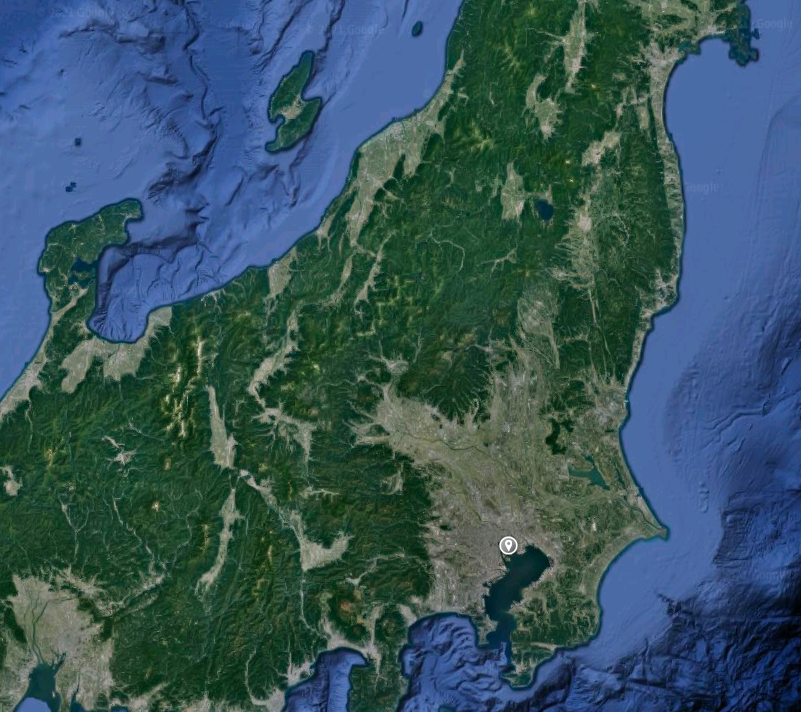
We can also see the same lake which is shown in the attacker's photo. Zooming in will give us the name of the lake, which is the flag needed for Question 14.
Question 15: What city does the attacker likely consider "home"?
Process: In order to solve this final question, we will need to look back at past questions and synthesize a few things. Based on the answers to Question 13 and Question 14, we know that the attacker is flying north from the last airport.
This gives us the general direction, but not the exact city. However, if we recall back to the WiFi SSIDs shown in Question 11 there are three WiFi SSIDs, including one labeled as "Home Wifi".
If we search the SSIDs associated with the Mcdonalds, City Free Wifi, and Home Wifi networks on Wigle, we can find them all within the same city, which is along the expected flight path north of the last airport the attacker was in. The name of this city is the answer flag needed to solve Question 15.