A Definitive Guide To DMARC
Learn about DMARC and how it can prevent fraudulent or spoofed emails being sent from your domain. Includes full DMARC setup instructions!

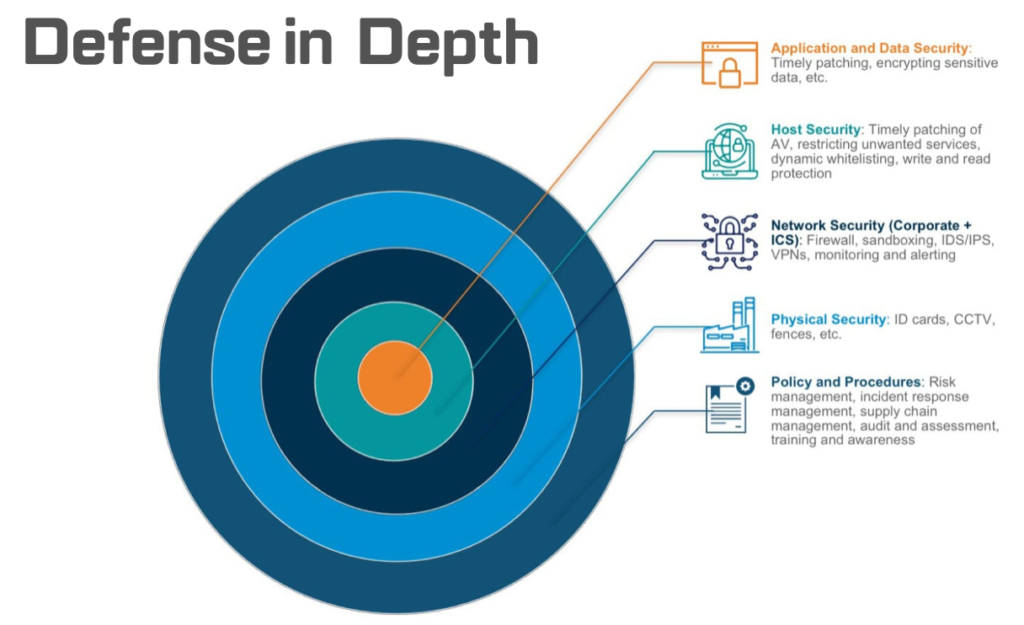
When we drive in our cars we don’t rely on just the seatbelts to protect us. We don’t rely on just the airbags or the anti-lock brakes or the mirrors or the sensors alone. We rely on them all working together in harmony, a symphony designed to provide us with layers of protection from a broad spectrum of risks while we’re driving. We call this design Defense-in-Depth.

Security on and offline is the same. We need multiple layers for that, too. If we rely on a single tool or tactic or strategy, such as only antivirus or physical locks or a security policy or cyber insurance alone to protect us – we’ll eventually regret it.
DMARC
It’s the holiday season and this is the time of year we’re all too aware how much phishing really sucks. It’s a persistent nuisance at best and potentially catastrophic at worst. While technology isn’t able to catch all of it 100% of the time, DMARC is one of these important layers of defense that helps to dramatically minimize the amount of phishing emails that get through to our inboxes.
DMARC is also good for helping keep domains off of email blacklists, which is added value for protecting brands and reputations.
DMARC is complex though and has a lot of parts.

This guide is written in a linear manner to try and help you understand DMARC, its independent components, and friendly, step-by-step instructions for how to set up each part so that we might bring this technology to more people in a consistent and predictable way.
Thanks for making time to learn about DMARC. Education and awareness help others understand how tools like DMARC can minimize or even eliminate preventable risks to their organization.
What is DMARC?
DMARC stands for Domain-based Message Authentication, Reporting & Conformance.
DMARC is a set of 3 DNS records that work together to ensure email is sent only from authorized origins (mail servers) thereby helping block fraudulent messages that might appear to be from domains under our control.

Why is DMARC important?
Email is easy to spoof. Criminals love it because it’s easy to exploit and e4asy to get us to click on phishing emails when they appear to come from senders we trust, especially from well-known brands. Simply inserting the logo of a well known brand into an email makes it appear more legitimate, exponentially increasing the likelihood that someone will click on something they shouldn’t.
Since it’s getting harder and harder to tell a legitimate message from a forged or malicious one, and because we can’t always trust our email provider (GSuite, Office365, etc) to catch and filter these messages before they reach our inbox, we have technologies like DMARC that can help.

How does DMARC help prevent phishing?
DMARC helps prevent criminals from spoofing the “header from” or “reply-to” address by making it possible for senders and receivers to determine whether or not a message has been sent from an authorized sender. DMARC sets a clear policy for what to do if a message hasn’t been sent from an authorized source, such as sending it to the spam folder or rejecting the message altogether. Think of DMARC as an additional layer of defense to help protect us against phishing and spear-phishing.

In what scenarios is DMARC not effective in helping prevent phishing?
If an email account is compromised, meaning a criminal has obtained direct access to the account and password via nefarious means and has full control, they can effectively send legitimate messages that will pass all DMARC checks. In these cases, DMARC is not an effective tool to prevent further social engineering attacks using a person’s legitimate email address.
What’s required for DMARC to work?
There are 3 components to DMARC that make it work, all TXT records we need to set up in the specific domain’s DNS:
- A DKIM record – this record provides a public key (or “digital signature”) that can be used to authenticate, encrypt, and decrypt messages sent from authorized email servers.
- A SPF record – this DNS record defines what email servers are authorized to send mail on behalf of a domain.
- A DMARC record – this DNS record checks to ensure both SPF and DKIM pass scrutiny before delivering messages to their intended recipients, according to a policy we can set.

DMARC helps prevent criminals from spoofing the “header from” or “reply-to” address using the following process:
- First it checks that the DKIM (or “digital signature”) is a match.
- Then it checks the SPF record to ensure the message came from an authorized server.
- Under the most ideal and restrictive policy setting (p=reject), when both DKIM and SPF pass these checks, DMARC delivers the message to the intended recipient. If one or more of these tests fails when a less restrictive policy is set, DMARC behaves accordingly (p=none or quarantine), which render using DMARC somewhat pointless.
The goal is to get to a policy that rejects anything that's not up to snuff. Doing so, however, without interfering with legitimate email delivery takes time and intention, which is why I've written this guide.
One might imagine how these checks can vastly reduce the number of spoofed messages that get to our inboxes. Here’s a real world example of how effective it can be:

Getting Started (workflows included)
Let’s take a step-by-step walk through the process of setting up DMARC, steps we can use both as a learning tool for building our own awareness and also for guiding others through the process.
Be sure to think before making any changes and if you need help, please ask for it
Before we get to actually setting up and configuring DMARC, we need to ask a few important questions first.
Critical Questions That We Must Ask First
- What domain(s) are we currently sending email from?
- Do we send email from more than one domain?
- What server(s)/services are we using to send email from?
- Do we send email from more than one server/service? For example, are there any SMTP devices, like printers, sending email from scans? If so, we may or may not need to consider these. This often requires a larger discussion with the team for good security practices.
- Where are the name servers for these domains hosted?
- Do we have access to the name servers that control DNS configurations for these domains? Without access to change DNS we can’t properly set up DMARC. If we don’t already have it, take steps to ensure access.
- Set proper expectations. This process will take several weeks to get just right. Be sure to be clear and set appropriate expectations for everyone who may be impacted. Under-promise and over-deliver whenever possible.
- Also – make sure we’re documenting all of this in friendly terms so others on our team can also learn and make sense of it.
Once we have all the answers, we can move to actually doing stuff.
Let’s start with the most straightforward part first: the SPF record.
What is SPF?
SPF stands for Sender Policy Framework.
SPF is set up as a new TXT record in the domain’s DNS.
An SPF record tells the world what email servers are authentic and permitted to send email on behalf of a specific domain.

How SPF Works
SPF works by publishing what’s called a “reverse MX” record to tell the Internet what servers can legitimately send mail on behalf of the domain. When receiving a message, a receiver’s mail server can check those records to make sure mail is coming from a legit point of origin.
Publishing a “reverse MX” or SPF record is pretty easy: one line in DNS is all it takes to enable a SPF record for the domain.
Steps for designing a good SPF Record
- Login to the domain’s DNS host (This *should* be easy to locate if you have good documentation!)
- Choose to edit the primary zone for the Top-Level-Domain or TLD (i.e. test_domain.com).
- Create a new DNS TXT record for SPF using this convention
- Here are some valid SPF records you can copy and paste into a new TXT record:
Here’s a generic SPF record for Office 365 that works for almost everyone: v=spf1 include:spf.protection.outlook.com -all
The hard fail variable above (-all) is recommended for fully-hosted Office 365 clients.
And here’s a generic one for GSuite: v=spf1 include:_spf.google.com ~all
The soft fail variable above (~all) is recommended to ensure all mail is delivered.
But wait – there might be more.
If we have servers that send email from locations outside of GSuite or Office 365, we’ll need to includ that information in our SPF record.
Once we have all the information, domains, services/IP addresses, etc. that we need to ensure delivery of email from all sources, we might try using this handy tool to create an SPF record and check it against our proposed design: https://www.spfwizard.net/
A word about how to construct SPF Records that are short and sweet
SPF records don’t like it when we have strings in them that exceed 255 characters, which means we need to focus on keeping our SPF records as concise as we can.
This is due in part to the IETF’s RFC 1035, which means DNS entries in general don’t like to exceed 512 octets or about 455 characters.
So, for example, if we have many ip4 and ip6 addresses to add, let’s make sure they’re not redundant. We can merge them using CIDR notation.
Here’s an example of IP address ranges that can be merged in this way:v=spf1 a mx ip4:192.168.0.0/24 ip4:192.168.1.0/24 -all
What that means is:
ip4:192.168.0.0/24 = 256 IP addresses; including 192.168.0.0 – 192.168.0.255
ip4:192.168.1.0/24 = 256 IP addresses; including 192.168.1.0 – 192.168.1.255
So, if we need to, we can replace the above example with shorter and better CIDR notation:v=spf1 a mx ip4:192.168.0.4/23 -all
Because what the above notation means is:
ip4:192.168.0.0/23= 512 IP addresses; including 192.168.0.0 – 192.168.1.255
Another approach to keep SPF Records short and sweet (mostly for larger organizations)
An effective way for larger organizations to reduce the number of characters in an SPF record is to create an SPF specific subdomain represented as: _spf.test_domain.com. Using “_spf” as the subdomain tells a mail server to treat the subdomain as a storage container, which is only used for listing additional SPF information.
If we need to create more than one SPF specific subdomain, we can use _spf, _spf1, _spf2, etc.
Here’s a good example: Google is HUGE and has massive amounts of IP addresses represented in different netblocks due to the size and scope of their organization. Attempting to place all this information into one SPF record would easily exceed standardized limits.
To resolve this, they created smaller “storage containers” of SPF records with IP addresses that are shorter and combined them together using include statements.
Here’s a list of netblocks they use and the corresponding SPF records:
- _netblocks.google.com
v=spf1 ip4:64.18.0.0/20 ip4:64.233.160.0/19 ip4:66.102.0.0/20 ip4:66.249.80.0/20 ip4:72.14.192.0/18 ip4:74.125.0.0/16 ip4:108.177.8.0/21 ip4:173.194.0.0/16 ip4:207.126.144.0/20 ip4:209.85.128.0/17 ip4:216.58.192.0/19 ip4:216.239.32.0/19 ~all - _netblocks2.google.com
v=spf1 ip6:2001:4860:4000::/36 ip6:2404:6800:4000::/36 ip6:2607:f8b0:4000::/36 ip6:2800:3f0:4000::/36 ip6:2a00:1450:4000::/36 ip6:2c0f:fb50:4000::/36 ~all - _netblocks3.google.com
v=spf1 ip4:172.217.0.0/19 ~all
In order to keep the SPF record short for google.com, Google created an SPF specific subdomain of _spf.google.com and references each netblock using an include statement in the SPF record. The include statement instructs a mail provider to search for additional SPF information for the domain listed.
- _spf.google.comv=spf1 include:_netblocks.google.com include:_netblocks2.google.com include:_netblocks3.google.com ~all
Google then adds their SPF specific subdomain _spf.google.com with an include statement to the google.com SPF record.
The end result is a simple SPF record for google.com that’s short and sweet.
- google.comv=spf1 include:_spf.google.com ~all
Before we create SPF specific subdomains, though, let’s try to use better CIDR notation for IP ranges in order to reduce the length of our SPF records. That’s the more straightforward way.
How can we test our SPF Record?
There are many online tools to check and verify SPF records out there. One of the friendliest and most useful may be https://www.dmarcanalyzer.com/spf/checker/
Once your SPF record passes muster, congratulations! You’re ready to take the next step, but not before we DOCUMENT all of our work so far in ITG : )
What is DKIM?
DKIM stands for DomainKeys Identified Mail.
DKIM is set up as a new TXT record in the domain’s DNS.
DKIM is an encryption tool that allows senders to “digitally sign” email messages to help keep them private. Most people who use DKIM don’t have to do anything special and probably don’t even know they’re using it, which makes it a friendly tool for better security.

How does DKIM work?
Honestly, DKIM is the most complicated email authentication protocol out there. Even if we do extensive research, it’s hard to find one place that describes how it all works.
For our purposes here, we can say it uses a public key or asymmetric-key encryption, a commonly used but effective method, where the private key is kept secret and the public key is published and made freely available for verifying authenticity.
To help keep things simple, let’s think of DKIM as a “digital signature.” This signature is generated by the sending email server and inserted into the message’s header before it’s sent.
The public key the mail server used to generate the signature is stored at the DNS server (in the TXT record) so it can be used on the receiving end, too. After receiving the email, the receiving mail server can verify the DKIM signature by checking it against the public key on the DNS server.
The receiving mail server then uses the key to decrypt the message’s header and also do some other calculations to ensure the message is legit.
If all of these activities and calculations pass muster, the mail server can presume with pretty good certainty that the message originated from a legitimate and authorized mail server, hasn’t been altered, and is safe for delivery.
Steps for setting up DKIM
Depending on the type of mail service the primary domain is using (i.e. GSuite, Office 365, etc.) there are specific and unique steps for each.
For any custom or self-hosted email platform and/or level of complexity, more manual and sophisticated configuration may be required, which means you can ask for more personal guidance.
In any case, it’s important to note that domain keys include a text string called the selector prefix, which we can modify when we generate the key. Make sure to write this down or know what it is because we’ll need it to test the DKIM configuration later. (Also – make sure we’re DOCUMENTING all of our work in ITG).
Setting up DKIM in Google’s GSuite (GMail)
For GSuite, the comprehensive steps are linked to here: https://support.google.com/a/answer/174124?hl=en
Here’s Google’s general, step-by-step instructions:
Generate the DKIM domain key
- Sign in to your Google Admin console. Sign in using an administrator account.
- From the Admin console Home page, go to Apps > G Suite > Gmail.
- From Gmail, go to Authenticate email.
- Select the domain where you’ll use DKIM. You’ll generate a domain key for this domain. Your primary domain appears by default. To generate a domain key for a different domain, click the to select another domain.
- Click Generate new record.
- If your registrars don’t support 2048-bit keys, change the key length from 2028 to 1024. 2048-bit domain keys are more secure than 1024-bit domain keys. If your registrars support 2048-bit keys, we recommend using them. There’s no impact if you previously used a 1024-bit domain key.
- If your domain already uses a DKIM domain key that uses google as the selector prefix, you must change the default selector prefix. You might already have a domain key if you’re using another email provider. Domain keys include a text string called the selector prefix, which you can modify when you generate the key. The default selector prefix for the Gmail domain key is google. Change the prefix only if your domain already uses a DKIM domain key with the selector prefix google.
- Click Generate. The text box displays the information you use to update the DNS record. Email servers retrieve the public domain key from the DNS record and use it to validate incoming messages.
Add the domain key to your domain’s DNS records
- Sign in to the management console for the domain’s DNS.
- Locate the page where we update DNS records. Subdomains: If our domain host doesn’t support updating subdomain DNS records, add the record to the parent domain. Learn about Updating DNS records for a subdomain.
- Create a TXT record using the name and value from the Gmail Admin console. To see the name and value you need to create the TXT record, in the Admin console go to Apps > G Suite > Gmail > Authenticate.If your domain provider limits the length of TXT records, see Tips for updating domain provider DNS records.
- Update the DNS record: In the first field, enter the text under DNS Host name (TXT record name). In the second field, enter the text under TXT record value.
- Save your changes!
Setting up DKIM in Microsoft’s Office 365
For Office 365, the comprehensive steps are linked to here: https://docs.microsoft.com/en-us/office365/SecurityCompliance/use-dkim-to-validate-outbound-email
Here’s the part of their general step-by-step instructions that might matter most:
Publish two CNAME records for your custom domain in DNS
For each domain for which you want to add a DKIM signature in DNS, you need to publish two CNAME records. A CNAME record is used by DNS to specify that the canonical name of a domain is an alias for another domain name.
Office 365 performs automatic key rotation using the two records that you establish. If you have provisioned custom domains in addition to the initial domain in Office 365, you must publish two CNAME records for each additional domain. So, if you have two domains, you must publish two additional CNAME records, and so on.
Use the following format for the CNAME records.
Important
If you are one of our GCC High customers, we calculate domainGuid differently! Instead of looking up the MX record for your initialDomain to calculate domainGuid, instead we calculate it directly from the customized domain. For example, if your customized domain is “contoso.com” your domainGuid becomes “contoso-com”, any periods are replaced with a dash. So, regardless of what MX record your initialDomain points to, you’ll always use the above method to calculate the domainGuid to use in your CNAME records.Copy
Host name:			selector1._domainkey
Points to address or value:	selector1-<domainGUID>._domainkey.<initialDomain>
TTL:				3600

Host name:			selector2._domainkey
Points to address or value:	selector2-<domainGUID>._domainkey.<initialDomain>
TTL:				3600
Where:
- For Office 365, the selectors will always be “selector1” or “selector2”.
- domainGUID is the same as the domainGUID in the customized MX record for your custom domain that appears before mail.protection.outlook.com. For example, in the following MX record for the domain contoso.com, the domainGUID is contoso-com: Copy
contoso.com. 3600 IN MX 5 contoso-com.mail.protection.outlook.com - initialDomain is the domain that you used when you signed up for Office 365. Initial domains always end in onmicrosoft.com. For information about determining your initial domain, see Domains FAQ.
For example, if you have an initial domain of cohovineyardandwinery.onmicrosoft.com, and two custom domains cohovineyard.com and cohowinery.com, you would need to set up two CNAME records for each additional domain, for a total of four CNAME records. Copy
Host name:			selector1._domainkey
Points to address or value:	**selector1-cohovineyard-com**._domainkey.cohovineyardandwinery.onmicrosoft.com
TTL:				3600

Host name:			selector2._domainkey
Points to address or value:	**selector2-cohovineyard-com**._domainkey.cohovineyardandwinery.onmicrosoft.com
TTL:				3600

Host name:			selector1._domainkey
Points to address or value:	**selector1-cohowinery-com**._domainkey.cohovineyardandwinery.onmicrosoft.com
TTL:				3600

Host name:			selector2._domainkey
Points to address or value:	**selector2-cohowinery-com**._domainkey.cohovineyardandwinery.onmicrosoft.com
TTL:				3600
Enable DKIM signing for your custom domain in Office 365
Once you have published the CNAME records in DNS, you are ready to enable DKIM signing through Office 365. You can do this either through the Office 365 admin center or by using PowerShell.
To enable DKIM signing for your custom domain through the Office 365 admin center
- Sign in to Office 365 with your work or school account.
- Select the app launcher icon in the upper-left and choose Admin.
- In the lower-left navigation, expand Admin and choose Exchange.
- Go to Protection > dkim.
- Select the domain for which you want to enable DKIM and then, for Sign messages for this domain with DKIM signatures, choose Enable. Repeat this step for each custom domain.
How can we test our DKIM configuration?
There are also many online tools out there for testing DKIM configurations. Again, here’s one of the more friendly and useful ones: https://www.dmarcanalyzer.com/dkim/dkim-check/
For domains using GSuite, we can also use Google’s internal tool*: https://toolbox.googleapps.com/apps/checkmx
*Note that Google’s internal tool does not work for domains using other mail services.
Alright, we’re ready. How do we set up DMARC?
Step 1: How to create a DMARC configuration
Now that we’ve set up and tested SPF and DKIM, our next step is to create a DMARC record for the domain to get them all working together.
A good, generic DMARC record to start with might look like this:
v=DMARC1; p=none; rua=mailto:dmarc@test_domain.comLet’s look at the distinct parts of it, each called a ‘tag”:
DMARC tags
The example above includes the 3 most commonly used DMARC tags: v, p, and rua.
Common tags used in DMARC recordsTag Name Required?PurposeSample Valuesv YesProtocol Versionv=DMARC1pYesPolicy settingp=none, p=quarantine, or p=rejectpctNope. Optional% of messages filteredpct=20ruaNope. Optional Email address where aggregate reports are sent (forensics)rua=mailto:dmarc@test_domain.comspNope. OptionalPolicy for subdomains (if needed)sp=raspfNope. OptionalAlignment mode for SPFaspf=r
v and p tags
The first two tags, v and p, are required in order to create a valid DMARC record. All other tags are optional (though we insist on setting an email address for rua below).
“v” stands for version and is always set to DMARC1 as this is the current version of DMARC in use.
“p” is for policy and can be set to one of three values:
- none = least restrictive; doesn’t impose any actions whether or not a message passes SPF and DKIM checks (we will start by using this when we first set up DMARC).
- quarantine = Flags messages that fail SPF and/or DKIM checks to be directed to the recipients’ spam or junk folders (as we learn more about how our DMARC configuration is working, we will move to this in a phased approach).
- reject = outright refuses messages that fail SPF and/or DKIM checks (this is the end goal of a good DMARC configuration).
rua tag
“rua” stands for Reporting Uniform Resource Identifier (URI) for Aggregate reports.
It’s not required for a valid record but it probably should be. It’s where we set the email address where DMARC reports are sent. We will use these reports later to understand more about how DMARC is working, what sorts of messages are being blocked, why, etc. They are sent according to how many messages are passing through, being blocked, etc.
If you choose to set a unique address for receiving these reports (like dmarc@test_domain.com) REMEMBER TO CREATE or ALIAS IT SO IT EXISTS OR REPORTS WON’T BE DELIVERED
sp and spf alignment tags
These are useful for situations where a message might be sent from a different domain or subdomain that the primary domain. For example, a message sent from spongebog@spongbob_test_domain.com to beyonce@test_domain.com
The authentication will accept this in relaxed mode but not in strict mode.
This can be defined using aspf alignment mode tags and can be set to relaxed or strict, with relaxed being the default if no tag is present. Otherwise, this tag can be set in two ways:
- r = relaxed mode (recommended)
- s = strict mode (more advanced and more likely to cause false positives – use with caution)
DMARC TXT Record Examples
Here’s a handy 3-Phased process to introduce DMARC to our DNS configuration that progressively gets more restrictive over a period of weeks (8 or more) as we gain confidence that things are working well.
Included are some example DMARC TXT records using the most common tags that we can modify as our process progresses, starting with introducing an initial DMARC configuration that uses a policy setting of “none” (START HERE), then moving to a more restrictive policy setting of ‘quarantine’ (MIDDLE PHASE), and then onto the goal of a policy set to ‘reject’ all illegitimate messages (FINAL PHASE).
For demonstration purposes, we’ll set each of these DMARC TXT records to send aggregate reports to dmarc@test_domain.com
START HERE (WEEK 1 to 3): This policy setting implements no action. It’s used for testing only.
To begin, we just want to test and learn without interrupting the flow of legitimate email. This is important because it’s easy to prevent legitimate messages from arriving in inboxes with these configurations and we don’t want to have to explain to our mail recipients what happened.
With that in mind, we recommend starting with a policy that is least restrictive, meaning it won’t interfere with normal mail delivery (that’s important). This is a good choice for the first two or three weeks (don’t rush this process – take your time and do this right) and get a feel for how this all fits together and ensure legitimate email is flowing and being delivered as it should.
This record will take no action on messages that appear to be from our test_domain.com but don’t pass DMARC checks.
v=DMARC1; p=none; rua=mailto:dmarc@test_domain.comMIDDLE PHASE (WEEK 4 or 5): This policy introduces the “quarantine” setting to send illegitimate messages to spam/junk folders in recipients’ inboxes. After our least restrictive configuration is in place for a couple of weeks, we’ll take the next step and make the policy a bit more restrictive. To set our p tag’s value to “quarantine” and introduce the pct tag, which stands for percentage, that allows us to set a value that tells DMARC to sample that much of the total flagged traffic (messages that fail SPF and/or DKIM checks) for analysis. Typically, a good percentage to set is 1, to start.
v=DMARC1; p=quarantine; pct=1; rua=mailto:dmarc@test_domain.comThe pct tag can be set from 1 to 100 and we’ll experiment with his more for a few weeks as we get closer and closer to being able to try this final step below, but it’s still a few weeks away at this point. As the weeks progress, we’ll begin gradually increasing the pct value, incrementally sampling more and more traffic each week until we get to 100%.
FINAL PHASE (WEEK 8): This policy setting will introduce “reject” to block illegitimate messages.
<<WARNING – this may prevent mail delivery of legitimate messages – use caution>>We’ll start with setting the pct tag at 1 and gradually increase it as we go. Once we’re 100% certain we’ve got things humming pretty well (after a few weeks of running the middle step’s configuration and seeing good things in the aggregate reports), we’ll then use this type of record and reject 100% of the messages that don’t pass DMARC checks.
v=DMARC1; p=reject pct=1; rua=mailto:dmarc@test_domain.comHow to add a DMARC record to DNS
Next, we want to enter our DMARC configuration into DNS.
Now, this part is a bit tricky to build a step-by-step guide for because it depends on the registrar where DNS resides for the domain being configured with DMARC. Each one has subtle differences so, depending on where the DNS resides, we’ll create a new TXT record based on the steps for the specific DNS provider.
In any case, there are some values that will always be consistent.
Make sure we’re entering these into the appropriate domain and zone:
- Name: _dmarc
- Type: TXT
- Value: (this is where we paste the DMARC record we designed)
- TTL: (sometimes we need to set this – if so, 300 is a good choice)
Don’t forget to save the configuration in order to complete adding the TXT record.
How to test DMARC records
DMARC is a DNS record and may take a bit of time to propagate across the Internet before it’s testable.
Once it’s live, there are a lot of online tools for testing DMARC records but this may arguably be one of the friendliest:
https://mxtoolbox.com/dmarc.aspx
We’ll use the feedback we get from tests to correct or refine our configuration.
Then, we wait. Gradually, the aggregate reports will begin to roll in to the inbox of the address we set up to receive them.
Step 2: Analysis and Reading Aggregate Reports
What are DMARC Aggregate Reports for?
These reports are crucial for helping us understand if our DMARC configuration is set up well or not. We use these report to:
- Verify outbound email sources are authenticating and passing SPF and DKIM checks
- Verify the email servers sending messages from domains are legit
- Respond if a new mail server comes online (common with SaaS platforms) or an existing server or IP isn’t working right
What format do reports arrive in?
Reports arrive via email to the address set in the DMARC record’s rua tag. They are attached to these messages as compressed .zip files and unzip into .xml format.
The subject line of reports when they arrive in our inbox is standard and consistent (and long). Here’s an example of one:
Report domain: test_domain.com Submitter: google.com Report-ID: 11758684929384756971
Once unzipped, the xml reports can be viewed in browsers, text editors (gui or cli). Use whatever works best for you.
What does a report look like?
Here’s an example report from Google using our test domain for demonstration purposes:<?xml version="1.0" encoding="UTF-8" ?>
<feedback>
<report_metadata>
<org_name>google.com</org_name>
<email>[email protected]</email>
<extra_contact_info>https://support.google.com/a/answer/2466580</extra_contact_info>
<report_id>14948423697488147001</report_id>
<date_range>
<begin>1548892800</begin>
<end>1548979199</end>
</date_range>
</report_metadata>
<policy_published>
<domain>test_domain.com</domain>
<adkim>r</adkim>
<aspf>r</aspf>
<p>quarantine</p>
<sp>quarantine</sp>
<pct>20</pct>
</policy_published>
<record>
<row>
<source_ip>123.456.789.012</source_ip>
<count>18</count>
<policy_evaluated>
<disposition>none</disposition>
<dkim>pass</dkim>
<spf>pass</spf>
</policy_evaluated>
</row>
<identifiers>
<header_from>test_domain.com</header_from>
</identifiers>
<auth_results>
<dkim>
<domain>test_domain.com</domain>
<result>pass</result>
<selector>google</selector>
</dkim>
<spf>
<domain>test_domain.com</domain>
<result>pass</result>
</spf>
</auth_results>
</record>
<record>
<row>
<source_ip>123.456.789.011</source_ip>
<count>1</count>
<policy_evaluated>
<disposition>none</disposition>
<dkim>pass</dkim>
<spf>fail</spf>
</policy_evaluated>
</row>
<identifiers>
<header_from>test_domain.com</header_from>
</identifiers>
<auth_results>
<dkim>
<domain>google.com</domain>
<result>pass</result>
<selector>20161025</selector>
</dkim>
<dkim>
<domain>test_domain.com</domain>
<result>pass</result>
<selector>google</selector>
</dkim>
<spf>
<domain>calendar-server.bounces.google.com</domain>
<result>pass</result>
</spf>
</auth_results>
</record>
</feedback>
What are we looking for?
At first, we’re interested to search for the word fail. If we find it, that means something in our SPF record or DKIM configuration need to change for these checks to pass.
In the example report, we can find one here:<record>
<row>
<source_ip>123.456.789.011</source_ip>
<count>1</count>
<policy_evaluated>
<disposition>none</disposition>
<dkim>pass</dkim>
<spf>fail</spf>
</policy_evaluated>
</row>
If we’re still in testing mode, that fail in between the <spf> tags tells us that our SPF record is not yet complete. There may be something missing.
We need to verify what this IP address points to and whether or not this is something that should be included in the SPF record, and how to do that while being mindful of good security practices, too.
That gives us some work to do. We need to verify who owns that IP and, if it’s legit, we will add this IP to our SPF record to ensure it passes an SPF check next time (or not). It can get rather complicated in some cases. Ask for help if you get stuck.
For the sake of continuing our learning here, let’s presume this is a legit IP of a legit email server.
If this is our current SPF record:v=spf1 include:_spf.google.com ~all
We can add its IPv4 address to our SPF record like so:v=spf1 ip4:123.456.789.011 include:_spf.google.com ~all
We can add IPv6 addresses like this, when needed:ip6:2607:f0d0:1002:0051:0000:0000:0000:0004
Keep in mind that strings within SPF records shouldn’t exceed 255 characters. If we run into a situation where this happens, have no fear, there’s a solution for that and we addressed it in the section above on creating SPF records.
If DKIM is failing, that’s a dog of a different color. Any number of things could be happening. It usually requires going back and resetting the key. Each platform has it’s own process so refer to the documentation above or ask someone on staff for guidance.
What’s else is in a DMARC Aggregate Report?
- ISP information, including:
- <org_name> tells us the email provider’s name
- <email> tells us the email provider’s email address
- <extra_contact_info> provides us with additional contact information
- <report_id> is the unique report ID number
- <date_range> provides us with the beginning and ending date range in seconds (this is the language of time mail servers speak)<?xml version="1.0" encoding="UTF-8" ?>
<feedback>
<report_metadata>
<org_name>google.com</org_name>
<email>[email protected]</email>
<extra_contact_info>https://support.google.com/a/answer/2466580</extra_contact_info>
<report_id>14948423697488147001</report_id>
<date_range>
<begin>1548892800</begin>
<end>1548979199</end>
</date_range>
</report_metadata>
- A line-by-line description of our DMARC record, including:
- <domain> tells us what domain was in the mail header
- <adkim> and <aspf> are alignment settings for both DKIM and SPF
- <p> tells us what policy DMARC is set to use
- <sp> will tell us if any subdomain policies are set
- <pct> reports the percentage of messages to which the DMARC policy is to be applied<policy_published>
<domain>test_domain.com</domain>
<adkim>r</adkim>
<aspf>r</aspf>
<p>quarantine</p>
<sp>quarantine</sp>
<pct>20</pct>
</policy_published>
- Summary of authentication results, including:
- <source_ip> identifies the origin of legitimate and/or fraudulent email
- <count> shows us how many IP addresses were identified
- <disposition> tells us if a policy was applied (tag: disposition)
- <dkim> tells us if the digital signature matched or not (e.g. none, pass, or fail)
- <spf> tells us if the SPF record authenticated the source (e.g. neutral, pass, or fail)<record>
<row>
<source_ip>123.456.789.012</source_ip>
<count>18</count>
<policy_evaluated>
<disposition>none</disposition>
<dkim>pass</dkim>
<spf>pass</spf>
</policy_evaluated>
</row>
<identifiers>
<header_from>test_domain.com</header_from>
</identifiers>
<auth_results>
<dkim>
<domain>test_domain.com</domain>
<result>pass</result>
<selector>google</selector>
</dkim>
<spf>
<domain>test_domain.com</domain>
<result>pass</result>
</spf>
</auth_results>
</record>
What’s NOT in an Aggregate Report?
Trends across ISPs
Identifying trends on IP addresses reporting across different ISPs is a great way to troubleshoot authentication issues and help ensure legitimate email is getting delivered. However, aggregate reports do not contain trends.
Sender Score (reputation data)
If an authentication failure is due to an IP address not within our infrastructure (e.g. belongs to a third-party sending email on their behalf), we’ll have to do additional research on that IP address to determine whether or not it’s a legitimate sender.
Message samples
Aggregate reports don’t contain message-level data. Forensic reports do. If we identify a dubious IP address within an aggregate report and need to find message-level data to troubleshoot it, we’d have to search both the aggregate and forensic information we have to make those connections.
Alerting capabilities
Once we move our policy setting (p tag) to reject, we want to ensure legitimate mail is not negatively impacted. Since aggregate reports don’t contain trend data, there’s no way to tell if legitimate messages are getting blocked in bulk due to the reject policy. We have to test, test, test.
Step 3: Policy Refinement (without losing mail)
As time goes by and mail is flowing and being delivered as expected, we can begin to tighten up our configuration to make it more restrictive toward the goal of full-on ‘reject’ and ‘100’ in our policy (p) and percentage (pct) tags. This is the goal.
We don’t get there overnight, however.
So, every week or so, as we learn more about a specific DMARC implementation, we will slightly increase the strictness.
Here’s another way to think about how to roll out the implementation gradually:
Using the policy (p) tag
We can set and change the policy option using the p tag value in the TXT record. Start with a quarantine policy so you can inspect suspicious messages. Then gradually modify the policy based on what you learn from quarantined messages and daily reports.
- p=none: Monitor email traffic and look for issues in the daily reports, but let all message through. Watch for spoofed messages and messages not signed with DKIM or SPF.
- p=quarantine: When you’re familiar with email patterns you see in the daily reports, change the policy to quarantine. Continue to review the daily reports and view the messages that are being set aside (quarantined) as spam.
- p=reject: When you’re sure all messages from your domain are signed, change the policy reject to start filtering spam messages. Continue to review daily reports to check that you’re filtering out spam and sending valid email to recipients.
Use the percent (pct) tag
The percent option specifies what percentage of suspicious messages have the DMARC policy applied. Suspicious messages are messages that fail DMARC checks. The default when there is no pct tag is 100% (all suspicious messages).
We can set this tag to fewer messages at first, increasing the percentage every few days as we refine our DMARC policy. For example, at first, we should set the percent option to 20 to filter 20% of rejected or quarantined messages to start with.
The following week, we can change the value from 20 to 50 to filter 50% of the messages.
Example deployment
Here’s an example of how to use the p and pct tags to gradually deploy a DMARC policy. Update the DMARC policy over time with these values:
Week 1 p=none pct=100
Week 2p=quarantine pct=1
Week 3p=quarantine pct=5
Week 4p=quarantine pct=10
Week 5p=quarantine pct=25
Week 6p=quarantine pct=50
Week 7p=quarantine pct=100
Week 8p=reject pct=1
Week 9p=reject pct=5
Week 10p=reject pct=10
Week 11p=reject pct=25
Week 12p=reject pct=50
Week 13p=reject pct=100
As time goes on, DKIM should be fine, as is, without any effort on our part. Some recommend updating the key from time-to-time and that can be easily done.
We’ll want to continue to refine the DMARC and SPF records, however, but be cautious.
While there are many opinions on how strict these need to be, it’s important to balance that against ensuring legitimate mail keeps flowing. It’s easy to interrupt the flow of authentic mail with any of these components.
Research, test, research, and test some more before doing anything you might regret.
For example, there is an ongoing debate about using soft (~all) vs. hard (-all) fail in SPF records (and also in SPF alignment tags).
~all evaluates all messages as neutral, while -all will fail if a message isn’t using strict SMTP servers and relays. This may make sense for some more than others. It would require a larger discussion with the whole team.
This is worth a discussion of our threat model. If there is a case where such a configuration provides essential value, then it should be considered. Otherwise, it is most likely outside of their real threat model and likely just adds needless complexity.
In the case of Google, they recommend SPF records use ~all because otherwise legitimate mail delivery will be impacted. This isn’t true for every email platform so pay close attention to this in your testing, especially if you need to set this to hard fail.
Step 4: Maintenance and Sustainability

This is a case-by-case sort-of-thing. Each DMARC implementation can be unique. In any case, maintaining them well relies on keeping good documentation.
As external IP addresses for mail servers change and/or are added, for example, the SPF record will need to be updated. If a Web server that sends email responses from Web forms is migrated to a new host or platform, the configuration, including even DKIM, may need to be reset or reconfigured. There are many possible scenarios but in each one good documentation is the best way to ensure a reliable strategy for good maintenance and sustainability of DMARC.
Be sure to document DMARC values, as well as SPF and DKIM values, as you refine them, in your documentation and be sure it can make sense to someone else, too, who might need to read it.
Step 5: Monitoring
There are a number of free tools for monitoring DMARC, such as PostmarkApp, but keep in mind free means you are the product. Don’t use free services if you can do better. Free services create their own risks.
It’s pretty quick to open an aggregate report from time-to-time, do a quick search, and make adjustments as needed. Adding complexity to the process should have value to save time and make things easier. If it does, then use it. If it doesn’t, then don’t.
Gratitude
If you made it all the way to the end, some gratitude is in order.
Thanks for reading! Happy smart and productive DMARCing.
More Gratitude for Resources, Inspiration, and References
DMARC official documentation: https://dmarc.org/overview/
DMARC deployment tools: https://dmarc.org/resources/deployment-tools/
Why DMARC? https://www.dmarcanalyzer.com/dmarc/
How to Explain DMARC in Plain English: https://blog.returnpath.com/how-to-explain-dmarc-in-plain-english/
Enhanced Security for Forged Spam: https://support.google.com/a/answer/2466563?hl=en&ref_topic=2759254
Image credits: https://blog.returnpath.com and https://www.striata.com/ and https://o365info.com and https://postmarkapp.com
Good explanation of different DMARC record values: http://www.zytrax.com/books/dns/ch9/dmarc.html
How to Read Aggregate Reports: https://blog.returnpath.com/how-to-read-your-first-dmarc-reports-part-1/
Add or edit custom DNS records in Office 365 https://support.office.com/en-us/article/Add-or-edit-custom-DNS-records-in-Office-365-AF00A516-DD39-4EDA-AF3E-1EAF686C8DC9
Create DNS records at Google Domains for Office 365 https://support.office.com/en-us/article/Create-DNS-records-at-Google-Domains-for-Office-365-0db29490-2612-48bc-9b77-1862e7a41a8c
Prevent email fraud with DMARC: https://blog.returnpath.com/infographic-how-to-prevent-email-fraud-with-dmarc/
Create DNS records at any DNS hosting provider for Office 365 https://support.office.com/en-us/article/create-dns-records-at-any-dns-hosting-provider-for-office-365-7b7b075d-79f9-4e37-8a9e-fb60c1d95166?ui=en-US&rs=en-US&ad=US
Configure SPF records to work with G Suite https://support.google.com/a/answer/33786?hl=en&visit_id=0-636584064723370396-2061747718&rd=1
SPF Records and Too Many DNS Lookups https://mjtsai.com/blog/2014/08/24/spf-records-and-too-many-dns-lookups/
SPF Fail: too many DNS lookups https://wordtothewise.com/2013/07/spf-fail-too-many-dns-lookups/