LinkedIn OSINT Techniques (II)
Welcome back to this two-part guide on how to extract open source intelligence information from LinkedIn.


Welcome back to this two-part guide on how to extract open source intelligence information from LinkedIn targets. If you haven’t read Part I, which covers some of the smaller bits of information that can be exploited, you can do so here. Part II will continue showcasing points of exploitation that are associated with more robust accounts such as a target’s experience, volunteer work, education, etc.
Articles and Activity
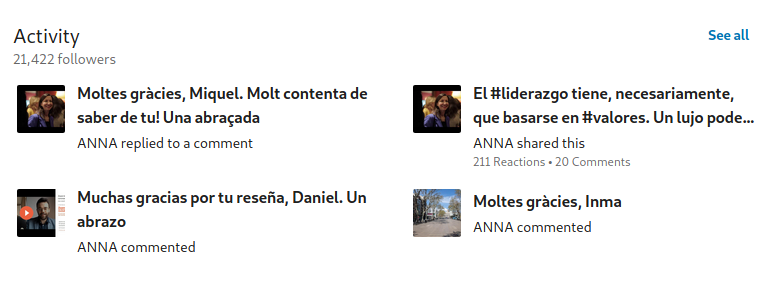
This section appears at the top of a LinkedIn profile above the experience sections. It provides a quick snapshot of recent posts that the user commented on, shared, liked, etc. I have seen this section missing on some profiles, however it is possible to still locate it by manipulating the URL from the profile to add “/detail/recent-activity/” to the end (ie https://www.linkedin.com/in/$TARGETPROFILE/detail/recent-activity/). Otherwise, if it shows like in the above example, you can get a full view of the user’s activity by clicking on the "See all" button which will open a new view and display a historic view of the following entries:
All Activity: This is the default view. It shows all activity of a user such as comments, likes, shares, posts, etc. If this section is modest and not too lengthy, it might be worth collecting the information to see what other accounts the target most frequently interacts with.
Articles: This will display articles written by the user and posted to the site.
Posts: Unlike the all activity view, the posts section will only display posts created by the user and exclude those they simply commented on or liked from other users. Be aware that posts from other users that the target shares will also appear here. This view may be useful in gathering information on the target quickly without going through hundreds or thousands of random posts they happen to like from their timeline.
Documents: This view will display documents uploaded by the user. Be sure to check them for any relevant information that might have been overlooked when the user uploaded it, such as the filename or embedded links or information the user failed to redact.
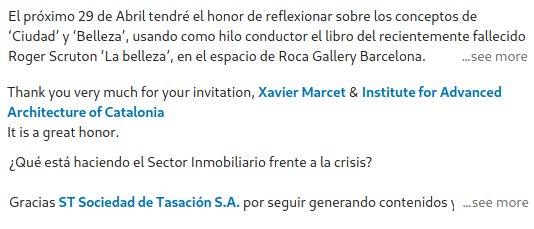
Clicking on the see more link for the above target, we can quickly scan their posts and see that many of them are in Spanish or English. Additionally, we can see that the user made many posts over time of when and where they will be speaking at specific upcoming events which help us narrow down location information.
Experience
The experience section is often the most utilized part of LinkedIn and will appear under the about and/or activity sections. As LinkedIn is mostly used for landing jobs (and you know, phishing) this section will likely be more fleshed out and tends to contain information that is true to the user.
By default, this section will have at least one entry so long as the user did not sign up as a student and did not remove this information after signing up. Each experience entry may include one or all of the following points of information:
Title: This is a free text field that displays the position or job title that the subject held. In the event that the user does not post their company, more unique titles might help narrowing down possible companies. Additionally, you may be able to glean their experience level, and possibly to an extent their age or point in their career, by job titles as well.
Employment Type: This is a drop-down list of employment types such as full and part-time, apprenticeship, self-employed, etc. Not too valuable from an intelligence perspective but might help fill in other gaps later on.
Company: This is a required field where the user can place the name of the company they worked for. Knowing this information allows an investigator to possibly determine the email structure for sending phishing emails or might help with narrowing down a location if the company only operates in a specific area. It can also be searched on LinkedIn to locate additional accounts that were also employed by the company at the same time as the target.
Location: This is a free text box that holds the location, usually at a city level, of where the user physically worked for at this company. Although many roles can be 100% remote, users that work from home might place their home city in this field. I have also seen remote workers use the nearest office's city here as well.
Start and End Dates: This section has included drop-down selectors for years. Using the known dates a target works for an organization allows an investigator to look for press releases and social media posts from the company around that time to see if the user was tagged or commented, thus giving away their other social media accounts.
Description: Another free text form, may include a combination of the information found in the above sections or may include information regarding the target's job duties, workgroups, notable projects, or major accomplishments.
Media: Users may upload files to each entry; some might contain relevant information that helps narrow down the user's workgroup or perhaps include contact information like a work email. To view a list of media requirements, including supported file types, see here.
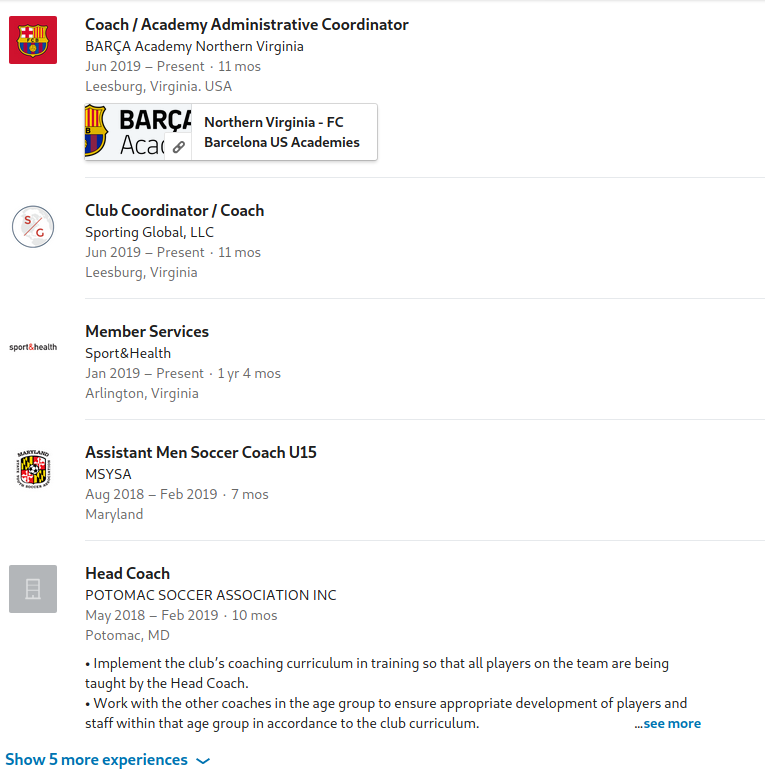
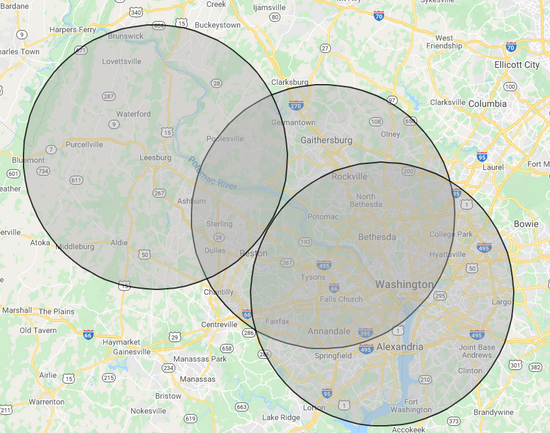
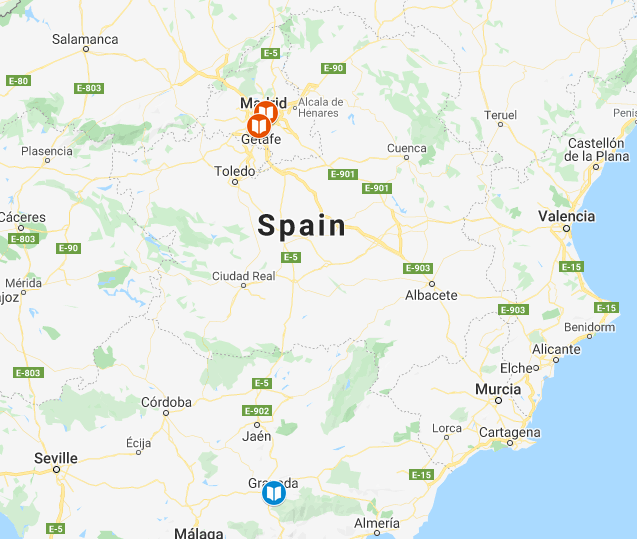
Going back to our example above, we can see that our target has numerous work entries revolving around coaching and fitness, making it easy to narrow down their field of work. Additionally, we can map out their locations and see if we can narrow down a potential area of where the target might live. I utilized this free tool to mark a 15-mile radius around each of the cities listed in the target’s profile. This is not an exact science with only three entries, but I would likely start my searches where the most overlap is observed from points created on the map.
The link provided on their first entry doesn’t provide a whole lot of additional information that would be useful in our instance, however it did help locate additional social media platforms for the organization which could then be exploited for tagged photos of our target.
Education
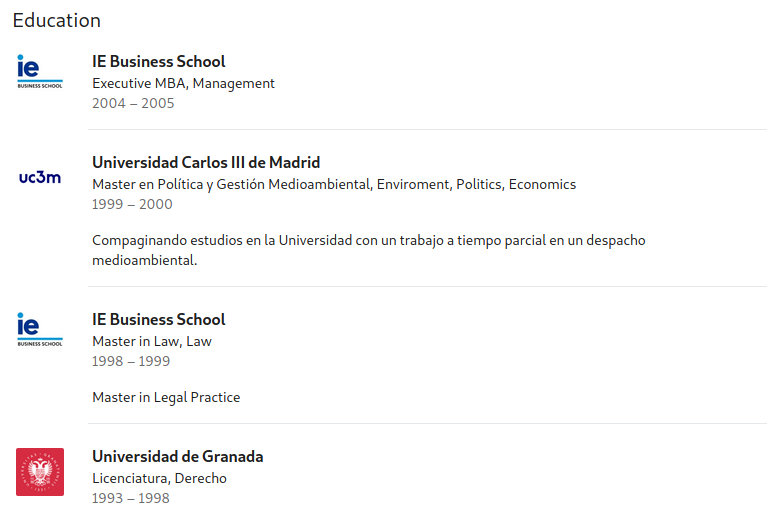
A user’s education section will usually immediately follow their work experience. It is important to note that by default this section will contain information if the user signed up as a student and did not remove this information after signing up. Be sure to do some research on the school’s syntax for email creation as well if you need to craft a targeted phishing attempt.
This section may not always be complete, but each education entry may include the following points of information:
School Name: Name of the school attended, this might help for narrowing down locations if the user lived on or nearby campus and did not attend school online.
Degree: Free text field for what type of degree was attained. Knowing this information might assist in guessing at what field or positions the user might be in. Level of degree might help in narrowing down an age range, especially when coupled with the start and end dates.
Field of Study: Free text field that often includes the major or minor field of study information. Similar to the degree field, this may assist in narrowing down possible suspects with information regarding what types of positions or work they might be engaged in, assuming they landed a job in their field.
Start and End Years: This section includes drop down selectors for years. If the user is a traditional student, this start and end range might assist in determining when a user went to high school and thereby determine approximately at what point they turned 18. This can then be backtracked to a possible range for a year of birth and current age.
Grade: Free text field that tends to include the GPA. Not the most useful, however if the user has graduated with honors (or was on President’s List or Dean’s List) an investigator might be able to locate press releases or other information posted from the school related to these achievements.
Activities and Societies: Free text form that often has any campus societies or groups the user was a part of during their time in school. I do not see this one filled in often. An investigator may search these groups on social media and may locate additional photos or information, sometimes tagged, on the target.
Description: Another free text form, may include a combination of the information found in the above or may include information regarding their classes or major accomplishments.
Media: This area may contain files that are uploaded and might include transcripts, relevant presentations, or other major reports or projects. Be sure to look out for filenames that might contain additional information. Also be sure to scan documents for relevant school emails, contact information, etc that might appear on the credits or about author sections.
Using our above example, we can see that all of the schools our target is associated with are located in Spain, with the oldest one being in Grenada and the newer ones being in Madrid.
We can make the assumption our target grew up in Spain. Looking at the times of their associated schools, it might be possible to approximate their age as in their mid-forties (assuming they starting their first university at ~18 years of age).
Additionally, it might be worth considering that the target is originally from the southern portion of Spain (based on their initial choice of colleges, though not a certainty) and likely has made their current home, or at least spent a considerable portion of their life, in and around Madrid. Finally, a bit of Google Dorking (madrid contact me "@ie.edu") suggests that the email address format for the target’s most recent school is likely [email protected]. We can use this to see if they still have access to the email and possibly craft a phishing email targeted to them.
Licenses and Certifications
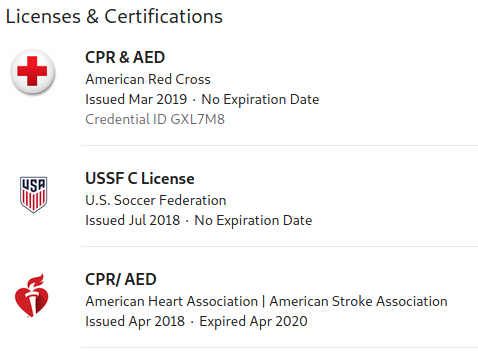
The licenses and certifications section will often appear near the middle to bottom of a profile and is where a user will note what industry licenses and certifications they currently or previously held. This is not a section that I often see filled out, however should a user provide this information each entry may include some or all of the following items:
Certification Name: This is a required free text field where the user can input the name of their certification. This can be cross-referenced to any known databases or press releases of persons who obtained the certification, particularly those with only a few people holding them.
Issuing Organization: This is another required free text field that holds the name of the company or organization that issued the certification or license. Be sure to take a look at the areas in which the organizations primarily operate to see if some countries or continents may be excluded based on their limited reach or authority.
Issue and Expiration Dates: This is a set of four drop-down selectors that show the months and years the credential was issued on and expires at. This is not a required field.
Credential Id: This is a free text field where a user can enter their credential id. Depending on the credential, it may be possible to locate additional information on the target using this id in searches, especially if the list of those holding the credential is made public. This is not a required field.
Credential URL: This is a free text field that allows a user to enter a URL that directs to their credential. This might provide the user’s real name, as well as other information that might be left out such as the issue and expiration dates, credential id, etc. This is not a required field.
Our above example is missing many of the non-required information points, but there is still enough to help us with an investigation. Primarily, we can see that all of their credentials come from U.S.-based organizations, suggesting our target is likely living and working in the United States. Additionally, based on the types of credentials they have we can make the assumption they work in sports, specifically futbol, whether paid or on a volunteer basis.
Digging into the USSF C License, we can see that it is specifically for coaches, providing us a possible job title to search for as well. Finally, cross-referencing the time in which the target obtained their USSF C License (July 2018), we can quickly see where the classes were held, suggesting that our target might be located nearby Maryland, USA. We can also do a search on the credential id provided for his first credential, but it appears to only return the target’s LinkedIn profile.
Volunteer Experience
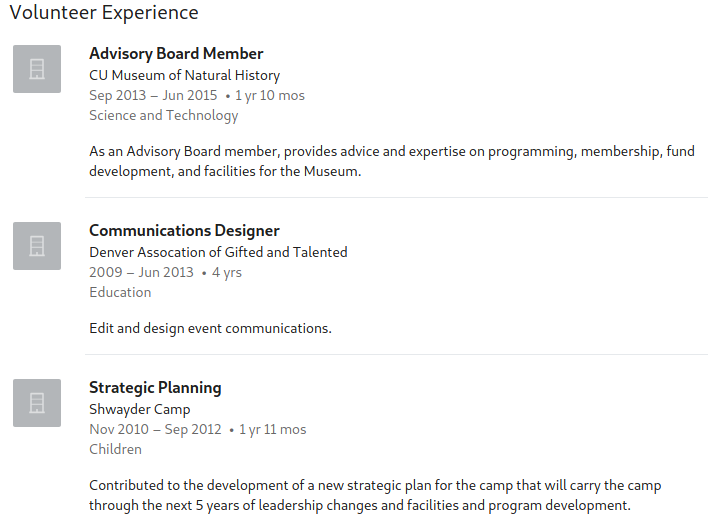
The section for volunteer experience is great for determining pattern of life information on a user as well as location information. This information in this section may be more valuable than that found within the experience section. This is primarily because volunteer work is often a passion, rather than just a way of making money. Additionally, while users might have longer commutes for well-paying jobs, not many will be willing to take long commutes for unpaid work unless they are extremely dedicated to the mission.
Each entry in this section can contain any or all of the following:
Organization: This is the only required field for any volunteer experience entry. This free text field is used to display the organization or company where the user volunteered. Organizations that are region or city-specific will help narrow down locations.
Role: This is a free text field that is similar to the title field in the employment experience section. Users may enter their volunteer title given here. This might provide insight into how far up in the organization the user was: with lower-level volunteers less likely to have an email address associated with the organization than those at the top.
Cause: This is a drop down list of possible causes that the entry is associated with. Not as useful but might assist in determining what causes the target is passionate about if not immediately available based on other known information.
Start and End Dates: These dates are chosen via a drop-down menu and correspond to when a user started and ended their volunteer work. Knowing these dates might assist in narrowing down what times to specify for locating information on our target whether in news stories or social media posts of the organization.
Description: This is a free text field where a user may enter information about what they did while volunteering at this entity.
Our above example displays three (of many) volunteer entries for a target. We can see that the user might be passionate about teaching or helping children based on their last two entries, whereas the totality of the three entries suggest that the user would have lived or worked in the Denver, Colorado area for a significant amount of their lifetime. Additionally, as an advisory board member we can expect our target to have some sort of background or experience in the field of natural history, anthropology, etc, and might be a position in which they are granted an email address to perform their duties.
Skills and Endorsements
The skills and endorsements section offers an insight into the field they might be associated with by showcasing the skills a user wants others to be aware that they are proficient in. These skills are then endorsed by their peers, often those who are also in the same field. This might assist an investigator in narrowing down their field should their experience section otherwise be empty. It may also assist in narrowing down a user’s job positions should some of the skills be very unique.
These skills contain any or all of the following points:
Skill: This is a free text field that the user may choose to have others endorse them on. As this is generated by the user it may give an insight into what skills they find most important in their field, as well as which skills are seen as highly valuable by their peers and recruiters. Looking at the totality of skills might help narrow down a field of work.
Number of Endorsements: Connections may endorse one another which is basically vetting other users on their skills. This section is not too useful for OSINT other than knowing that users with a larger number of connections or with a longer work history tend to have a higher number of endorsements.
Endorsed by: Looking at who they are endorsed by may also assist in locating coworkers or colleagues in their fields. This might assist in locating other users that have close or continuing working relationships with the target.
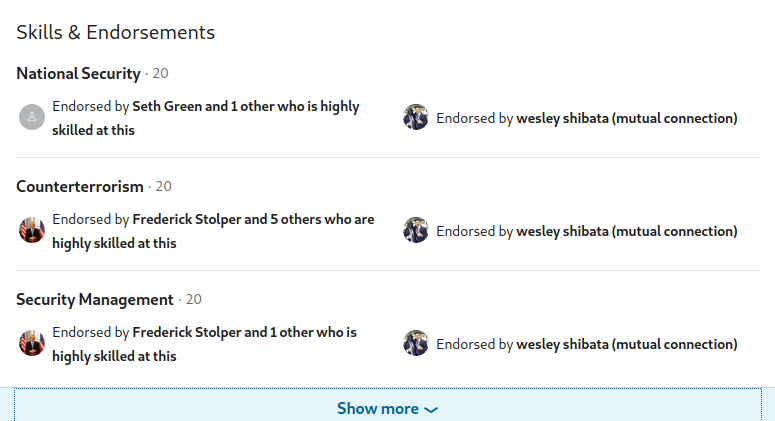
Using our above example, we can glean preliminary information from the shown skills, however we will be able to get a fuller picture by clicking on the “Show more” button at the bottom.

Looking at the various skills, we can make a few assumptions on their field of work, specifically that they are likely a member of a government organization based on the Government, National Security, Policy, and other skills listed.
We can also possibly narrow down the specific group or organization within the government by the other skills, specifically Intelligence Analysis, Counter-terrorism, Intelligence, Crisis Management, and Emergency Management. We could expect them to work in a position likely in a military or law enforcement organization rather than say the offices for Economics or transportation. By clicking on each individual skill, we can see every user that endorsed our target for that specific skill.

This helps strengthen our assumption, with his endorsements coming from personnel at many law enforcement agencies. Additionally, we could likely lean towards this target being an employee of the United States federal government based on his connections and endorsements.
Recommendations
Recommendations are not the most common point of exploitation, but profiles that have them can be leaking a great deal of information on a subject via their given and received recommendations. This is particularly true for their received recommendations, which may provide information that the target did not originally include on their profile. The more recommendations given and received the more chances that one of them will leak relevant information about your target.
All recommendations on a subject’s profile, whether given or received, should contain the following points of exploitation:
Recommender: This is an automated section that is created based on the profile of the person making the recommendation. It should include the recommender’s profile photo, name, current position, date recommendation was made, and finally the relationship between the recommender and the person they are recommending.
Description: This is a free text field where a user will post the actual recommendation. It might include information such as where, either city or business, the recommender worked with or met the person they are recommending. It might also provide other information that fills in gaps such as job positions, age, schools, names, and associated persons.
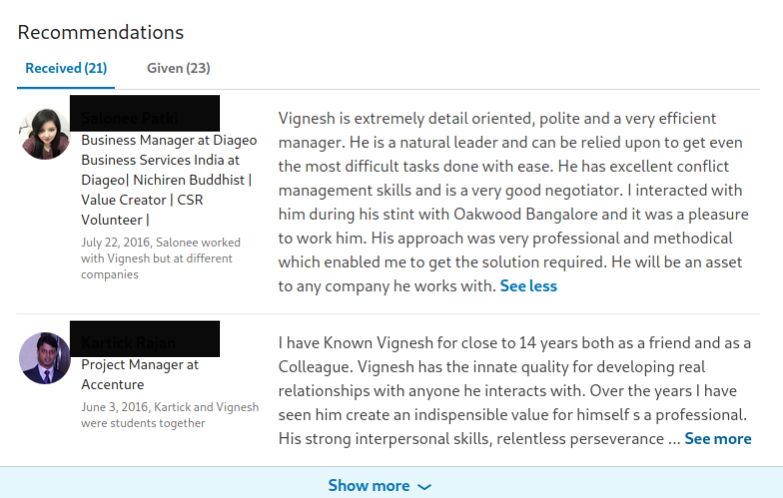
Using the above example, we can see two of the many recommendations that the user received. The first one provides us with the target’s name and states that they were in a managerial position at Oakwood Bangalore, providing us a possible field of work and a city location to use as a filter when searching for our subject. The second recommendation does not provide a lot of direct information but does provide some indirect details that might be useful with additional digging. This second user states he attended school with our target and was a colleague of theirs as well.
We can also see that this recommendation was provided on June 3, 2016. Should our target have left the work or education sections of their profile empty, we could possibly obtain this information by referencing the LinkedIn profile of the user that recommended our target for any education or work experience that occurred prior to June 3, 2016. Finally, should we wish to view all of their recommendations we could click on “Show more” at the bottom of the section.
Accomplishments
The accomplishments section appears to be LinkedIn’s version of a “catchall” for anything that doesn’t fit nicely into one of the previous categories. The information here can vary widely from totally useless to something that breaks a case. Be sure to click on the drop-down arrow on the right side of each section to see additional information that is hidden by default. The various types of entries that can appear in this section may include:
Publications: Requires a publication title and may also include the publisher or publication information, publication date, a link to the publication, as well as a description. Locating the actual publication is the best way to exploit this information as it may contain the user’s title, name (as an author), and other information that might not be shared by the user elsewhere on the profile.
Patents: Requires a patent title and patent number, as well as which country the patent was created in. Other information may include whether the patent is issued or pending, the issue date, and the description. This information might help locate the country in which the target lives and works in as well as what fields of work they may be an expert in. Should they include a link or patent number, it may be possible to locate it in the record of the country issued in to find additional information on the target.
Courses: By default, every course entry requires the course name and may also include a course number and what work or education experience the course was associated with, if any. Pay particular attention to course names and numbers as schools might have unique ones that allow you to narrow down a target’s school even if they left it out on their education section.
Project: This section is for listing any projects worked on, and by default only requires a project name. Additional fields are the start and end date of the project, what work or education the project was associated with, as well as a project URL and a description. This section might not provide too much additional information, although it might leak associates that worked on the same project as well as information found about that particular project posted elsewhere online.
Honors and Awards: Requires only the title by default, although it might also include who issues the award, what work or education the award is associated with, as well as the issue date and a description of the award. Knowing the date and award name or organization might allow an investigator to locate a press release or photos of the award ceremony in which the target attended.
Test Score: This section allows a user to show off their test score, with each entry requiring the test name and score. It might also include what education or work experience the test was associated with as well as the test date and the description. Not too valuable of a section, however if looking at college entry tests such as the SAT or ACT it might be possible to make a ballpark guess on the target’s age if they included the date in which they took the particular test.
Languages: This is one of the smallest sections, including only a text field to enter the language and a drop-down menu to display how proficient in the language the user is. Unique languages might assist in determining where a subject grew up or lives, particularly if the user has native proficiency in such a language.
Organization: This section is for listing organizations a user is associated with and by default only requires the organization name for each entry. Other possible fields include the position held, what work or education entry the organization is associated with, as well as the start and end dates and a free text field for a description. I rarely see this section utilized, and often find this information simply listed under the education or work entries instead.
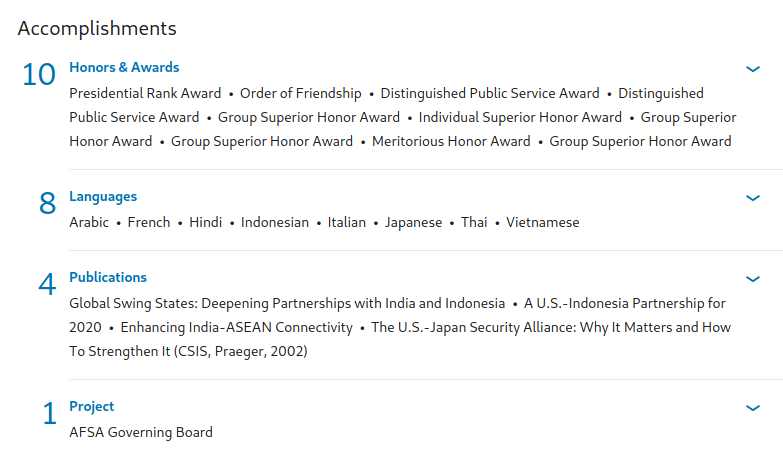
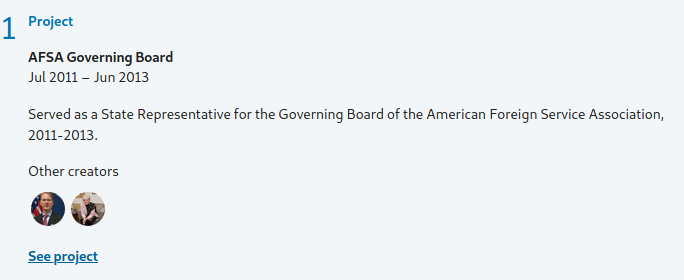
Our above example has numerous points we can exploit, however we are going to focus on two sections, honors and awards and projects. Clicking on the arrow on the right side of projects displays additional information about the project, including two other users associated with the project as well as the time in which our target was involved and a link to the project.
Unfortunately, clicking the link goes to a site that no longer works, however seeing the .gov domain associated with the project tells us the use likely worked for the government at this time. Moving on, we can expand the honors and awards section in the same way.
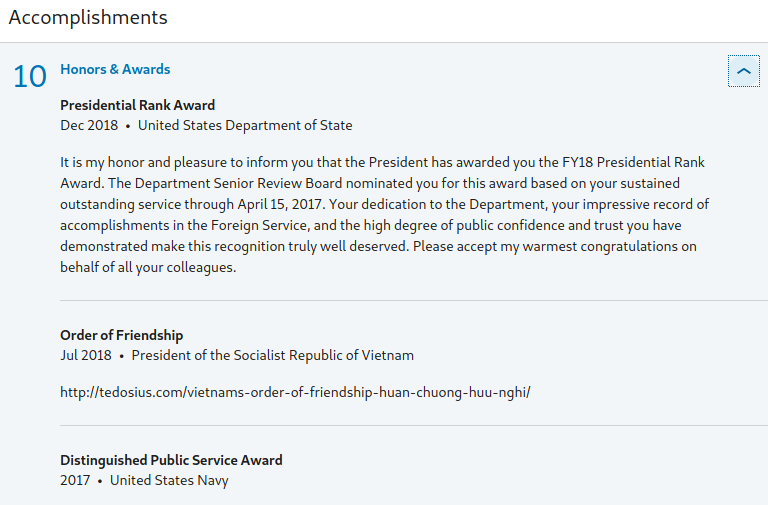
The results quickly strengthen our assumption about the target working for a government, and we can see that he is associated primarily with the United States, though they also appear to have done work with Vietnam. Looking back at our target’s languages, Vietnamese now stands out as being more important than some of the other ones and should be given more weight when searching on our target.
Conclusion
With so much information available on the platform, LinkedIn remains an OSINT goldmine for investigators. Between the two parts of this guide there should be no part of a LinkedIn profile that you are unable to exploit. Before setting out on your next investigation, be sure to take a look at my LinkedIn OSINT Bookmarklet tools and OSINT Attack Surface guide on my Github to help in simplifying some of the tasks above. As always, should you have any questions feel free to reach out to me on Twitter.
