Make Your Own Custom OSINT Bookmarklets (p2)
Part two of Sinwindie's guide to creating custom Javascript bookmarklets for help you during OSINT investigations.


Sinwindie returns with part two of his guide to creating custom Javascript bookmarklets to aid in OSINT investigations. This guide can be read independently from the first one, but it won't hurt you to take a look at part 1 before getting started. This week he is going to show you another handy type of bookmarket he uses to quickly gather information from several similar websites using one query.
Running Multiple Search Queries
Another type of bookmarklet I frequently employ is one that uses a common variable and parses it out to multiple websites for analysis. Such an example would be running the same image URL through Yandex, Bing, and Google reverse image searches all using one bookmarklet tool. The biggest benefit of creating such a bookmarklet is reducing the time of checking multiple platforms as well as mitigating the chances of forgetting to exhaust all resources (by forgetting to run the information on one or more of the platforms). Running similar information across multiple tools is useful when each platform provides differing results as well as in instances where one or more platforms may go down.
Case Example: Multiple URL Expander Queries
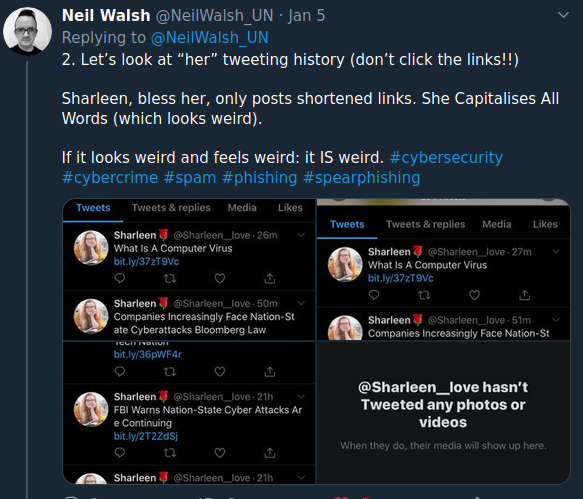
Around two months ago a Twitter user created a series of tweets that showcased multiple suspicious Twitter accounts. One of the commonalities across these accounts was the frequent use of shortened bit.ly links. The goal for me was to identify what lied behind these links without risking compromise.
There is no shortage of URL expanders on the internet and many of them will give you varying bits of information that others might not include in their analysis. For this reason, you might want to run it across at least a few different platforms to ensure you have the fullest picture of what lies behind the URL. Using the second link in the screenshot (bit.ly/2T2ZdSj) I ran the shortened URL through three different URL expander platforms. Each platform provided some different information, and should one go down or fail to function we have other options as a backup. I received the following results below:
GetLinkInfo.com
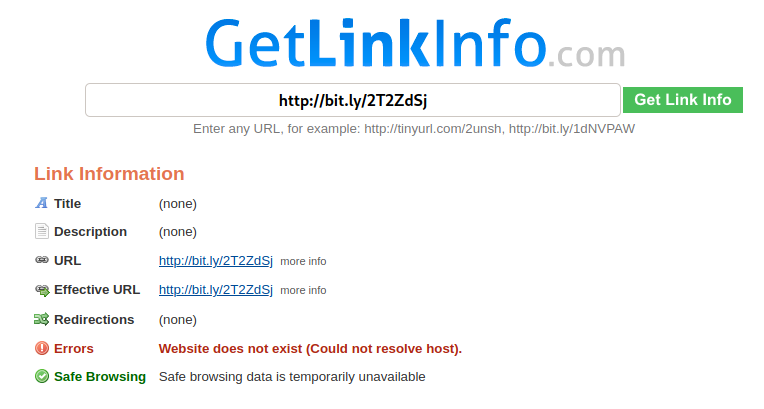
The first website did not manage to provide any information.
CheckShortUrl.com
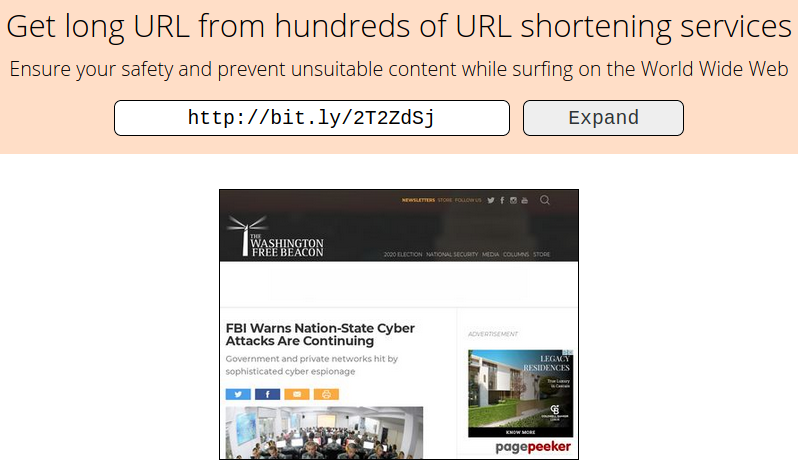
The second website provides a snapshot of the website as well as options to check the URL on other platforms and provides the final website the URL redirects to.
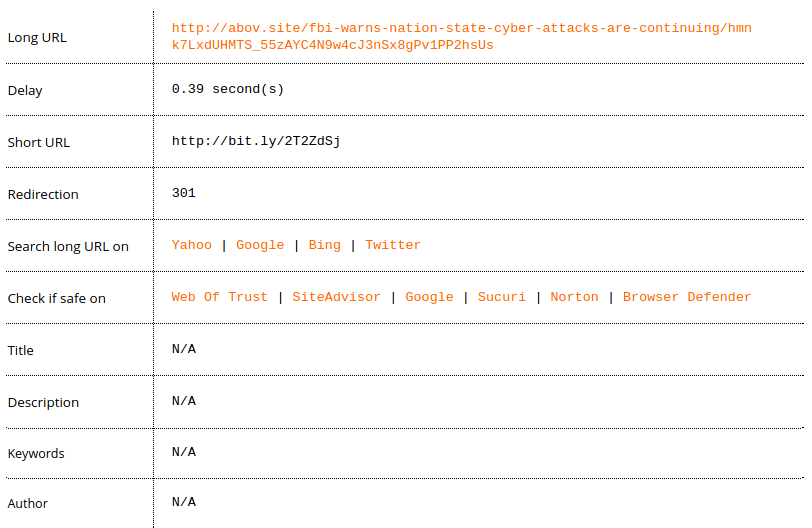
ExpandUrl.net
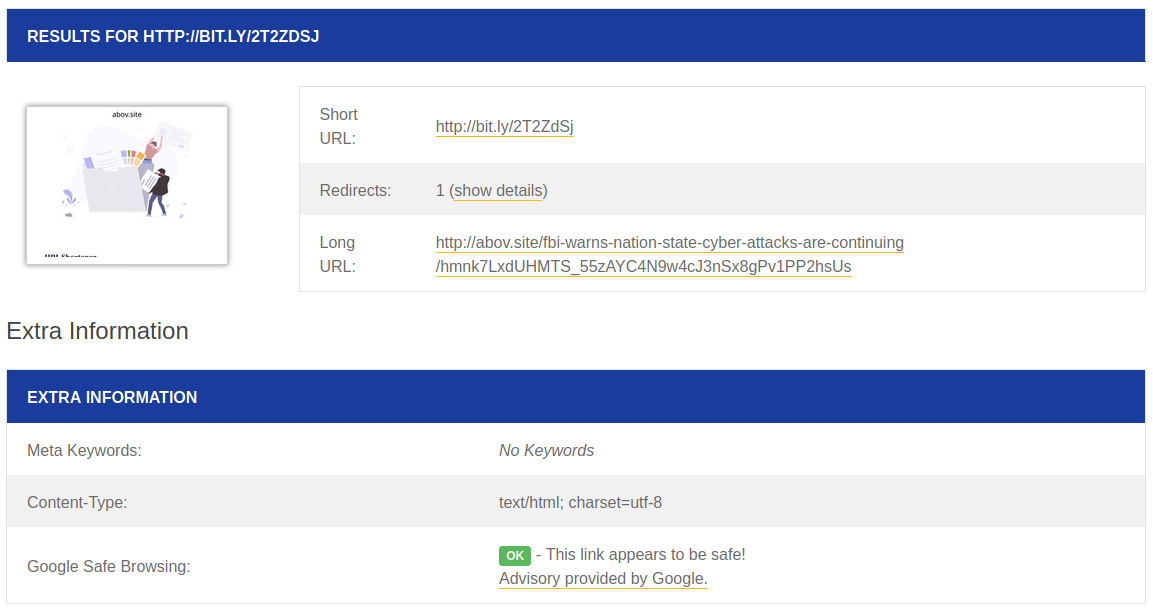
The final website provides the destination URL as well as Google Safe Browsing information.
Now that we’ve chosen the three websites we want to run the information (in this case, a bit.ly URL) against, we need to gather all of our information in order to create our bookmarklet. First, we must determine what the URL structure is for querying the website. Thankfully, one of the websites give us this very information at the bottom of the webpage.

The above photo shows us that the CheckShortUrl.com website appends the shortened URL to the end of the website like so: http://checkshorturl.com/expand.php?u=#SHORTENEDURL. Note down this URL for later.
Just as well, the website GetLinkInfo.com updates the URL in the address bar when we complete a search. Just as before we can see it appends the shortened link to the end of the URL. We will also note this URL structure (www.getlinkinfo.com/info?link=#SHORTENEDURL) for later.

Unfortunately, the last site (ExpandUrl.net) does not give us a hint, nor does the URL in the address bar update to show us the URL structure of the query. However, this does not mean that we cannot use it. We just need to take a few extra steps.
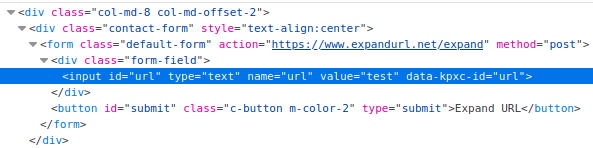
Looking at the final website, we will right click the text box where we would normally enter the shortened URL and click Inspect (or Inspect Element depending on your browser). This will open up the page's source code and highlight the input box we selected. We are wanting to take note of the id (url) here.
Once we have the id, we will attempt to manually build the URL by modifying what we currently see in the URL bar. (https://www.expandurl.net/expand) In order to construct this, we will need to know the base URL, the id of the input box, as well as the shortened URL we want to search. We will need to construct it similar to our previous two URLS by using the following URL formula:
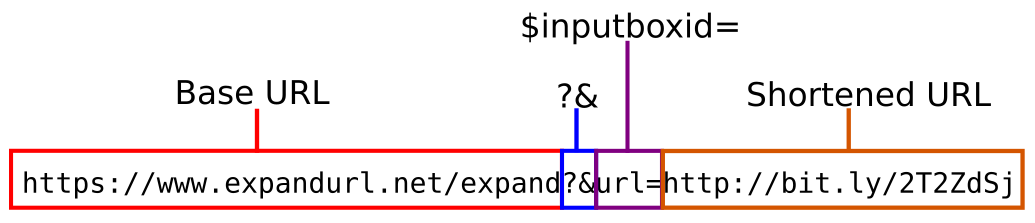
What the above URL does is automatically insert the shortened URL we want to expand into the input box (with the id of url) when the page loads. This will not automatically load the results page like our first two websites, however all that will be left to do is click on the “Expand URL” button once the page loads. In instances where a website does not let you fully automate the process this is the second best option as it automates everything but that last click. This is the last of our three websites and we will note down the newly created URL structure for later (https://www.expandurl.net/expand?&url=#SHORTENEDURL)
Now that we have all of our URL structures listed, we can use that information to plug into a template to create our new bookmarklet tool.
javascript:
var input = prompt("Prompt user for Input");
var variable1 = "$URLSTRUCTUREONE" + input;
var variable2 = "$URLSTRUCTURETWO" + input;
var variable3 = "$URLSTRUCTURETHREE" + input;
SiteOneFunction();
SiteTwoFunction();
SiteThreeFunction();
function SiteOneFunction() { setTimeout(function(){ window.open(variable1, "_blank"); }, 1000); }
function SiteTwoFunction() { setTimeout(function(){ window.open(variable2, "_blank"); }, 1000); }
function SiteThreeFunction() { setTimeout(function(){ window.open(variable3, "_blank"); }, 1000); }
I know that there are many more lines than the last bookmarklet tool that we created, however do not be intimidated! It is quite simple and the extra lines are due to it performing the same task three times rather than one.
javascript:
This line should always be first in every bookmarklet. It will tell the browser to execute the Javascript code that follows and will not work if it is missing. You will not change this line.
var input = prompt("Prompt user for Input");
This line will prompt the user for input via a popup. You will change the text within the quotations to whatever instructions you want to provide the user along with the prompt for input.
var variable1 = "$URLSTRUCTUREONE" + input;
This line will take the input received from the user and append it to the end of a URL structure for the first website and assign it to a variable called variable1. You will change variable1 to whatever you want to name the variable, perhaps the website name. You will also change $URLSTRUCTUREONE to the URL structure of the first website which appears before the user input (such as http://www.getlinkinfo.com/info?link=) You will repeat this line of code as many times as needed to cover all of the websites you will be querying. (In our case three total.)
SiteOneFunction();
This line will call on the corresponding function at the end of our code. You will change SiteOneFunction to whatever you want that function to be called. There will be as many lines like this one as you had in the above section (So three total.)
function SiteOneFunction() { setTimeout(function(){ window.open(variable1, "_blank"); }, 1000); }
This is where the magic happens. This line will open a tab using the full URL crafted from variable1. In this line you will change the SiteOneFunction to the function name you used in the previous line, make sure they match perfectly or they will not run. You will also change the variable1 name to whatever you called the variable in the second line of code above. Finally, we wrapped it in a Timeout to prevent our browser from blocking the numerous popups that will otherwise occur rapidly. (Even so, you might also need to allow popups when you run the bookmarklet.) You will repeat this line three times like the others to use all three URL shorteners we selected.
Next, we will plug in our information into the above template to create the following code. I have marked the changes in the template in bold:
javascript:
var input = prompt("Paste in the shortened URL to be expanded: ");
var getlinkinfo = "http://www.getlinkinfo.com/info?link=" + input;
var checkshorturl = "https://checkshorturl.com/expand.php?u=" + input;
var expandurl = "https://www.expandurl.net/expand?&url=" + input;
GetLinkInfoFunction();
CheckShortUrlFunction();
ExpandUrlFunction();
function GetLinkInfoFunction() { setTimeout(function(){ window.open(getlinkinfo, "_blank"); }, 1000); }
function CheckShortUrlFunction() { setTimeout(function(){ window.open(checkshorturl, "_blank"); }, 1000); }
function ExpandUrlFunction() { setTimeout(function(){ window.open(expandurl, "_blank"); }, 1000); }
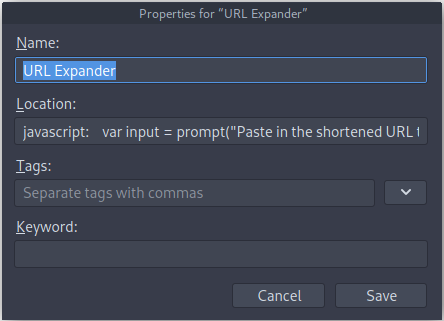
Now we can take the above code and create a new bookmark in our browser just like we did in Part I. For these fields, Name will be what you call the bookmarklet tool and will appear in the bookmark bar of your browser. In the section titled Location we will paste all of our code created above. Click save and the new bookmarklet tool is ready to go!
Part II Conclusion
Between Parts I and II you should be well on your way to understanding how to craft basic OSINT bookmarklets to either find information hidden in the source code, submit multiple URL-crafted queries, or perhaps even a bookmarklet that does both! (Such as pulling the full-size profile photo URL from a website's source code and then running multiple reverse image searches using that URL.) If you are looking for inspiration you can find a number of bookmarkets on my Github page, including the one created during this article as well as some templates to create your own. Should you have any questions or run into some problems with a particular process found in this article don't hesitate to shoot me a message over on Twitter.